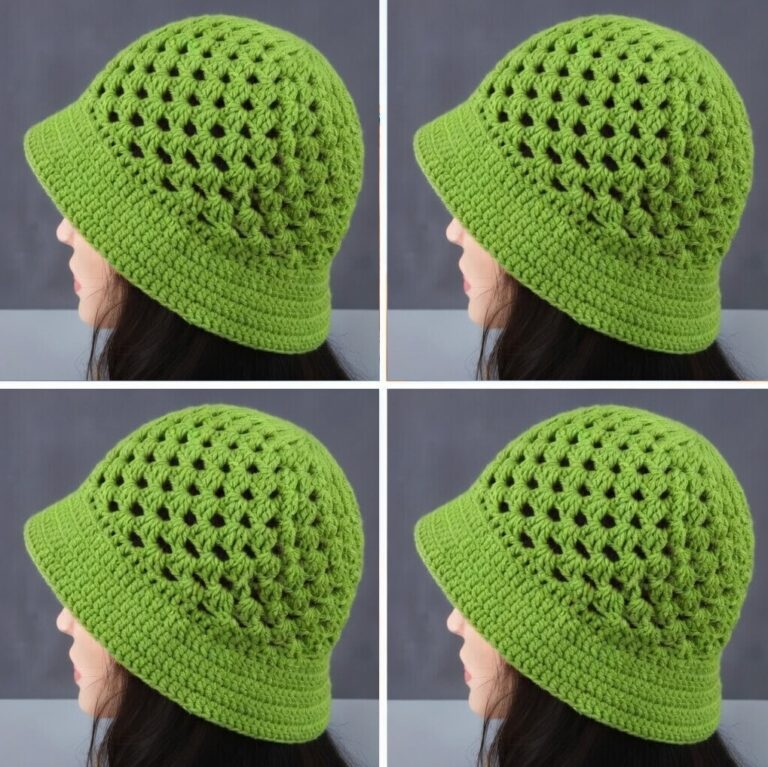
American Granny Square Bucket Hat Pattern

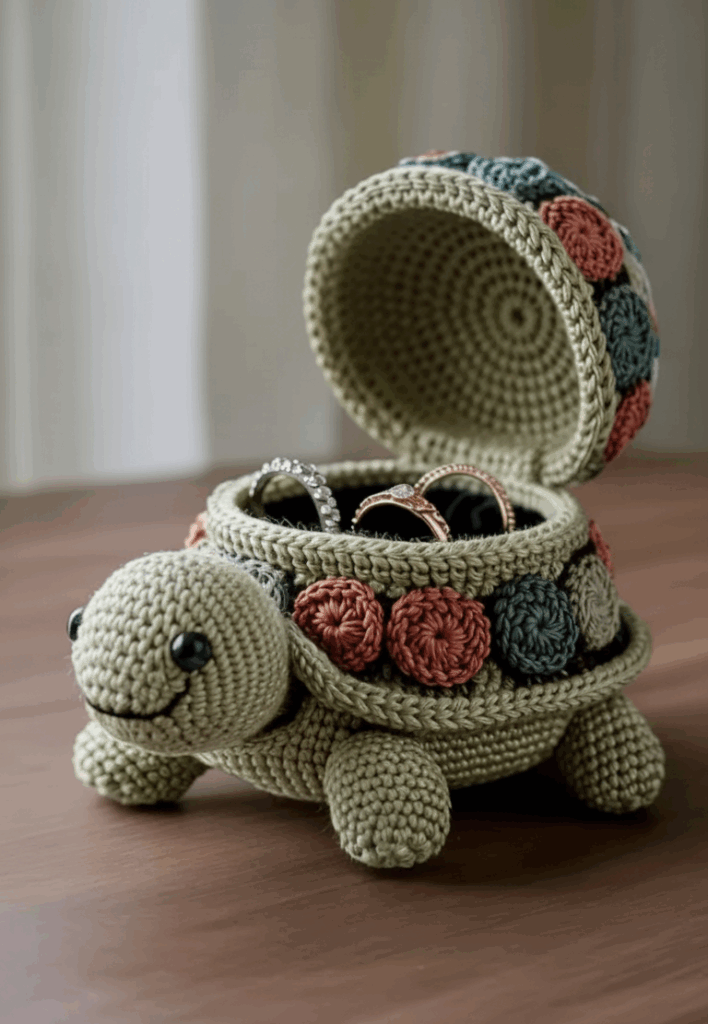
The Amigurumi Tortoise Jewelry Box Free Pattern is one of the most charming and creative crochet projects you can make. Combining functionality with adorable design, this crochet pattern transforms a cute tortoise into a miniature jewelry box, perfect for storing rings, earrings, and tiny treasures.
The idea behind this Amigurumi Tortoise Jewelry Box Free Pattern is both clever and delightful—the turtle’s shell doubles as a lid that opens to reveal a small storage compartment. This makes it not only a fun decorative piece but also a practical handmade item that adds warmth and personality to your space.
Crocheting your own tortoise jewelry box is easier than it looks, even for beginners. The project uses basic amigurumi techniques such as single crochet, increasing, and decreasing, all worked in the round.
Whether you want a charming gift for a loved one, a unique addition to your dresser, or a way to keep small items safe, this Amigurumi Tortoise Jewelry Box Free Pattern is the perfect choice.
What makes this design extra special is how customizable it is. You can choose your own colors, textures, and decorative details to make each tortoise unique. Some crocheters prefer realistic greens and browns, while others enjoy pastel shells or metallic yarns for a more whimsical style. The Amigurumi Tortoise Jewelry Box Free Pattern gives you the freedom to be creative, turning a classic animal figure into something both artistic and useful.
To create your Amigurumi Tortoise Jewelry Box Free Pattern, you’ll need a few basic crochet supplies. The key is to use materials that are durable enough to hold shape but still soft to the touch.
Start with worsted-weight or cotton yarn in two or more colors. Choose one color for the tortoise’s body (such as green, brown, or beige) and another for the shell (which can be anything from classic brown to bright pink, teal, or even gold). Cotton yarn works beautifully for this project because it creates a firm fabric with great stitch definition—ideal for forming a stable jewelry box structure.
Next, select a crochet hook that’s one size smaller than what’s recommended for your yarn. This helps ensure tight stitches that won’t let the stuffing show through. Commonly, a 2.5 mm to 3.5 mm hook works well for amigurumi projects.
You’ll also need stuffing or fiberfill, a yarn needle for sewing parts together, scissors, and stitch markers to keep track of your rounds. For the jewelry box function, some crocheters like to add a plastic insert or small circular container inside the shell to create a firm base—though this is optional, depending on how structured you want your box to be.
To decorate your tortoise, gather small buttons, beads, or embroidery thread for the eyes and shell details. You can also use safety eyes for a clean, professional finish. If you want the shell to open and close securely, consider adding a snap button or small zipper between the top and bottom shell pieces.
The Amigurumi Tortoise Jewelry Box Free Pattern is worked in several main parts: the bottom shell (base of the box), the top shell (lid), the body, and the finishing details. Follow these steps to bring your adorable tortoise jewelry box to life.
Step 1: Creating the Bottom Shell (Box Base)
Start with a magic ring and crochet six single crochets (sc) into it. Increase evenly each round until your circle reaches the desired diameter—usually around 8–10 cm, depending on your preference. Once the base is the right size, continue crocheting several rounds without increasing to form the sides of the jewelry box. This creates a shallow bowl shape that will hold your jewelry.
Step 2: Making the Top Shell (Lid)
For the lid, repeat the same process as the base, but make it slightly larger so it fits comfortably over the bottom part. Once you reach the desired diameter, add one or two extra rounds to form a domed shape that resembles a tortoise shell. You can add texture by using stitches like half double crochet (hdc) or front post double crochet (fpdc) to create ridges or patterns.
Step 3: Crocheting the Body
The body of your amigurumi tortoise is made by crocheting an oval shape for the belly and attaching small limbs, a head, and a tail. Start with the belly by chaining 10–12 stitches, then work single crochets around both sides of the chain, increasing at the ends to form a rounded oval. Build up the sides by crocheting in the round until the body reaches about half the height of the shell base.
Next, make the head separately by crocheting a small ball shape. Begin with six single crochets in a magic ring and increase until you have about 18 stitches. Continue straight for a few rounds, then decrease to close. Lightly stuff before finishing. The legs can be simple cylinders—chain 2, work 6 sc in a ring, and continue for several rounds before stuffing lightly. The tail is made with a small triangle or cone shape.
Step 4: Assembly and Details
Sew the head, legs, and tail onto the underside of the bottom shell. Attach them evenly for balance. If you want your jewelry box to open, make sure to attach the body only to the bottom half, leaving the top shell detachable or connected with a small hinge or thread loop.
Add your eyes and decorate the shell using embroidery, surface crochet, or contrasting yarn. Some crafters like to sew tiny hexagonal shapes or “spots” on the top shell to mimic the texture of a real tortoise shell. You can even use metallic thread to add a subtle shimmer.
Finally, if you’re using a snap button or zipper, sew it neatly between the two shell pieces so it opens and closes smoothly.
One of the best things about the Amigurumi Tortoise Jewelry Box Free Pattern is how easily you can customize it. This pattern gives you room to express creativity in color, shape, and embellishments.
For a realistic tortoise, use shades of green, olive, or brown, and add subtle shell patterns with darker tones. For a fantasy-inspired version, try pastel or jewel tones—lavender, turquoise, or gold—and decorate with beads or glitter thread for a magical effect.
If you want a children’s version, make it colorful and playful with bright yarns and embroidered smiles. You can even personalize it by adding initials or small heart appliqués.
To create a matching set, make multiple tortoise boxes in different sizes. The smaller ones can hold rings or earrings, while the larger ones can store necklaces or keepsakes. Arrange them together for a beautiful decorative display.
You can also use this pattern as a gift idea—fill the tortoise jewelry box with small surprises like earrings, notes, or candies. It’s perfect for birthdays, Mother’s Day, or even as a handmade wedding favor.
The versatility of the Amigurumi Tortoise Jewelry Box Free Pattern makes it not only a delightful project but also a creative canvas for personal expression. Every stitch adds personality, and each version can tell its own story.
To make your amigurumi tortoise turn out perfectly, focus on consistency, structure, and finishing.
First, maintain tight tension when crocheting. This helps your jewelry box hold its shape and keeps stuffing from showing. Use a smaller hook if your stitches are too loose.
When joining parts, use a strong yarn needle and sew carefully. Invisible stitches help your tortoise look polished and professional. Always pin the limbs and head in place before sewing to ensure even placement.
If you’re using a container insert inside the shell, cover it with your crocheted piece snugly before sewing the top and bottom together. This adds durability and helps your box stay firm.
Pay attention to color transitions—carry your yarn neatly or fasten off cleanly to prevent lumps. Embroider details like shell lines or small dots for added realism.
Finally, take your time shaping the head and legs. A well-stuffed, symmetrical shape gives your tortoise its character. Don’t overstuff the shell lid—it should fit gently over the base.
By following these tips, your Amigurumi Tortoise Jewelry Box Free Pattern will not only look adorable but also function beautifully as a keepsake or gift.
1. Is the Amigurumi Tortoise Jewelry Box Free Pattern suitable for beginners?
Yes! The pattern uses basic stitches like single crochet and simple shaping, making it beginner-friendly.
2. What yarn should I use for the jewelry box?
Cotton or acrylic yarn works best. Cotton provides a firm finish, while acrylic adds softness.
3. Can I make the jewelry box larger or smaller?
Absolutely! Adjust your hook size and yarn weight to scale the project up or down.
4. How does the lid stay on the base?
You can attach it with a snap button, zipper, or small thread hinge for easy opening and closing.
5. Can I wash the amigurumi jewelry box?
Yes, gently hand-wash it in cold water and air-dry to maintain its shape.
6. What can I store inside the tortoise jewelry box?
It’s perfect for rings, earrings, small trinkets, or any little keepsakes you want to keep safe.
The Amigurumi Tortoise Jewelry Box Free Pattern is a delightful mix of practicality and charm—a perfect blend of cute and functional crochet design. It’s a joy to make, easy to customize, and endlessly useful.
With each stitch, you’re creating something that’s not only beautiful but also serves a purpose. Whether you keep it for yourself or gift it to someone special, this crochet tortoise brings a smile every time it’s opened.
Try making one today, enjoy the creative process, and don’t forget to share your honest opinion and suggestions—your creativity keeps the crochet community growing and inspiring others!


