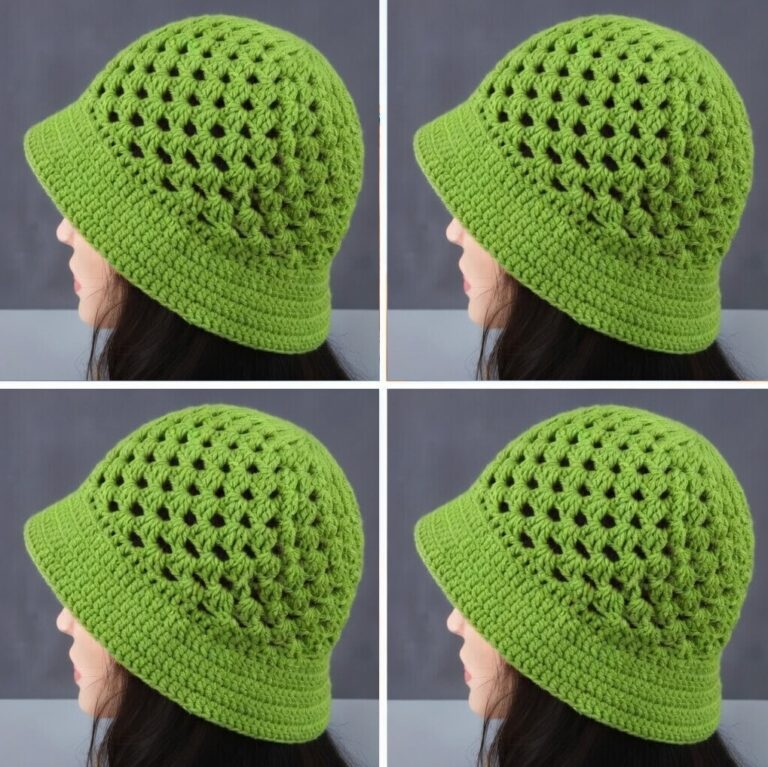
American Granny Square Bucket Hat Pattern

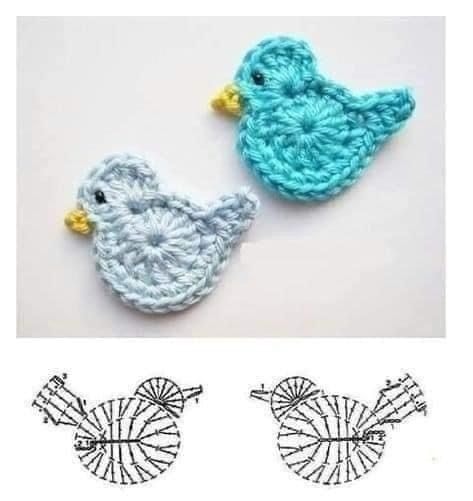
The Crochet Mini Bird Free Pattern is an adorable and beginner-friendly project that adds a sweet handmade touch to your décor, gifts, or craft collections.
With its simple construction and endless customization options, this little bird can be made in various colors and sizes, making it perfect for using up yarn scraps.
The Crochet Mini Bird Free Pattern captures the charm of nature in a soft, cozy form—ideal as a keychain, ornament, or miniature toy. Whether you’re new to crochet or a seasoned crafter looking for a quick, satisfying project, this mini bird will surely become one of your favorites.
Crocheting small birds is not only fun but also rewarding. These tiny creations can be used in countless creative ways: attached to baby mobiles, displayed on wreaths, or turned into brooches.
The Crochet Mini Bird Free Pattern typically uses basic stitches like single crochet, increases, and decreases, making it easy to follow while still allowing for detailed shaping. This makes it an excellent introduction to amigurumi—the art of crocheting small stuffed animals and toys.
What makes this pattern even more special is its versatility. You can change colors, add wings or tails, or even personalize each bird with different expressions. With minimal yarn and a few simple tools, you can create a flock of delightful crochet birds that bring color and cheer wherever they go. The Crochet Mini Bird Free Pattern is not just a craft—it’s a way to express creativity and spread joy, one stitch at a time.
To start your Crochet Mini Bird Free Pattern, gather a few basic materials. You’ll need medium-weight (worsted) yarn, although lighter yarns like DK or sport weight can also work for smaller birds. Acrylic yarn is a great choice for beginners because it’s affordable, durable, and easy to shape. If you prefer a softer, natural feel, cotton yarn is another excellent option.
You’ll also need a crochet hook that matches your yarn—usually a 3.0 mm to 4.0 mm hook works best for tight stitches that hold stuffing well. In addition, have a yarn needle for sewing parts together, a pair of scissors, and a small amount of fiberfill or stuffing to give your bird its shape. For the eyes, you can use tiny safety eyes, black embroidery thread, or even small beads for added detail.
Choosing the right colors can make your crochet mini bird truly unique. Traditional shades like soft blue, yellow, or white make for realistic birds, while bright, playful hues like pink, turquoise, and lavender add a whimsical touch. Mixing two or three complementary colors can give your bird extra charm—try using one shade for the body, another for the wings, and a contrasting color for the beak.
If you plan to make several birds, consider creating a color theme—pastels for spring, bright tones for summer, or natural earth tones for a woodland look. The beauty of the Crochet Mini Bird Free Pattern lies in its flexibility: each bird can have its own character and style, reflecting your imagination.
Before starting, check your tension by making a small test circle. Amigurumi patterns require tight stitches to prevent stuffing from showing through. Adjust your hook size if necessary to ensure firm, even fabric.
To begin the Crochet Mini Bird Free Pattern, start by creating a magic ring with six single crochets (sc) inside. This will form the top of the bird’s head. Work in continuous rounds, using a stitch marker to keep track.
Step 1: Head and Body
After your first round, increase evenly around the circle until you have about 18–24 stitches, depending on how large you want your bird to be. Continue crocheting several rounds without increasing to build the height of the body. As you go, lightly stuff the piece with fiberfill to maintain its round shape.
Step 2: Shaping the Tail
To form the tail, start decreasing on one side of the body while keeping the other side more rounded. This creates a teardrop shape that resembles a bird’s silhouette. Make small, even decreases, and add more stuffing before closing the body completely. Fasten off and weave in the yarn end securely.
Step 3: Beak
For the beak, use a contrasting color like orange or yellow. Chain 2, and work a single crochet, half double crochet, and slip stitch into the first chain. This creates a small triangle. Sew it onto the front of the bird’s face, between the eyes.
Step 4: Eyes
If you’re using safety eyes, insert them before closing the body completely—around round 6 or 7 is ideal. Alternatively, you can embroider small eyes using black thread for a softer look.
Step 5: Wings
The wings can be made by crocheting two small ovals. Chain 4, then work single crochet (sc), half double crochet (hdc), and double crochet (dc) into the chain, followed by a slip stitch. Repeat for the other side. Sew both wings symmetrically on the sides of the bird.
Step 6: Finishing Touches
To complete your crochet mini bird, shape it gently with your fingers to ensure it sits evenly. Add extra details like embroidered cheeks, a tail feather, or even a small ribbon bow if you like.
The Crochet Mini Bird Free Pattern can be used in countless creative ways, making it one of the most versatile crochet projects you can try. Here are a few ideas to inspire your next craft session:
You can turn your crochet birds into Christmas ornaments by adding a small yarn loop on top. Hang them on your tree, attach them to garlands, or use them as decorative gift tags during the holidays.
Another popular idea is to create keychains or bag charms. Simply attach a key ring or clip to the top of your bird, and you’ll have a cute accessory that shows off your handmade creativity wherever you go.
For home décor lovers, the Crochet Mini Bird Free Pattern makes lovely additions to wreaths and mobiles. Hang several birds at different lengths for a dynamic, cheerful display in nurseries, bedrooms, or craft rooms.
If you’re looking for handmade gifts, crochet mini birds make perfect party favors or baby shower decorations. You can personalize each bird by color or add embroidered initials for a special touch.
Garden lovers can also use these crochet birds as part of indoor planters or seasonal displays. They bring a pop of color to any corner and can be placed among faux flowers or greenery.
Lastly, these tiny birds can be part of a larger amigurumi set, such as a spring animal collection featuring bunnies, bees, and butterflies. The Crochet Mini Bird Free Pattern fits beautifully into any themed set.
To ensure your crochet mini bird turns out perfectly, focus on consistency and attention to detail. First, maintain tight, even tension so your bird holds its shape well. Loose stitches may cause gaps that allow stuffing to peek through.
When working with small parts like the wings and beak, use shorter yarn tails and weave them carefully to prevent bulkiness. If you’re new to sewing crochet pieces together, pin them in place before stitching to check alignment.
Use minimal stuffing—just enough to give shape without overfilling. Too much stuffing can stretch the stitches and distort the bird’s round body.
Experiment with different yarn textures to achieve various effects. Smooth cotton yarns provide clean stitch definition, while fluffy or textured yarns create a soft, feathery look that suits birds beautifully.
Blocking is optional for amigurumi, but gently shaping your finished bird by hand can make a big difference in its appearance. Adjust the beak, wings, and tail until they look balanced.
Lastly, let your imagination fly! The Crochet Mini Bird Free Pattern is all about creativity. Try adding tiny accessories like hats, flowers, or scarves to personalize your flock. Each bird can have its own character and charm.
1. Is the Crochet Mini Bird Free Pattern suitable for beginners?
Yes! This pattern uses basic stitches and simple shaping, making it perfect for beginners learning amigurumi.
2. What yarn is best for this project?
Worsted-weight acrylic or cotton yarn works great. Choose firm yarns that hold stitches well and show off details.
3. How big is the finished crochet mini bird?
Typically, each bird measures about 2 to 3 inches (5–8 cm), but you can adjust the size by changing your yarn or hook.
4. Do I need special tools for this pattern?
No. You only need a crochet hook, yarn needle, scissors, stuffing, and optional safety eyes or beads.
5. Can I make these birds in different colors?
Absolutely! The Crochet Mini Bird Free Pattern is perfect for experimenting with color combinations and patterns.
6. What can I use these crochet birds for?
They make great ornaments, keychains, home décor accents, or handmade gifts for any occasion.
The Crochet Mini Bird Free Pattern is a charming, easy, and rewarding project for crafters of all levels. With just a bit of yarn and imagination, you can create a flock of adorable birds that brighten any space.
From ornaments and gifts to decorations and accessories, these tiny crochet birds bring warmth, color, and joy wherever they appear. Whether you make one or many, each bird carries a piece of your creativity and care.
Try this delightful pattern, enjoy the process, and share your thoughts or suggestions — your feedback helps inspire even more handmade magic in the crochet community!
