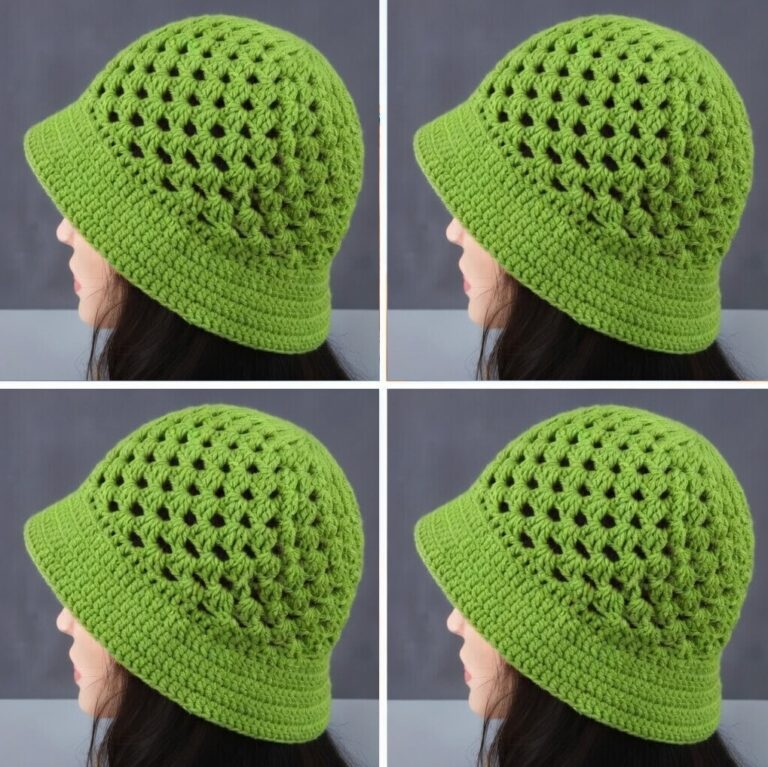
American Granny Square Bucket Hat Pattern

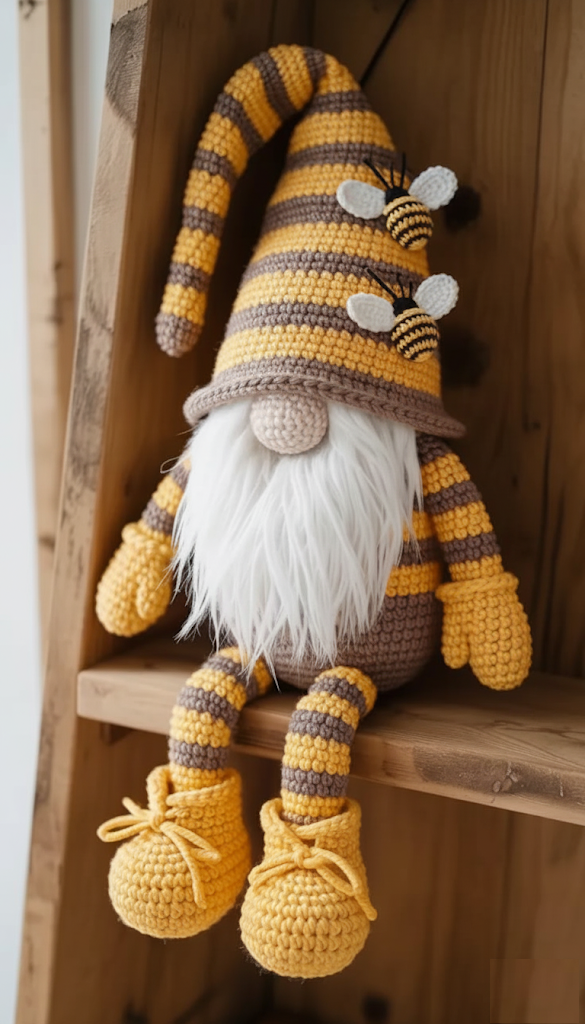
The Amigurumi Bee Gnome Free Pattern is a delightful and creative craft project that combines the charm of gnomes with the adorable appeal of bees.
This Amigurumi Bee Gnome Free Pattern uses a combination of simple stitches such as single crochet, slip stitch, and increases and decreases to form the cute body.
The charm of the Amigurumi Bee Gnome lies not only in its aesthetic appeal but also in its versatility. It can be displayed on a shelf, used as a keychain.
To start your Amigurumi Bee Gnome Free Pattern, gather all necessary materials to ensure a smooth crafting experience. You will need high-quality yarn in colors such as yellow, black, white, and beige to replicate the bee’s stripes and gnome features accurately. A suitable crochet hook that matches the yarn weight is essential for maintaining tight stitches and a uniform appearance. Fiberfill stuffing will give the gnome its plush shape, and small safety eyes or embroidery thread will complete its facial expression. Optional accessories, such as tiny felt wings, can enhance the gnome’s bee-like features. By having all materials prepared, you will avoid interruptions and make your crafting process more enjoyable.
The choice of yarn and hook directly affects the final outcome of your Amigurumi Bee Gnome. Using a slightly thinner yarn with a smaller hook creates a dense and tight fabric, which prevents stuffing from showing through the stitches. On the other hand, a thicker yarn and larger hook may result in a softer and slightly larger gnome. These variations allow crafters to personalize their creations while staying faithful to the original pattern. Remember, consistency in stitch tension is key to achieving a professional-looking bee gnome.
When creating your Amigurumi Bee Gnome, it is important to keep your workspace organized. Arrange your yarn, hooks, stuffing, and accessories neatly to avoid tangling and misplaced items. Following the free pattern step by step ensures that each part, from the gnome’s hat to its tiny wings, is constructed accurately. Beginners should consider practicing basic stitches before starting the project to gain confidence. By being prepared and patient, the crafting experience becomes both enjoyable and rewarding.
The Amigurumi Bee Gnome Free Pattern is designed to be accessible and straightforward. Begin by crocheting the gnome’s body, starting with the head and working downwards. Use single crochet stitches in a spiral, gradually increasing and decreasing as indicated in the pattern. Pay close attention to the color changes to create the bee stripes accurately. Once the body is complete, move on to the arms, which are typically small and attached to the sides of the gnome. Each piece should be stuffed lightly to maintain shape without bulging.
Next, create the gnome’s hat, which can be shaped in a cone or rounded style, depending on your preference. The hat is usually crocheted separately and then sewn onto the gnome’s head. This part of the Amigurumi Bee Gnome allows for creative customization, including stripes, patterns, or even a tiny pom-pom at the tip. The wings can be added using white yarn or felt, giving the gnome its bee-inspired look. Attach the wings securely to ensure they remain in place during play or display.
Adding details such as facial features brings your bee gnome to life. Embroider or attach safety eyes, a tiny nose, and a smiling mouth to give personality to the gnome. Some crafters also like to add small accessories, like flowers or a honey pot, to enhance the thematic design. These finishing touches transform a simple Amigurumi Bee Gnome Free Pattern into a charming miniature piece of art. Attention to detail ensures the gnome is not only visually appealing but also durable and well-crafted.
Following the instructions carefully ensures that each element of your Amigurumi Bee Gnome fits together perfectly. Beginners should consider using stitch markers to track rounds and prevent mistakes. It is normal to take time on intricate parts, especially the hat and wings, to achieve precise shapes. Patience and focus during this stage result in a polished and professional-looking final product. Enjoy the process, and remember that practice improves skill over time.
Finally, assemble all parts of your Amigurumi Bee Gnome by sewing them together using a yarn needle. Ensure that each attachment is secure, and check for loose ends. Once complete, give your gnome a final fluff and shape adjustments to enhance its overall look. The free pattern guides you through each step, making it easy for crafters to achieve the iconic bee gnome appearance. After finishing, your creation is ready to be displayed, gifted, or incorporated into larger decorative projects.
One of the joys of creating an Amigurumi Bee Gnome Free Pattern is customization. You can experiment with colors, stitch styles, and accessories to reflect your personal taste. For example, changing the hat color or adding sparkly yarn can give your gnome a unique personality. Even the size can be altered by using different yarn weights and hooks, creating a collection of gnomes in various sizes. Customization ensures that your project is a reflection of your creativity and skill.
Crafters can also explore different wing designs for their bee gnome. Felt wings are simple and lightweight, while crocheted wings offer texture and continuity with the yarn. Adding embroidery details, such as veins or glitter, enhances the wings and makes the gnome more eye-catching. Experimenting with these details allows you to create a signature version of your Amigurumi Bee Gnome. These personal touches make your craft stand out and increase its charm.
Accessories play a key role in personalizing your Amigurumi Bee Gnome. Consider adding tiny honey pots, flowers, or even miniature baskets to create a story around your gnome. These elements make the gnome not only decorative but also interactive, especially if it’s used as part of a larger scene or display. The possibilities for customization are endless, limited only by imagination and creativity. Small touches transform a simple free pattern into a memorable gift or collectible.
Another tip is experimenting with textures. Combining different yarn types, such as cotton, acrylic, or wool, can create contrasting textures that enhance the gnome’s visual appeal. Using plush or fuzzy yarns for certain parts, like the hat or wings, adds a tactile element to the Amigurumi Bee Gnome. Mixing textures keeps the project interesting and allows crafters to explore different techniques while following the free pattern instructions. These small details make a big difference in the final product.
Color gradients are another creative avenue for the bee gnome. Using variegated yarn or blending colors gradually can produce a smooth transition between stripes or hat sections. This technique adds sophistication to your project and makes the Amigurumi Bee Gnome Free Pattern feel more professional. Paying attention to color placement ensures the gnome maintains its classic bee appearance while allowing room for creative interpretation.
Finally, practicing patience is crucial when customizing your Amigurumi Bee Gnome. Rushing through the process may result in uneven stitches or poorly attached parts. Take your time to perfect each section, especially the small details that bring your gnome to life. With careful attention and creativity, your Amigurumi Bee Gnome will become a standout piece in your collection or a cherished handmade gift for someone special.
When following the Amigurumi Bee Gnome Free Pattern, beginners often make common mistakes that can affect the final outcome. One frequent issue is inconsistent stitch tension, which leads to uneven shapes and gaps in the fabric. Maintaining a steady tension ensures a polished and professional-looking gnome. Another mistake is skipping steps or miscounting stitches, which can distort the body or hat. Using stitch markers and counting carefully can prevent these problems.
Overstuffing is another common mistake that can affect the look of your bee gnome. Too much stuffing may cause the stitches to stretch, revealing gaps, while under-stuffing results in a floppy and misshapen gnome. Achieving the right balance ensures the gnome is firm yet soft and huggable. Following the free pattern guidelines for stuffing amounts is essential for optimal results.
Incorrect color changes can also detract from the gnome’s appearance. Failing to switch yarns at the right point may disrupt the bee stripe pattern. Paying attention to color transitions and securing yarn ends properly is crucial for creating a visually appealing Amigurumi Bee Gnome. Practice and patience will help overcome this challenge.
Attaching parts improperly is another pitfall. Arms, wings, and hats must be sewn securely to prevent detachment. Loose attachments not only affect appearance but also compromise the durability of your bee gnome. Ensuring proper alignment and stitching strengthens the gnome for display or gentle play.
Rushing through finishing touches is also a mistake to avoid. Small details like facial features, hat shaping, and wing placement require careful attention. These elements give personality to the Amigurumi Bee Gnome and complete the overall aesthetic. Taking your time ensures your gnome looks as charming as possible.
Lastly, neglecting to practice basic stitches before starting can lead to frustration. Beginners should familiarize themselves with single crochet, increases, decreases, and slip stitches. Mastering these techniques will make following the Amigurumi Bee Gnome Free Pattern much easier and more enjoyable.
Q: What skill level is needed for the Amigurumi Bee Gnome?
A: This free pattern is suitable for beginners with basic crochet knowledge, but intermediate and advanced crafters will also enjoy creating detailed features.
Q: Can I use different yarn types?
A: Yes, you can use cotton, acrylic, or wool, but ensure the yarn weight matches the crochet hook to maintain the gnome’s shape.
Q: How big is the finished gnome?
A: The size depends on yarn and hook choices, but typically the Amigurumi Bee Gnome is about 10–12 cm tall.
Q: Can I sell the finished gnome?
A: Yes, as long as you credit the Amigurumi Bee Gnome Free Pattern source and do not claim the design as your own.
Q: How do I clean the gnome?
A: Hand wash gently in cold water and reshape it while damp. Avoid machine washing to maintain its structure.
Q: Are there tips for beginners?
A: Practice basic stitches first, follow the pattern step by step, use stitch markers, and don’t rush. Patience is key to a beautiful result.
Creating the Amigurumi Bee Gnome Free Pattern is a rewarding and creative experience that combines the joy of crochet with the charm of gnomes and bees.
By following this guide, you have learned about the necessary materials, step-by-step instructions, customization tips, and common mistakes to avoid.
This project enhances your crochet skills, introduces new techniques, and results in a charming miniature gnome perfect for decoration or gifting.
We hope this article has inspired you to craft your own Amigurumi Bee Gnome. Share your creations, leave a sincere opinion, and offer suggestions for improving or customizing future projects.