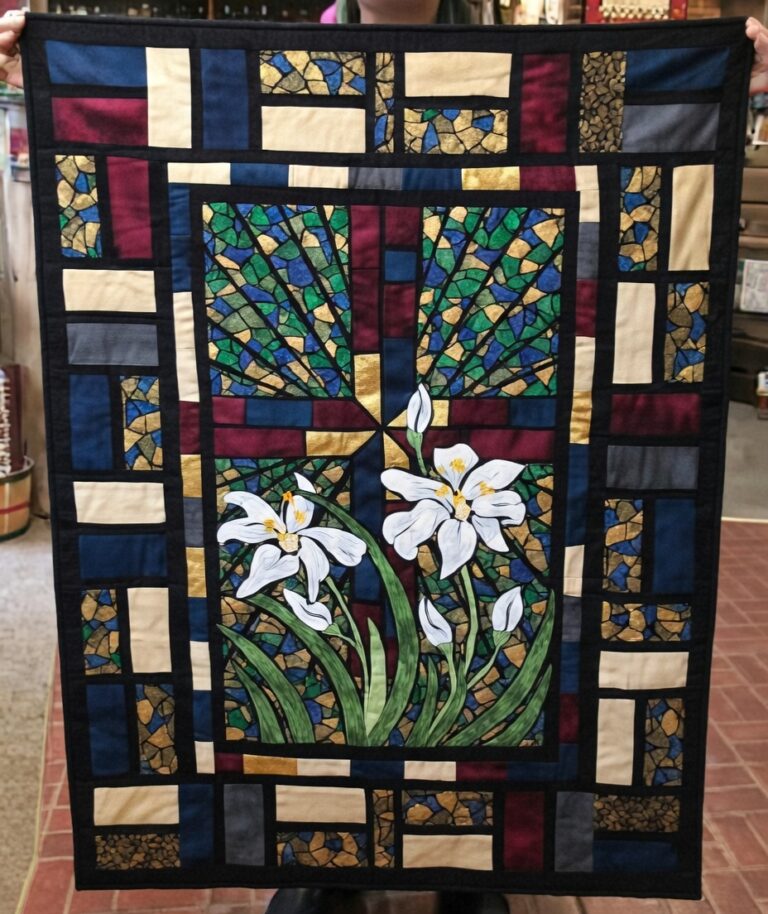
Stained Glass Lily Quilt Pattern

Stained Glass Lily Quilt Pattern is a stunning quilting project for anyone who loves floral designs with bold contrast and artistic detail. A well-made Stained Glass Lily Quilt Pattern combines the elegance of lilies with the dramatic structure of stained glass, creating a quilt that feels decorative, expressive, and deeply satisfying to sew.
One of the biggest reasons a Stained Glass Lily Quilt Pattern is so appealing is because it transforms a soft floral subject into something much more striking and graphic. Instead of relying only on delicate flower shapes, this style uses dark dividing lines, color segmentation, and strong visual framing to create the illusion of stained glass.
Another reason this project is so rewarding is that it helps build valuable quilting skills in a very creative format. While working on a Stained Glass Lily Quilt Pattern, you often improve your understanding of contrast placement, precise cutting, shape definition, fabric control, layout planning, clean seam work, appliqué or framed piecing, and decorative finishing.
This kind of quilt is also especially enjoyable because it offers a lot of creative flexibility. Depending on your fabric choices, line spacing, and color balance, the same lily design can feel more dramatic, more elegant, more modern, more traditional, or even more luminous and artistic.
Another lovely advantage of a Stained Glass Lily Quilt Pattern is that it works beautifully as both a decorative and practical handmade piece. It can be used as a wall hanging, mini quilt, accent panel, table centerpiece, or even adapted into a larger quilt project depending on the final size.
If you want to create something floral, bold, and beautifully handmade, this Stained Glass Lily Quilt Pattern is an excellent quilting project to learn and enjoy in detail.
Before starting your Stained Glass Lily Quilt Pattern, it helps to understand how this type of quilt is usually built. Even though it looks artistic and decorative, the structure is what gives it that crisp stained-glass-inspired effect.
The project usually begins with the main lily design, which forms the central visual focus of the quilt. The lily is often divided into multiple fabric sections to mimic the separate pieces of colored glass found in stained glass art.
A defining feature of a Stained Glass Lily Quilt Pattern is the use of dark outlining lines. These dark sections separate the flower pieces and background sections, helping create the signature framed effect that makes the design look more dimensional and graphic. Stained-glass-style quilt patterns commonly rely on dark bias, framing strips, or appliqué edges to create that window-like look.
Many versions also include leaf sections, background panels, and sometimes borders or geometric framing that help support the floral design and balance the composition.
Depending on the style of the pattern, the quilt may be made using appliqué, bias strip leading, framed patchwork, or a combination of these methods. Quilting resources often describe stained-glass quilts as being built either with appliqué-style methods or with pieced sections separated by dark lines.
Because this type of quilt depends heavily on visual clarity, the relationship between fabric contrast, line definition, cutting precision, and layout balance matters a lot. Understanding the structure first helps you make better quilting choices and gives the finished piece a much cleaner, bolder, and more artistic result.
Choosing the right fabrics is one of the most important parts of making a successful Stained Glass Lily Quilt Pattern.
Because this project relies on contrast and segmentation, your fabrics need to do more than just look pretty on their own. They need to work together to create a clear and expressive overall image.
A quilting cotton is often one of the best choices for this kind of quilt because it is stable, easy to cut, easy to press, and ideal for detailed piecing or appliqué. It helps keep the shapes crisp and the edges cleaner, which is especially important in a design with many visible lines and framed sections.
For the lily petals, rich and clear colors often work beautifully because they help create the glowing, jewel-like feeling that makes stained glass quilts so striking. Soft pinks, purples, whites, yellows, corals, and even dramatic reds can all work depending on the style you want.
For the leaf and stem sections, greens with depth and variation often help add realism and visual richness without overpowering the flower.
One of the most important choices in this kind of project is the dark outlining fabric, which is often black or a very deep charcoal. This fabric is what gives the design its stained glass identity by separating the sections and making the color contrasts stand out more strongly. Some stained-glass-style quilt patterns specifically call for black fabric or black bias to cover raw edges and define every section clearly.
The background fabric also matters a lot because it affects how much the lily stands out. A lighter or more neutral background often helps the flower feel more dramatic and central, while a darker or richer background can create a more moody and artistic look.
The fabrics you choose will play a major role in whether your Stained Glass Lily Quilt Pattern feels more romantic, more dramatic, more modern, or more classic in the final result.
One of the most important parts of a Stained Glass Lily Quilt Pattern is the actual stained glass effect, because this is what transforms a floral quilt into something much more graphic and visually powerful.
The most recognizable feature is the use of dark dividing lines between each color section. These lines act like the leading in stained glass windows and help separate the shapes so the flower appears framed and defined.
These dark lines can be created in different ways depending on the construction method. Some patterns use narrow black strips, some use bias tape or bias binding, and others rely on appliqué framing or carefully placed dark patchwork lines. Pattern descriptions for stained-glass floral quilts often mention black bias, fusible web, or narrow framing as the key to achieving this look.
Spacing also matters a lot. If the dark lines are too wide, they may overpower the flower. If they are too narrow or inconsistent, the design may lose some of its sharpness and stained-glass-inspired definition.
Another important factor is color separation. The stained glass look becomes much stronger when neighboring fabric sections have enough contrast to feel like separate “glass” pieces rather than blending together visually.
The cleaner and more intentional your stained glass effect is, the more dramatic and beautiful your finished quilt will feel.
A few thoughtful quilting habits can make your Stained Glass Lily Quilt Pattern look much more polished and visually striking.
Start by cutting your pieces as accurately as possible. Since this type of quilt often depends on framed sections and sharp edges, even small cutting differences can affect the clarity of the final design.
Try to keep your seam allowances consistent, especially if your pattern includes many narrow sections or shaped pieces. Consistency helps the flower and framing lines remain balanced.
Pressing throughout the project is also extremely important. Pressing seams, appliqué sections, and framing strips can dramatically improve the final appearance and help the quilt look cleaner and more professionally finished.
If your quilt includes curved floral shapes, take extra care with those areas so the lily remains graceful and recognizable rather than stiff or uneven.
It also helps to step back and look at the quilt from a distance as you work. Because stained glass quilts are so visual, this makes it easier to notice whether the flower feels balanced, defined, and easy to read.
These small finishing habits can make your Stained Glass Lily Quilt Pattern look much sharper, cleaner, and more artistically finished.
One of the best things about a Stained Glass Lily Quilt Pattern is how easy it is to personalize.
You can keep it classic and elegant with white lilies, soft green leaves, and deep black outlines for a timeless stained-glass-inspired look.
If you want something more dramatic, you can use jewel tones such as sapphire, ruby, emerald, gold, and amethyst to create a richer and more luminous floral effect. Quilters discussing stained-glass-style projects often mention that deep jewel tones, bright fabrics, and strong black framing help create the most striking stained-glass appearance.
A softer version can also look beautiful with pastel petals, gentle greens, and more subtle contrast for a lighter and more decorative finish.
You can also customize the project by adjusting the size. A smaller version can work beautifully as a wall hanging or table accent, while a larger version can become a bold centerpiece quilt.
Additional details such as borders, background textures, decorative quilting, or extra floral elements can also help make the finished piece feel even more unique and personal.
Customizing your Stained Glass Lily Quilt Pattern helps turn a beautiful design into a meaningful handmade quilt that reflects your own style and creativity.
1. Is a Stained Glass Lily Quilt Pattern beginner-friendly?
Some simpler versions can work for confident beginners, but many are better for intermediate sewists because they often require precision and careful layout control.
2. What fabric works best for this project?
Quilting cotton is often one of the best choices because it is stable, easy to sew, and ideal for clean piecing and appliqué.
3. What creates the stained glass effect?
The effect usually comes from dark dividing lines, strong contrast, and clearly separated color sections.
4. Can I use bright colors for the lily?
Yes, bright or rich colors often work beautifully and can make the design feel even more dramatic and artistic.
5. Why does my quilt not look crisp enough?
This usually happens when the contrast is too soft, the lines are inconsistent, or the pieces are not cut accurately enough.
6. Is this a good decorative quilt project?
Absolutely. It works especially well as a wall hanging, floral accent quilt, or statement piece for seasonal or year-round decor.
7. Can I resize the pattern?
Yes, many versions can be adapted depending on whether you want a mini quilt, panel, or larger finished quilt.
Before reaching the final stage of your Stained Glass Lily Quilt Pattern, take a moment to review the dark framing lines, petal contrast, seam accuracy, and overall flower definition. Small adjustments at this stage can make a very big difference in how crisp and artistic the finished quilt looks. These final refinements help transform a beautiful patchwork idea into a bold and elegant handmade quilt piece.
Creating a Stained Glass Lily Quilt Pattern is a wonderful way to combine floral beauty, bold contrast, and artistic quilting in one rewarding project. Throughout this guide, you learned how the quilt is structured, how to choose better fabrics, what creates the stained glass effect, how to improve the clarity of the design, and how to finish the project in a cleaner and more polished way.
This is the kind of quilting project that teaches much more than simple construction. It helps you improve contrast control, fabric placement, shape definition, precise cutting, and decorative finishing while allowing you to create something expressive and beautiful by hand. With thoughtful fabric choices and careful construction, your lily quilt can become a striking handmade piece full of elegance, floral charm, and stained-glass-inspired beauty.
If this article helped you, feel free to leave your honest opinion and suggestions. Your feedback can inspire future quilting ideas, better tutorials, and even more creative handmade projects to explore.

