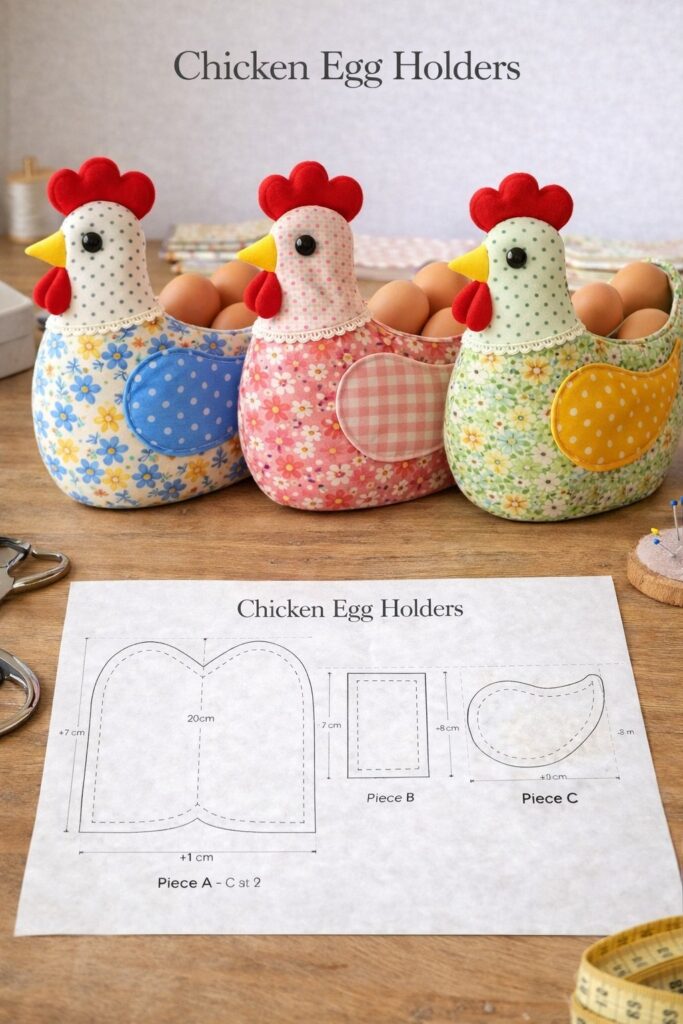
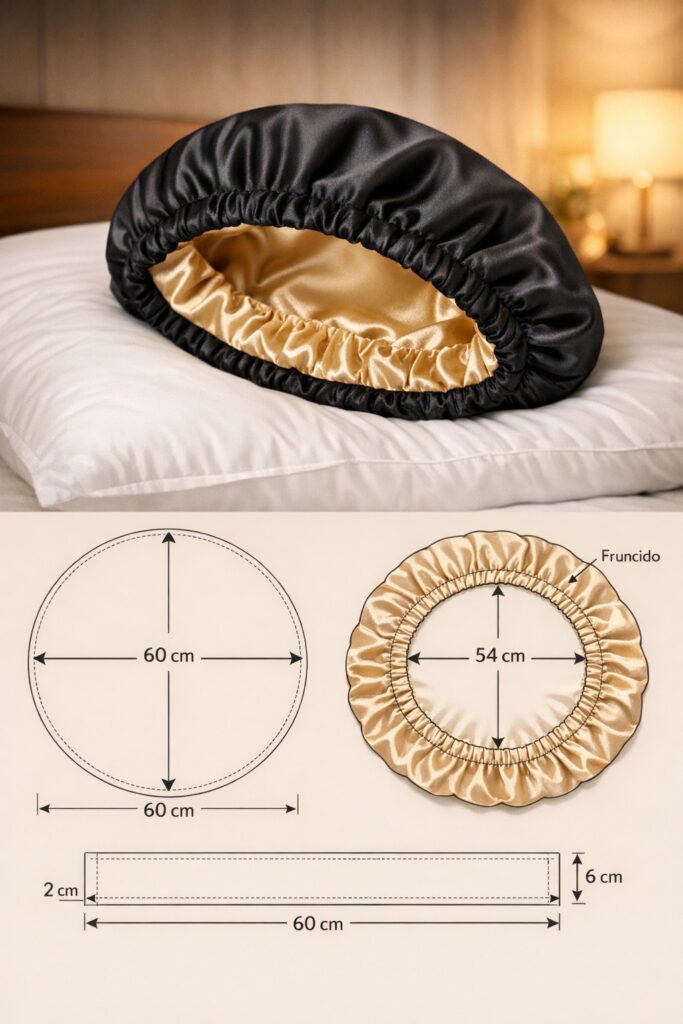
Fabric Chicken Egg Holders Pattern

Sewing Triangular Zipper Pouch Tutorial is a practical and creative sewing project that combines functionality with a modern geometric design. The Sewing Triangular Zipper Pouch Tutorial is ideal for anyone who enjoys making useful handmade items that are both stylish and versatile.
This unique pouch shape stands out from traditional rectangular designs, offering visual interest while remaining highly practical for everyday use.
One of the main reasons the Sewing Triangular Zipper Pouch Tutorial is so popular is its adaptability. This pouch can be used to store cosmetics, stationery, craft supplies, travel essentials, or small personal items.
Its compact triangular structure allows it to fit easily into bags while maximizing interior space. With the right fabric choices, it can be casual, elegant, or playful.
Another advantage of the Sewing Triangular Zipper Pouch Tutorial is that it helps develop valuable sewing skills. Working with angles, zippers, and lining improves precision and confidence. This project is suitable for beginners who want to challenge themselves and for experienced sewists looking for a quick and satisfying make.
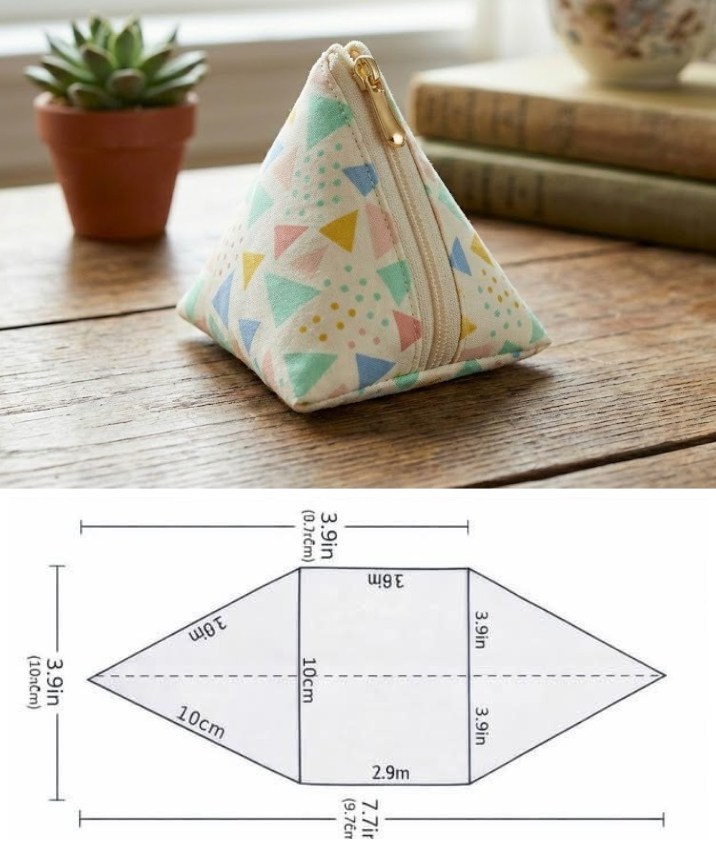
The design of the Sewing Triangular Zipper Pouch Tutorial is based on simple geometric construction. Instead of the standard boxy pouch, this pattern uses triangular panels that come together to form a structured yet flexible shape. This design gives the pouch its distinctive appearance.
The triangular form allows the pouch to stand upright when placed on a flat surface. This makes it especially useful for organizing small items that need to be easily accessible. The structure also helps prevent items from shifting excessively inside the pouch.
Zipper placement is a key feature of the Sewing Triangular Zipper Pouch Tutorial. The zipper usually runs along the top edge, following one side of the triangle. This placement provides a wide opening, making it easy to see and reach the contents.
Another important aspect of the design is symmetry. Accurate cutting and careful alignment ensure that all sides meet evenly. This balance is what gives the finished pouch a professional and polished look.
The pattern typically includes both an outer fabric and a lining. The lining not only hides seams but also adds durability and structure. In the Sewing Triangular Zipper Pouch Tutorial, the lining is just as important as the exterior fabric.
Overall, the design focuses on simplicity, efficiency, and visual appeal, making the Sewing Triangular Zipper Pouch Tutorial both practical and rewarding.
Choosing the right materials is essential for success in the Sewing Triangular Zipper Pouch Tutorial. Medium-weight cotton fabrics are commonly used because they are easy to sew and provide enough structure. Quilting cotton is an excellent choice for both beginners and experienced sewists.
For added durability, some makers choose canvas or linen blends. These fabrics give the pouch a more structured and sturdy feel. When using thicker fabrics, it is important to adjust needle size and stitch length accordingly.
The lining fabric should complement the exterior while remaining smooth and easy to clean. Cotton lining fabrics work well and help the pouch maintain its shape. A contrasting lining adds a fun surprise when the pouch is opened.
Zipper selection plays a major role in the Sewing Triangular Zipper Pouch Tutorial. A nylon coil zipper is often preferred because it is flexible and easy to sew around corners. Choosing a zipper slightly longer than needed allows for easier installation.
Interfacing is optional but highly recommended. Lightweight fusible interfacing adds stability to the fabric, helping the triangular shape hold its form. This step enhances the overall finish of the pouch.
Other basic materials include matching thread, fabric scissors, pins or clips, and a sewing machine. Having everything prepared before starting makes the Sewing Triangular Zipper Pouch Tutorial smoother and more enjoyable.
The Sewing Triangular Zipper Pouch Tutorial begins with cutting the fabric pieces accurately. Typically, this includes triangular outer pieces, matching lining pieces, and interfacing if used. Precision at this stage ensures clean assembly later.
Once the pieces are cut, interfacing is fused to the wrong side of the outer fabric. This step adds structure and prevents the pouch from collapsing. Proper pressing helps achieve a smooth and professional finish.
The zipper is then attached to the outer fabric pieces. Careful alignment ensures that the zipper sits evenly along the edge. This stage is crucial in the Sewing Triangular Zipper Pouch Tutorial, as it determines how smoothly the pouch opens and closes.
After attaching the zipper, the lining pieces are sewn to the zipper, creating a sandwich with the outer fabric. This method hides raw edges and creates a clean interior finish.
Next, the pouch is assembled by sewing the remaining sides together. The triangular shape becomes visible at this stage. Leaving a small opening in the lining allows the pouch to be turned right side out.
Finally, the pouch is turned, pressed, and the lining opening is closed. A final topstitch around the zipper adds durability and a polished look, completing the Sewing Triangular Zipper Pouch Tutorial project.
One of the most enjoyable aspects of the Sewing Triangular Zipper Pouch Tutorial is customization. Fabric choices alone can completely change the style, from minimalist and modern to colorful and playful.
Adding decorative elements such as fabric labels, embroidery, or contrasting zipper tape enhances the pouch’s visual appeal. These details make each pouch unique and personal.
Size adjustments are also possible. By scaling the triangular pieces up or down, the Sewing Triangular Zipper Pouch Tutorial can be adapted for different storage needs, from tiny coin pouches to larger organizers.
This pouch makes an excellent handmade gift. Its unique shape and practical use make it appealing for birthdays, holidays, or special occasions. Pairing it with thoughtful fabric choices adds sentimental value.
The pouch is also ideal for organizing bags and drawers. It helps keep small items contained and easy to find. Many people create multiple pouches for different purposes.
Ultimately, the Sewing Triangular Zipper Pouch Tutorial offers endless creative possibilities while remaining functional and beginner-friendly.
Is the Sewing Triangular Zipper Pouch Tutorial suitable for beginners?
Yes, this tutorial is suitable for beginners with basic sewing knowledge, especially those wanting to practice zipper installation.
What fabrics work best for this pouch?
Medium-weight cotton fabrics are ideal, but canvas and linen blends also work well.
Do I need interfacing for this project?
Interfacing is optional but recommended for better structure and durability.
How long does it take to sew a triangular zipper pouch?
Most sewists can complete the project in about one hour.
Can I resize the pouch?
Yes, the pattern can be easily scaled to create larger or smaller pouches.
What type of zipper should I use?
A nylon coil zipper is recommended for ease of sewing and flexibility.
The Sewing Triangular Zipper Pouch Tutorial is a creative and practical sewing project that combines geometric design with everyday usefulness. Throughout this article, we explored the pouch concept, material choices, construction process, and customization ideas.
This project is perfect for improving sewing skills while creating something stylish and functional. If you enjoyed this tutorial, feel free to leave your honest opinion and share suggestions or creative ideas for future sewing projects.


