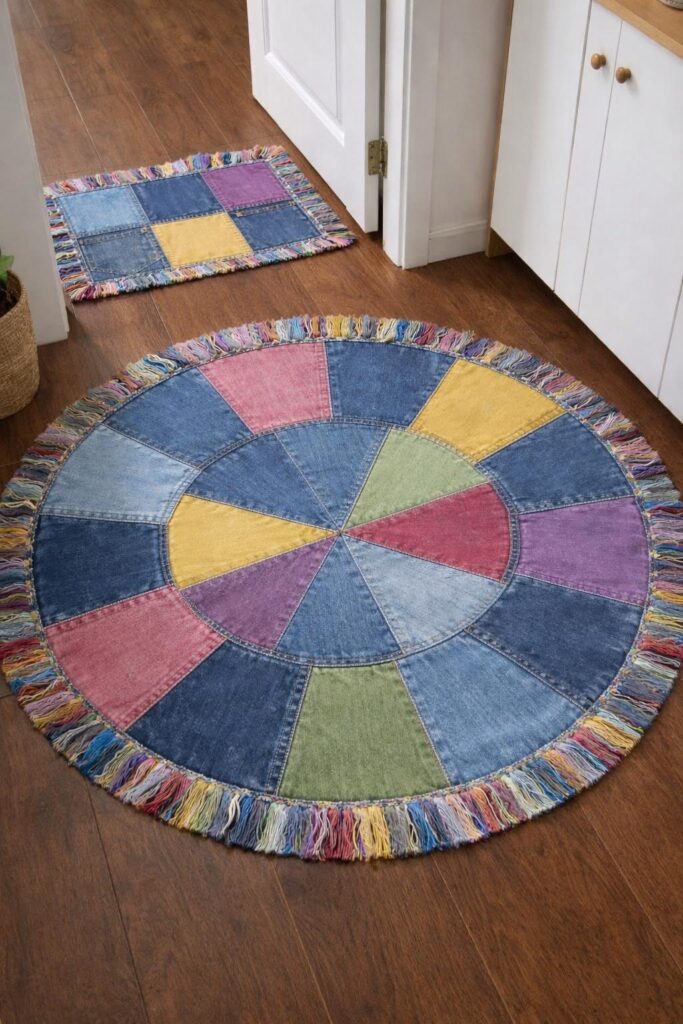
Patchwork Denim Rugs Pattern

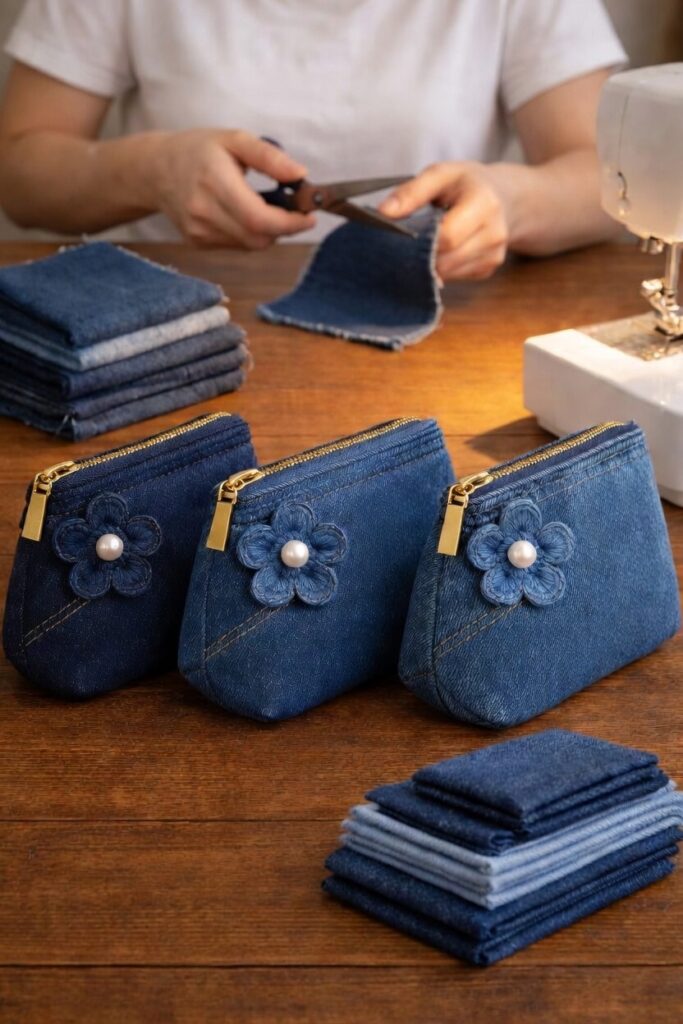
If you are looking for a creative and practical project, the DIY Zipper Pouch Free Pattern is the perfect choice to start with.
Working with a DIY Zipper Pouch also gives you the freedom to customize the size, fabric, and design based on your taste.
The DIY Zipper Pouch Free Pattern is also a great project to practice essential sewing techniques. From learning how to attach a zipper correctly to ensuring neat seams, every step adds to your sewing skills.
One of the biggest advantages of starting with a DIY Zipper Pouch is its accessibility for all skill levels. Beginners can easily follow the steps without feeling overwhelmed, while more advanced crafters can add personal touches like decorative stitching, linings, or embroidery to make each pouch unique. This flexibility is what makes this project so appealing and popular among sewing enthusiasts worldwide.
Another reason why people love making a zipper pouch is practicality. Everyone needs a small pouch at some point, whether it’s to carry cosmetics, organize items inside a handbag, or store craft tools. The pouch becomes a functional accessory that fits into everyday life, making it both useful and stylish at the same time.
The project is also highly customizable. By using the DIY Zipper Pouch Free Pattern, you can adjust the measurements to create larger or smaller pouches depending on your needs. You could make a tiny coin purse or a larger pouch that functions as a tablet sleeve or travel organizer. The ability to scale the project is one of its strongest benefits.
Additionally, sewing your own zipper pouch saves money. Buying pouches from stores can be surprisingly expensive, especially if you want a unique design. Making your own allows you to invest in affordable materials while still ending up with a professional-looking accessory. This makes the project budget-friendly without compromising quality.
Another great point is sustainability. By using fabric scraps and repurposing old clothing, you reduce waste and contribute to eco-friendly crafting. The pouch becomes more than just an accessory; it becomes part of a conscious lifestyle where you choose creativity and sustainability over mass-produced products.
Lastly, a DIY Zipper Pouch makes an excellent handmade gift. People always appreciate thoughtful, handmade items that reflect time and care. You can easily personalize the pouch with the recipient’s favorite colors or patterns, making it a memorable gift for any occasion.
To get started with a DIY Zipper Pouch Free Pattern, you need only a few basic materials. Most of these items are common in sewing kits, which makes the project even more beginner-friendly. Let’s take a closer look at what you’ll need before starting.
First, fabric is the most important element. Cotton fabric is highly recommended for beginners because it is easy to handle and comes in countless designs. You may also experiment with canvas, linen, or denim if you prefer sturdier options. Choosing fabric that matches your style will make the finished pouch even more special.
Second, you will need a zipper. The length of the zipper should match the width of your pouch. Zippers come in different colors and sizes, so you can select one that complements your chosen fabric. Installing the zipper is the key step in this project, so picking a quality one will make the process smoother.
Third, thread and a sewing machine are required. A matching thread color gives a professional finish, while a contrasting thread can add a decorative touch. A simple sewing machine is more than enough for this project, though you can also sew it by hand if you prefer.
Fourth, don’t forget lining fabric. Adding a lining ensures the pouch looks neat inside and prevents fraying. You can use a solid color or even a fun pattern for the lining, which adds personality to the pouch every time it is opened.
You will also need sewing notions like pins, scissors, and an iron. Pins help hold fabric pieces together, scissors ensure clean cuts, and ironing helps set seams for a polished finish. These small tools make the sewing process much easier and more enjoyable.
Finally, a ruler or measuring tape ensures accuracy. Following the DIY Zipper Pouch Free Pattern measurements closely guarantees your pouch turns out the way you expect, without uneven edges or misaligned seams. With these materials ready, you can begin creating your pouch with confidence.
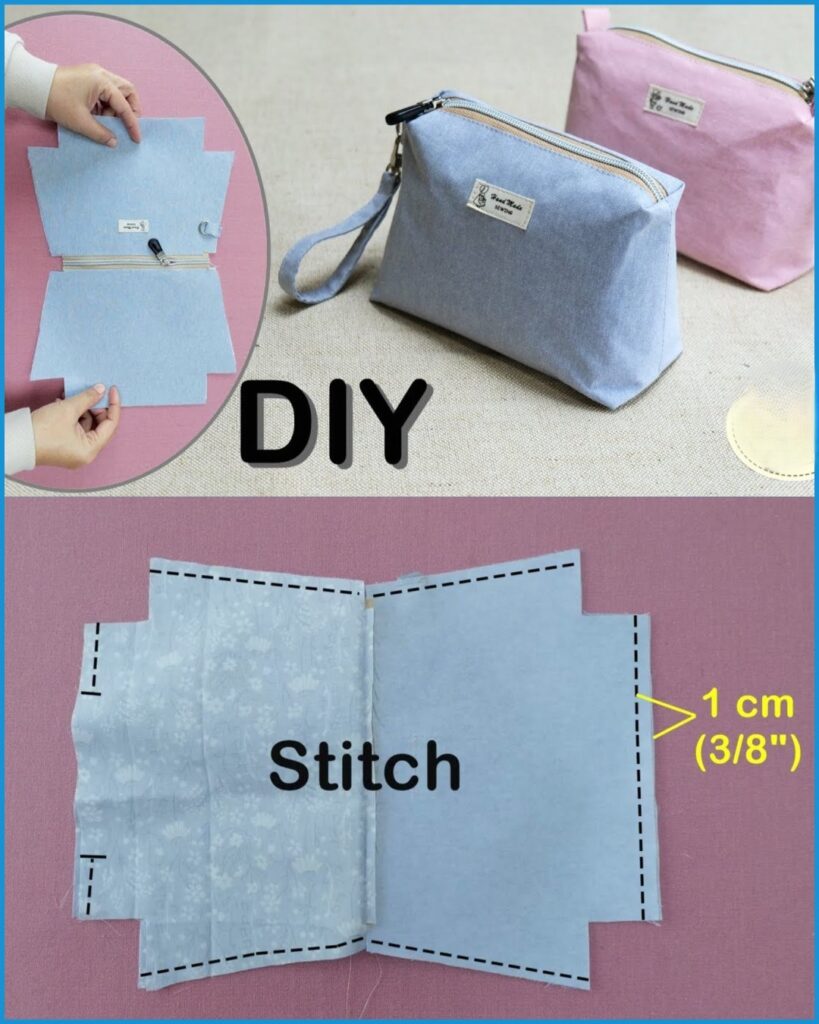
Once you’ve gathered your materials, it’s time to follow the DIY Zipper Pouch Free Pattern step by step. Each stage of the process builds on the previous one, making it simple and straightforward even for beginners.
First, cut your fabric pieces. You will need two outer fabric pieces and two lining fabric pieces, all of the same size. Precision here ensures the pouch will align properly once sewn together.
Second, attach the zipper. Place one outer fabric piece right side up, then position the zipper face down along the top edge. Add a lining piece on top, sandwiching the zipper in between. Sew along the edge carefully, making sure your stitches are straight.
Third, repeat the process with the other side of the zipper. This step creates the base structure of your pouch, with the zipper neatly secured between the fabrics. After sewing, press the fabric with an iron to smooth everything out.
Fourth, topstitch along the edges near the zipper. This not only gives the pouch a professional look but also ensures the fabric doesn’t catch in the zipper when you open and close it.
Fifth, sew around the edges of the pouch, leaving a small opening in the lining for turning. Be sure to backstitch at the beginning and end for strength. This step secures all pieces together, forming the pouch.
Finally, turn the pouch right side out through the opening, push out the corners for a neat finish, and close the lining with a small stitch. Congratulations—you have completed your very own DIY Zipper Pouch using a free pattern!
After mastering the basics, you can make your DIY Zipper Pouch Free Pattern more creative and unique. Adding personal touches transforms the pouch from a simple project into a stylish accessory you’ll be proud to use or gift.
One idea is to experiment with fabric combinations. Mixing two different prints or textures can create a bold and eye-catching pouch. For example, pairing denim with floral cotton brings contrast and personality to the project.
You can also add embellishments such as buttons, patches, or embroidery. Personalizing your pouch with initials or small decorative designs makes it one of a kind. This is especially nice when making pouches as gifts.
Another tip is to play with different pouch shapes. Instead of the classic rectangular design, try rounded corners or boxed bottoms to create more space inside the pouch. Adjusting the DIY Zipper Pouch measurements is simple once you understand the basic construction.
Adding a wrist strap or small handle is another great upgrade. This transforms the pouch into a clutch bag, making it even more practical for carrying on the go. It’s a small change that adds big functionality.
Consider using waterproof lining if you plan to use the pouch for cosmetics or toiletries. This makes the pouch more durable and prevents spills from damaging the fabric. It’s a functional upgrade that extends the life of your handmade pouch.
Lastly, think about making a set of pouches in different sizes. Having matching pouches for coins, makeup, stationery, or travel essentials keeps you organized in style. By repeating the DIY Zipper Pouch Free Pattern with size variations, you can create a complete handmade collection.
1. Is a DIY Zipper Pouch beginner-friendly?
Yes, it is one of the easiest sewing projects for beginners. The steps are simple, and the zipper installation is a great learning experience.
2. What type of fabric works best for a zipper pouch?
Cotton fabric is ideal for beginners, but you can also use canvas, denim, or linen for sturdier pouches.
3. Can I sew a zipper pouch without a sewing machine?
Yes, it is possible to sew by hand, though it will take longer. A sewing machine makes the process quicker and more precise.
4. How do I make the pouch waterproof?
Use waterproof lining or fabric, such as vinyl or laminated cotton, to protect the pouch from spills.
5. Can I change the size of the pouch?
Absolutely. The DIY Zipper Pouch Free Pattern can easily be scaled up or down depending on your needs.
6. Are zipper pouches good for gifts?
Yes, they make excellent handmade gifts, especially when customized with favorite colors, fabrics, or embroidered initials.
The DIY Zipper Pouch Free Pattern is an excellent project for anyone who loves sewing, whether you’re just starting out or already have experience.
Beyond the basics, the project opens doors to endless creativity, from experimenting with fabrics to adding custom touches.
Share your honest opinion and suggestions—we’d love to know how your pouch turned out and what creative ideas you added to make it unique.


