
Crochet Heart Rooster Rug Pattern – The Best Techniques and Tools

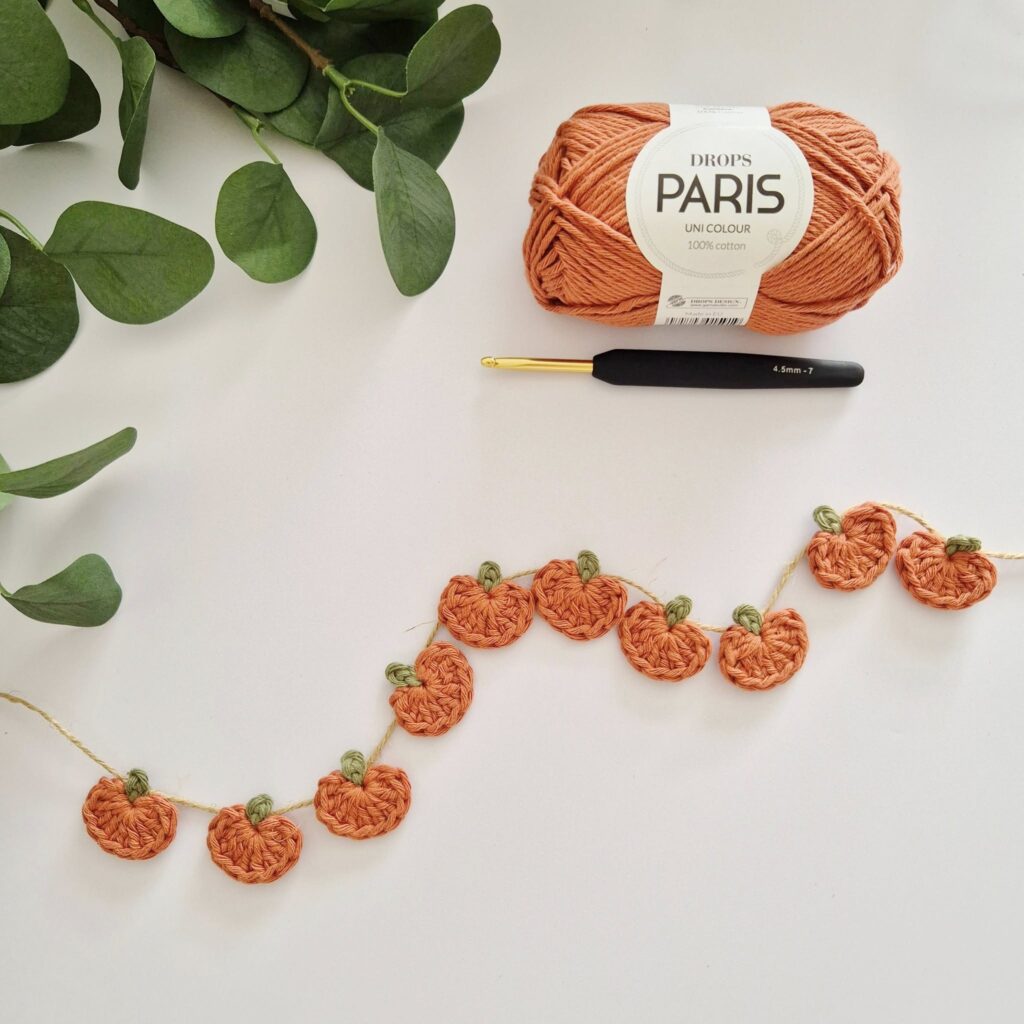
The Garland Mini Pumpkin Pattern is a charming and festive crochet design perfect for bringing the cozy spirit of autumn into your home. The Garland Mini Pumpkin Pattern is beginner-friendly, quick to make, and endlessly customizable.
With just a few simple stitches and vibrant yarn colors, you can craft a beautiful seasonal decoration that captures the warmth and joy of fall.
Using this Garland Mini Pumpkin Pattern, you can transform small amounts of yarn into delightful, handmade pieces that make any space feel more inviting.
Each mini pumpkin takes only a short time to complete, making it an ideal project for crocheters who enjoy instant gratification. Plus, it’s a wonderful way to use up leftover yarn scraps from other projects.
The design combines simplicity and texture, resulting in pumpkins that look plump, realistic, and irresistibly cute. Whether displayed on a mantel, wrapped around a staircase, or draped over a doorway, this garland will add a perfect touch of seasonal cheer.
Another reason to love the Garland Mini Pumpkin Pattern is its versatility. You can make your pumpkins in traditional shades of orange and brown, or experiment with neutral tones like cream, beige, and sage for a more modern farmhouse aesthetic. The small size of each pumpkin also makes them ideal for personalized crafts—you can attach them to gifts, wreaths, or table settings for an extra festive touch. The Garland Mini Pumpkin Pattern is not only decorative but also a symbol of creativity and the cozy handmade charm that defines fall crafting.
To begin your Garland Mini Pumpkin Pattern, gather your supplies. You’ll need worsted weight yarn in your chosen colors—classic orange for pumpkins, green or brown for stems, and optionally, neutral tones for variety. Acrylic yarns are popular for this project because they hold shape well, while cotton yarn provides a soft, matte finish ideal for a rustic look. You’ll also need a crochet hook (commonly size 3.5 mm to 4 mm), fiberfill stuffing, a yarn needle, and scissors.
When selecting yarn, focus on texture and color. For a traditional autumn garland, combine multiple shades of orange, from light pumpkin spice to deep burnt sienna. For a more modern design, try muted colors like terracotta, mustard, and ivory. You can even use metallic yarn for a festive shimmer during the holidays. Mixing textures—such as pairing standard acrylic with chenille or velvet yarn—adds depth and variety to your finished garland.
It’s also worth considering the weight of your yarn, as this will determine the size of your pumpkins. Thicker yarn creates larger pumpkins, while thinner yarn makes delicate miniatures. The beauty of the Garland Mini Pumpkin Pattern is that you can adjust the size to fit your vision simply by changing your yarn or hook size.
Stuffing is another key element. Fiberfill is the most common choice because it keeps the pumpkins lightweight and fluffy. However, for a more eco-friendly option, you can use leftover yarn scraps as stuffing. Just make sure the filling is evenly distributed to maintain a round, plump shape.
You’ll also need a sturdy cord or twine for assembling your garland. Jute string or cotton twine works perfectly and complements the rustic fall aesthetic. If you prefer a polished look, use a satin ribbon or crocheted chain to string your pumpkins together.
Lastly, consider adding decorative details like felt leaves, small wooden beads, or embroidered vines. These little touches enhance the charm of your Garland Mini Pumpkin Pattern and make each pumpkin uniquely yours.
Start your Garland Mini Pumpkin Pattern by crocheting a simple rectangular piece that will later be shaped into a pumpkin. Begin with a foundation chain long enough to determine the pumpkin’s width—usually between 12 to 20 stitches depending on the desired size.
Work in rows of single or half double crochet stitches to create texture. Continue crocheting until the piece forms a rectangle roughly twice as long as it is tall. This rectangle will be rolled and sewn to form the pumpkin’s body. Remember to leave a long tail of yarn at both ends for sewing.
Once your rectangle is complete, fold it in half and use your yarn needle to stitch the short sides together, forming a tube. Then, thread the yarn through one open end and pull it tight to close the bottom. Turn the piece right-side out and stuff it with fiberfill until it feels firm but still squeezable.
Next, close the top by weaving your yarn through the stitches around the open end and pulling tightly to cinch it closed. To create the pumpkin’s signature ridges, thread your needle through the center of the pumpkin from top to bottom, pull the yarn tightly, and bring it back up to create a segment. Repeat this step several times around the pumpkin to form even sections. Tie off the yarn securely at the top.
For the stem, use green or brown yarn. You can crochet a small cylinder or simply wrap yarn several times around your finger, tie it, and stitch it to the top of the pumpkin. Optionally, add a crocheted leaf or vine for extra detail.
Repeat this process to make several pumpkins in varying colors and sizes. Once you’ve completed your mini pumpkins, thread them onto your chosen string or cord, spacing them evenly. Knot the ends securely, and your Garland Mini Pumpkin Pattern project is ready to display.
The Garland Mini Pumpkin Pattern offers countless creative possibilities beyond just garlands. You can use the mini pumpkins as standalone decorations for your home, adding them to baskets, shelves, or centerpieces for an instant autumnal vibe. They make perfect table accents during Thanksgiving or fall gatherings.
If you enjoy gift wrapping, try tying one of your mini pumpkins to a package with twine or ribbon. It adds a handmade touch that recipients will adore. These little pumpkins also make charming additions to wreaths or floral arrangements, enhancing their texture and color.
Another fun use is turning your mini pumpkins into ornaments. Add a loop of yarn or ribbon to the top of each one and hang them from branches, curtain rods, or even your Christmas tree for a festive seasonal crossover.
For crafters who love personalization, try embroidering initials or small patterns onto each pumpkin. You could even sew a few together to create a pumpkin garland name banner or personalized decoration for special occasions.
The Garland Mini Pumpkin Pattern can also be used for educational or sensory activities with children. The small, soft pumpkins are safe to handle and can be used for counting games or color recognition activities.
Finally, if you’re selling handmade crafts, these mini pumpkins are ideal for markets or online shops. They’re quick to make, lightweight, and appeal to anyone who loves seasonal handmade décor. With your creativity, each piece can become a small work of art that celebrates the spirit of fall.
Achieving perfectly shaped mini pumpkins requires attention to detail. Make sure your tension remains consistent throughout your stitches to avoid uneven sides or lumpy shapes. Using a slightly smaller hook than recommended for your yarn can help the fabric stay firm and hold its structure better.
When stuffing, avoid overfilling. Too much stuffing can distort the pumpkin’s shape, while too little will make it appear flat. Aim for a plump, rounded look that still has enough give to create visible ridges.
Creating defined sections is key to the Garland Mini Pumpkin Pattern. When wrapping yarn to form the ridges, pull firmly but not too tightly—this ensures even, smooth segments without collapsing the pumpkin.
If your stitches appear loose or uneven, block the rectangles before assembling. Blocking helps even out tension and gives the fabric a smoother finish. For small projects like these, steam or pin-blocking works quickly and effectively.
Experiment with different yarn types to achieve varying effects. Cotton creates crisp stitches, while chenille or velvet adds softness and luxury. Mixing materials within one garland can give it an appealing textural contrast.
Lastly, don’t forget the finishing touches. Small details like embroidered leaves, cinnamon stick stems, or glitter accents can elevate the look of your Garland Mini Pumpkin Pattern, turning a simple project into an elegant decoration.
1. Is the Garland Mini Pumpkin Pattern beginner-friendly?
Yes! The pattern uses simple stitches, making it perfect for beginners and experienced crocheters alike.
2. What size hook should I use?
A 3.5 mm to 4 mm crochet hook works well with worsted weight yarn, but you can adjust based on your tension and yarn choice.
3. How long does it take to make one mini pumpkin?
Each pumpkin can be completed in 20–30 minutes, making it a great quick project.
4. Can I use other materials besides yarn for the stem?
Absolutely! Try using twine, felt, small twigs, or even cinnamon sticks for a rustic touch.
5. How should I store the garland?
Store it flat or loosely coiled in a box to prevent the pumpkins from being crushed. Avoid damp areas to maintain their shape.
6. Can I make the pumpkins in non-traditional colors?
Of course! White, sage, blush, and mustard are popular modern options that look beautiful in neutral or boho décor.
The Garland Mini Pumpkin Pattern is a delightful way to celebrate the beauty of autumn through handmade creativity. From choosing warm, inviting colors to assembling the perfect festive garland, each step of the process offers joy and relaxation.
Whether you use your pumpkins for decorating, gifting, or selling, this project captures the essence of fall—cozy, colorful, and full of charm. Take your time crafting each pumpkin, experiment with different yarns and textures, and enjoy the satisfaction of making something truly special.
If you loved this pattern, share your thoughts and suggestions below—your feedback helps inspire even more creative crochet ideas for the season ahead!


