
Crochet Heart Rooster Rug Pattern – The Best Techniques and Tools

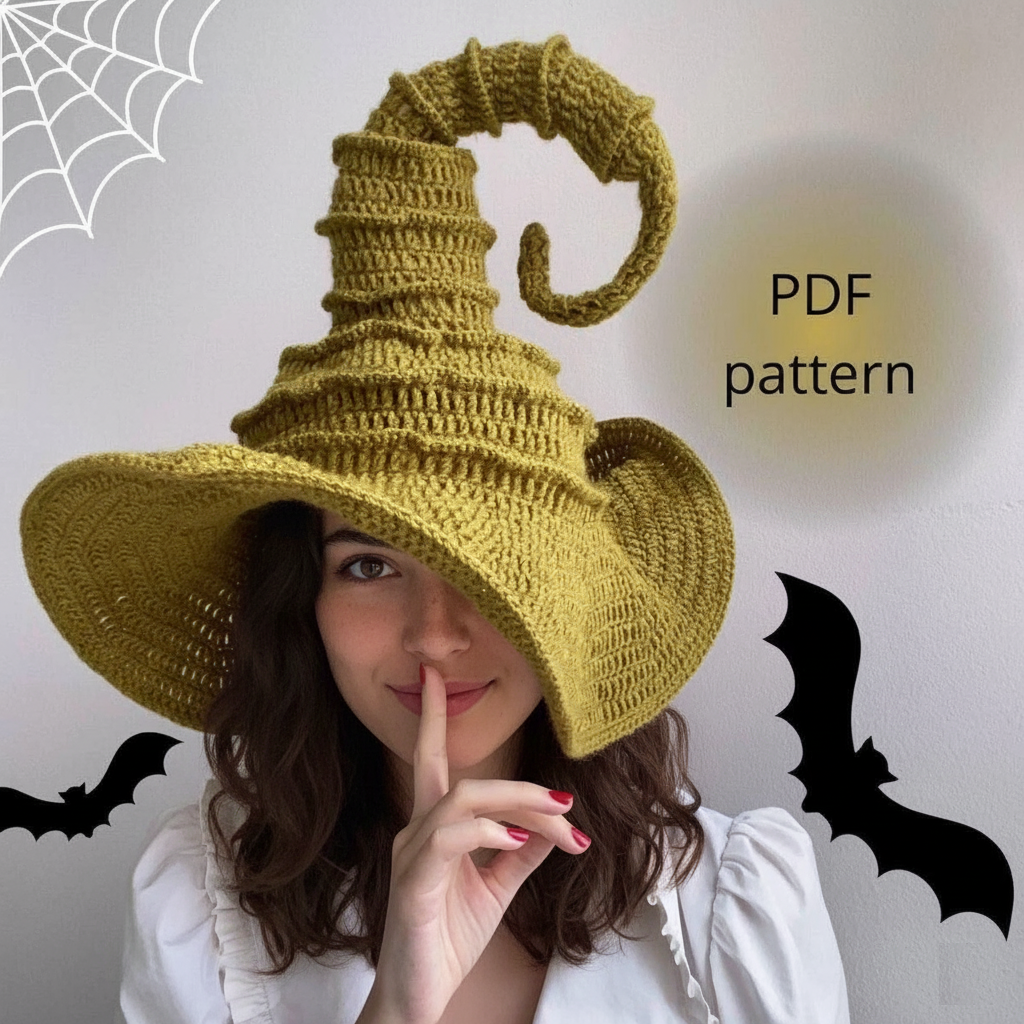
Starting a magical project like a Crochet wizard or witch hat pattern is one of the most exciting ways to combine creativity, comfort, and a touch of fantasy. Whether you want to wear it for Halloween, cosplay, themed parties, or simply as a fun accessory, this crochet idea brings out the wizardry in your craft skills.
The Crochet wizard or witch hat is more than just a costume accessory. It can also serve as a charming decorative piece, especially during festive seasons like Halloween.
This article will guide you through everything you need to know about a Crochet wizard or witch hat pattern. From materials and stitches to variations and creative uses, you’ll find tips and inspiration to make your project unique.
To create a beautiful Crochet wizard or witch hat, preparation is essential. Gathering the right materials before you start ensures your crafting experience will be smooth and enjoyable. The most important item is, of course, the yarn. For a hat that holds its shape well, many crafters choose medium to bulky weight yarn. This thickness provides both sturdiness and comfort, which are crucial for a tall and pointed hat design.
You’ll also need the right crochet hook size. Usually, a larger hook is recommended for bulky yarn, but the specific size can vary depending on your chosen yarn brand. Checking the yarn label will help guide you to the correct hook. Remember that your gauge plays a role in how firm or soft the hat will be, so testing a small swatch is always a good idea.
Other essential tools include stitch markers, a yarn needle for weaving in ends, and scissors. Stitch markers help keep track of increases and decreases, especially when shaping the cone of the hat. This makes it easier to maintain symmetry and achieve the sharp wizardly point that gives the project its iconic look.
Before beginning the Crochet wizard or witch hat pattern, it’s also helpful to choose your desired size. Some may want a small hat for decorative purposes, while others will prefer a full-size wearable version. Adjusting your pattern with different yarn weights or adding more rounds will allow you to tailor the hat exactly as you envision it.
Blocking is another preparation step worth considering. Once your hat is complete, you can block it using steam or water to help shape it perfectly. This step ensures that the point stays upright and the brim lays as flat or as wavy as you desire. Blocking transforms your crochet piece from good to great, making the finished hat look polished and professional.
Lastly, prepare your creative mindset. A Crochet wizard or witch hat is not only a craft project but also an expression of your imagination. Think about colors, embellishments, and textures that resonate with your vision. Adding stars, moons, or even a colorful band around the brim can make the hat truly one-of-a-kind.
When you start the Crochet wizard or witch hat pattern, the process usually begins with the tip of the cone. By working in rounds, you slowly increase stitches to form the pointed shape. This gradual increase is what gives the hat its distinctive look, stretching higher as you add rounds. Patience is key here, as the cone shape takes form gradually, but the result is worth the effort.
As you progress down the cone, you’ll eventually reach the base, where the brim begins. The brim can be styled in several ways depending on the look you want. A straight brim is classic and structured, while a wavy brim creates a whimsical, magical appearance. Using simple increases and stitch variations, you can adjust the brim’s size and flair to your liking.
The stitches most commonly used in this project are single crochet and double crochet. These provide the right combination of strength and flexibility, making the hat durable while still comfortable. Beginners often appreciate that the pattern relies on these basic stitches, making it accessible while still producing impressive results.
Another part of the step-by-step process involves shaping and reinforcing. If you want the hat to stand upright, consider using yarn that is firm enough or even adding a hidden wire along the brim edge. This small adjustment ensures that your hat maintains its magical form, even after frequent wear.
Personalization is a wonderful part of the Crochet wizard or witch hat pattern. During the process, you can switch yarn colors to create stripes or even add textured stitches for a more mystical appearance. Adding charms or buttons also gives the hat personality, making it uniquely yours.
Finally, once you finish crocheting, weave in all ends neatly. Try the hat on, check the fit, and make any small adjustments if necessary. This is the satisfying moment when you can admire the magical creation you’ve crafted with your own hands.
One of the best things about the Crochet wizard or witch hat is the ability to customize it in endless ways. A common variation is to play with color changes. Instead of sticking to one solid shade, alternating between black and purple stripes or using multicolored yarn can give the hat a unique look.
Some crafters also add embellishments like crocheted stars, moons, or appliqués. These small additions give the hat a mystical vibe, making it stand out even more. You can attach them with yarn or fabric glue, depending on your preference.
Texture is another exciting variation. Using popcorn stitches, bobbles, or cables can add dimension to the hat, transforming it into a more eye-catching accessory. These techniques require a little extra time, but they elevate the overall design significantly.
Another creative twist is making mini versions of the Crochet wizard or witch hat. These can serve as decorations for dolls, pets, or even as ornaments during seasonal events. Smaller versions work up quickly, making them great for gifts or festive displays.
For those who love cosplay, customizing the hat to resemble a favorite character’s style adds another layer of creativity. You can model your hat after famous wizards or witches from stories, giving your project a touch of fandom magic.
Lastly, experimenting with brims is a fun way to make each hat distinct. Some people prefer large, floppy brims for drama, while others enjoy a sharp, structured brim for a more classic wizard appearance. The Crochet wizard or witch hat pattern adapts beautifully to all these variations.
Working on a Crochet wizard or witch hat can be straightforward, but a few tips and tricks can make the process smoother and the outcome even better. One important tip is to use a stitch marker at the beginning of each round. Since the cone grows slowly with increases, it’s easy to lose track without a marker.
Another helpful trick is to adjust your tension as you go. Keeping consistent tension ensures that the hat’s shape doesn’t warp. If your stitches are too tight, the hat may curl, and if they’re too loose, it may not hold its shape. Finding the right balance is key.
Choosing the right yarn fiber can also improve the result. Cotton provides structure and durability, while acrylic is soft, affordable, and comes in a wide variety of colors. Wool blends add warmth, making the hat perfect for chilly outdoor events.
When working on the brim, try experimenting with different stitch counts before finalizing. Sometimes adding or reducing stitches can change the brim’s look from flat to wavy, depending on your creative vision.
Blocking, as mentioned earlier, is an underrated but powerful technique. Taking the time to block your finished hat ensures it keeps its magical shape. For brims, pinning them in place while blocking creates a perfectly flat or decorative curve.
Lastly, don’t hesitate to personalize. The Crochet wizard or witch hat pattern is just a foundation—you can let your creativity run wild with accessories, embroidery, or even adding a colorful ribbon around the brim.
1. Is the Crochet wizard or witch hat pattern beginner-friendly?
Yes, this project mainly uses basic stitches, making it accessible to beginners who want to try a magical and rewarding crochet project.
2. How long does it take to make a Crochet wizard or witch hat?
The time depends on the size and complexity. A simple hat may take a few hours, while more detailed versions with embellishments can take longer.
3. What yarn is best for a Crochet wizard or witch hat?
Medium to bulky weight yarns are best, as they provide structure. Acrylic, cotton, or wool blends are popular choices depending on preference.
4. Can I resize the Crochet wizard or witch hat for kids or pets?
Absolutely! By adjusting stitch counts and rounds, you can easily make smaller or larger versions suitable for children, dolls, or pets.
5. How do I keep the hat’s point from falling over?
Using sturdy yarn, consistent tension, and blocking helps. You can also insert a wire or lightweight support to keep the cone upright.
6. Can I wash my Crochet wizard or witch hat?
Yes, but always follow the yarn’s washing instructions. Most hats can be hand-washed and laid flat to dry to preserve their shape.
The Crochet wizard or witch hat pattern is a magical project that blends creativity, functionality, and fun. With the right yarn, tools, and imagination, you can create a hat that is uniquely yours, whether for wearing, decorating, or gifting.
From classic designs to whimsical variations, the possibilities are endless, making this pattern a must-try for crochet enthusiasts.
We’ve explored materials, step-by-step instructions, creative variations, and practical tips to help you succeed. Now it’s your turn to bring a little magic to your crochet hook. If you try this pattern, I’d love to hear your honest opinion and suggestions—share your thoughts and let your creativity inspire others.


