
Sunflower Bracelet Pattern

When the holiday season approaches, many crafters search for a Crochet Santa Applique Free Pattern to bring a festive touch to their projects.
Some makers prefer a classic red and white Santa, while others enjoy experimenting with playful colors like green, gold, or even sparkling yarns.
Another reason crafters love this pattern is its versatility. You can create a set of appliques to stitch onto sweaters, or make them as ornaments to hang on your Christmas tree.
When preparing for a Crochet Santa Applique Tutorial, the right materials and tools will ensure a smooth and enjoyable process. The most common yarn for this type of project is medium-weight cotton or acrylic yarn. Cotton provides a neat finish, while acrylic offers durability and a softer texture. Many crafters also use sparkly yarn for Santa’s hat brim or pompom, adding a magical festive detail.
Choosing the right hook size is also crucial. For most appliques, a 3.5 mm to 4.5 mm hook works perfectly. A smaller hook helps maintain a firm stitch, so the applique doesn’t look too loose or floppy. If you’re a beginner, starting with a slightly larger hook may help you see your stitches more clearly and improve accuracy.
Additional tools such as tapestry needles will be needed to sew in ends and attach different parts like the hat or beard. Safety eyes or small black buttons are often used to give Santa a playful expression. A pair of sharp scissors is essential for clean cuts, and stitch markers may be useful if you’re new to crocheting.
It’s also worth keeping some embroidery thread nearby for details like Santa’s smile or rosy cheeks. These small touches give character and personality to the applique, making each one unique. The great thing about this project is that it doesn’t require a lot of materials, and most of what you need is often already in a crafter’s toolkit.
Another important tip is to work in a well-lit space. Because the applique involves color changes, especially when switching between red, white, and skin-tone yarns, having good lighting helps prevent mistakes. Comfortable seating also plays a role in making the process more enjoyable, especially if you plan to make several appliques in one sitting.
Finally, remember that the beauty of a Crochet Santa Applique Free Pattern lies in creativity. Don’t be afraid to personalize your materials—whether that means adding glitter thread, experimenting with pastel shades, or using eco-friendly yarn. The tools you choose can make your applique truly one of a kind.
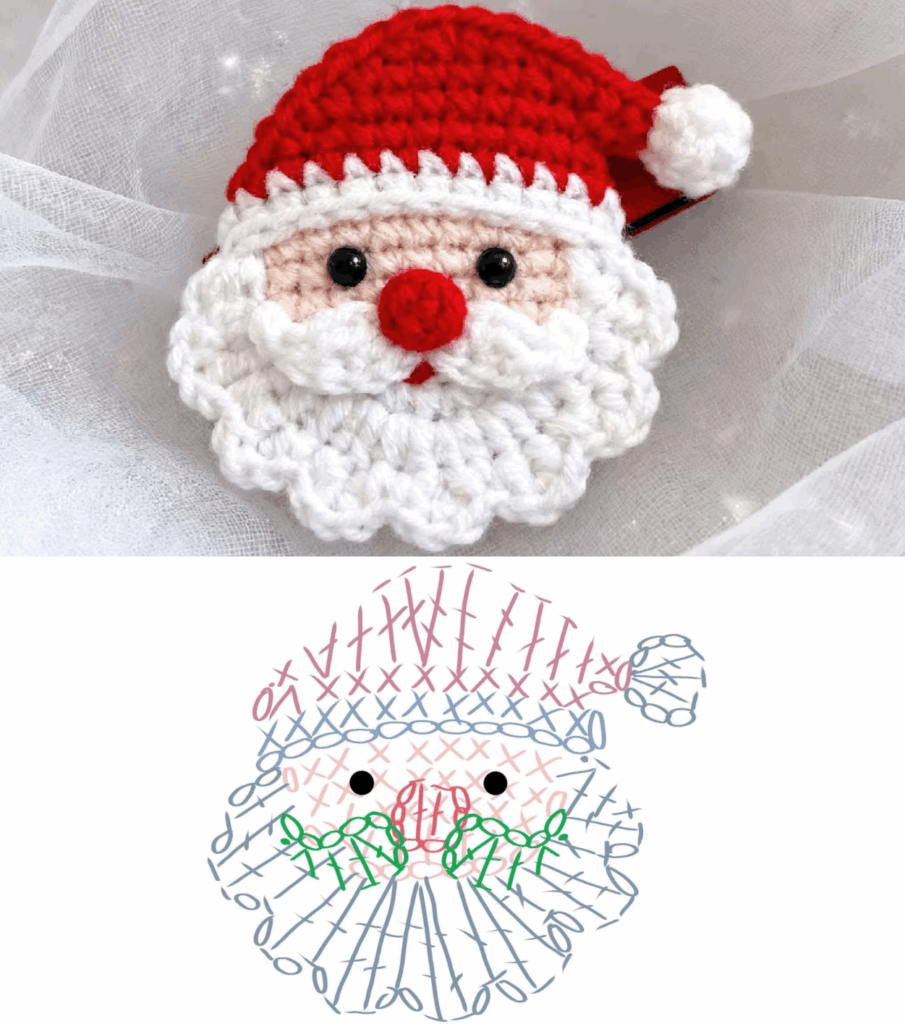
The Crochet Santa Applique Tutorial is designed to be approachable, even if you’re just starting to crochet. Begin with a magic ring to create Santa’s face. Use a light beige or skin-tone yarn and work single crochet stitches in a round. As the circle grows, this will form the base of Santa’s cheerful face. Remember to keep your tension even so the applique maintains a neat, flat shape.
Once the face is complete, you’ll move on to Santa’s hat. Switch to red yarn and start shaping a triangle that sits above the circle. This can be achieved by working rows back and forth, decreasing slightly at the edges to form the triangular shape. At the end, use white yarn to crochet a fluffy trim and a pompom. This detail instantly brings the iconic Santa look to life.
For Santa’s beard, use white yarn to create loops or scallops that outline the bottom half of the face. Many crocheters enjoy using puff stitches or shell stitches to give the beard a textured, fluffy appearance. This adds dimension and makes the applique stand out. Beginners can use simple chains and single crochets if they prefer a more straightforward approach.
Eyes and facial details complete the charm. Small safety eyes, buttons, or even embroidered stitches work well for the eyes. A simple curved line stitched with black thread makes a perfect smile, while a dab of pink yarn can give Santa rosy cheeks. These details allow you to give your applique personality, whether cheerful, playful, or classic.
Attaching all parts together requires patience but is rewarding. Use a tapestry needle to sew the hat onto the face, then attach the beard securely. Be mindful of aligning the pieces so that Santa’s features look balanced. The applique should lay flat, with no loose stitches sticking out.
After completing your first applique, practice will help refine your technique. Each time you make one, you’ll discover small adjustments that improve the overall look. That’s the beauty of following a Crochet Santa Applique Tutorial—every project becomes easier and more polished with experience.
One of the joys of finishing a Crochet Santa Applique Free Pattern is discovering the countless ways you can use it. These festive appliques are perfect as embellishments for handmade Christmas stockings. Simply sew them onto the front of a stocking, and it instantly becomes a personalized holiday treasure.
Another popular use is turning them into ornaments. Attach a small loop of yarn or ribbon at the top of the applique and hang it on your Christmas tree. This transforms a simple crochet project into a lasting keepsake that can be enjoyed year after year.
Appliques can also be added to clothing, such as sweaters or scarves, giving them a fun and seasonal touch. Children especially love wearing clothing adorned with festive designs. Since appliques are lightweight, they don’t add bulk and are comfortable to wear.
Gift wrapping is another creative idea. Instead of traditional bows, attach a crochet Santa applique to a present for a unique and handmade touch. It makes the gift even more special and shows the recipient the effort you put into it.
Table decorations can also benefit from these appliques. Use them as coasters, sew them onto placemats, or scatter them across your holiday table as festive accents. Their versatility makes them suitable for both decorative and practical purposes.
Finally, consider creating a whole set of holiday characters, with Santa as the star. Combine your crochet Santa appliques with reindeer, snowmen, and Christmas tree appliques to create a complete festive theme. This brings extra joy and variety to your holiday décor.
To make the most of your Crochet Santa Applique Tutorial, keep in mind a few practical tips. First, always check your gauge before starting. While appliques don’t require exact measurements, consistent tension ensures your Santa looks polished and not stretched or uneven.
Another key tip is managing yarn changes. Since the design involves switching between colors, weave in your ends carefully to avoid loose threads. A clean finish at the back makes the applique look professional, especially if it will be sewn onto clothing or blankets.
Avoid using yarn that is too thick, as it can make the applique bulky and less versatile. Thin to medium-weight yarn works best for small projects. Similarly, avoid overly large hooks, which can create gaps in your stitches and reduce the neatness of the design.
Patience is also essential. Many beginners rush through the process and end up with uneven shapes. Take your time with each stitch, especially when shaping the beard or hat, as these details define the look of the applique.
Blocking your applique after finishing can make a big difference. Gently steam or press it to flatten any curls, ensuring it lays perfectly flat for attaching or displaying. Skipping this step often leads to appliques that don’t sit neatly on projects.
Lastly, remember that practice makes progress. Your first applique may not look perfect, but each attempt improves your skills. Celebrate your progress and enjoy the creative journey.
What yarn is best for a Crochet Santa Applique Free Pattern?
Medium-weight cotton or acrylic yarn is recommended. Cotton gives a crisp finish, while acrylic provides softness and durability.
Can beginners follow a Crochet Santa Applique Tutorial?
Yes, this project is beginner-friendly. The stitches used are simple, and the applique is small, making it less overwhelming for new crocheters.
How long does it take to make one applique?
Most crafters can complete a Santa applique in less than two hours, depending on skill level and design details.
Can I wash items with Santa appliques attached?
Yes, but it is best to hand wash or use a gentle cycle to preserve the details and prevent stretching.
What can I do with leftover appliques?
They can be turned into ornaments, keychains, magnets, or used as decorative patches for accessories.
Do I need special tools for the project?
No special tools are required beyond a crochet hook, yarn, tapestry needle, and scissors. Optional additions like safety eyes or embroidery thread enhance the final look.
The Crochet Santa Applique Free Pattern is a joyful project that captures the spirit of the holiday season. Through this Crochet Santa Applique Tutorial, we explored materials, step-by-step instructions.
Now that you know how to create your own crochet Santa appliques, I’d love to hear from you. Share your honest opinion, experiences, or suggestions on how you’ve used this festive design.


