
Crochet Heart Rooster Rug Pattern – The Best Techniques and Tools

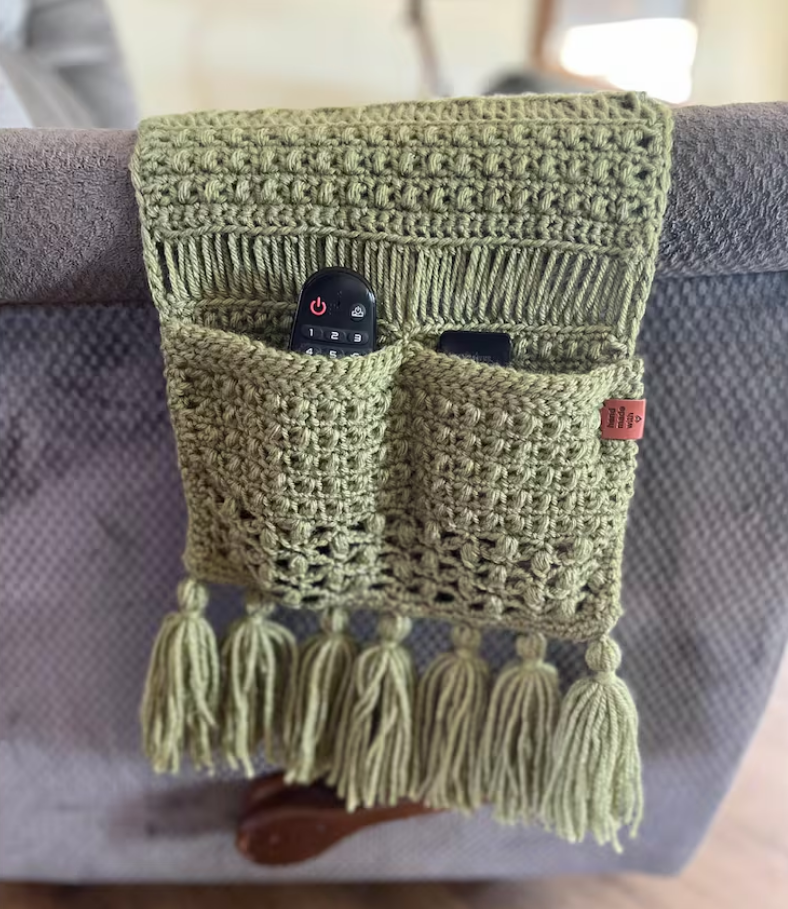
The Crochet Remote Control Caddy Pattern is an easy and practical project that combines creativity and functionality.
A handmade crochet remote control caddy not only solves the problem of misplaced remotes but also allows you to showcase your crafting skills.
Creating your own caddy is also budget-friendly. You can choose yarns, colors, and sizes according to your preferences, giving you a personalized solution that perfectly fits your sofa, chair, or coffee table.
One of the primary reasons to make a crochet remote control caddy is organization. Living rooms often become cluttered with remotes, phones, and small items scattered across tables. A caddy provides a dedicated space to keep everything neat.
A caddy is also an opportunity to add style to your space. Choosing colors that complement your furniture or matching your home’s theme can transform a simple item into a decorative accent.
Using a crochet remote control caddy encourages creativity. You can experiment with different stitch patterns, textures, and sizes, giving each caddy a unique look.
Additionally, handmade caddies are eco-friendly. By using leftover yarn or sustainable materials, you reduce waste while creating something functional.
The portability of a crochet caddy is another advantage. You can design it to hang over a sofa armrest, sit on a coffee table, or even serve as a small portable storage basket.
Finally, making your own crochet remote control caddy brings satisfaction. Each stitch represents effort and care, resulting in a piece that is both practical and sentimental.
To start your Crochet Remote Control Caddy Pattern, gather essential materials. The first is yarn. Cotton and acrylic blends are recommended because they provide durability, softness, and easy maintenance.
Next, select a crochet hook appropriate for your yarn. Medium-size hooks, such as 4.5mm to 5.5mm, usually work well for this project. Adjust the hook based on your chosen yarn thickness.
A fabric lining is optional but highly recommended. Lining helps maintain the caddy’s shape and adds extra strength to support heavier remotes or items.
You will also need scissors and a yarn needle to finish your project by cutting and weaving in ends. These basic tools are essential for any crochet work.
Optional decorative items include buttons, tassels, or pockets. Buttons can be functional or decorative, and pockets allow you to separate different remotes or small items.
Having all your tools and materials ready before starting ensures a smooth crafting process. It prevents interruptions and keeps your creative flow uninterrupted.
Start by creating the base of your crochet remote control caddy. This is typically a rectangular or square piece. Using tight stitches, such as single crochet, ensures a strong foundation.
Next, crochet the sides of the caddy. You can choose between simple straight sides or add a slight flare for a more decorative look. For durability, make the sides slightly taller than the height of your remotes.
If you want pockets, now is the time to add them. Use smaller rectangles or squares and sew or crochet them onto the sides. This allows you to separate different types of remotes or small devices.
Joining the base, sides, and pockets is done with slip stitches or single crochet seams. Ensure the stitches are tight and even for a neat, sturdy finish.
For extra reinforcement, consider making a double-layered base or inserting a stiff fabric inside. This prevents sagging and ensures the caddy maintains its shape over time.
Finally, add decorative touches. This may include a crocheted border, textured stitches, tassels, or small buttons. The decorations make your crochet remote control caddy unique and tailored to your style.
One of the joys of a crochet remote control caddy is customization. Choose yarn colors that match or contrast with your living room furniture to create an eye-catching accessory.
You can experiment with stitch patterns such as shells, popcorn, or basketweave for texture. A mix of textures enhances both the aesthetic and tactile experience of your caddy.
Consider creating multiple caddies for different rooms. Place one on your nightstand for small gadgets, another in the living room for remotes, and even one in the office for stationery.
Maintenance is simple. Most yarns used in crochet caddies are washable. Hand wash or use a gentle machine cycle to keep your caddy looking fresh and clean.
Gifting a handmade crochet remote control caddy is another great idea. Friends and family will appreciate a practical, handcrafted item that adds both charm and function to their home.
Think about the layout. If the caddy is for a couch armrest, make it compact yet deep enough to hold several items. If it sits on a table, consider a wider design for more storage.
Using basic stitches like single crochet, half double crochet, and double crochet is sufficient for creating a crochet remote control caddy. These stitches are strong, easy to work with, and beginner-friendly.
Slip stitches are useful for joining edges and creating clean seams. They also help maintain the caddy’s shape when attaching sides to the base.
For added texture, you can experiment with stitches like bobble stitch, popcorn stitch, or shell stitch. These stitches make your caddy visually interesting while keeping it functional.
Increasing and decreasing stitches allow you to create flared or tapered designs. This is helpful if you want a caddy that hugs the armrest or has pockets of varying sizes.
Color changes can create stripes or patterns, adding personality to your crochet remote control caddy. Plan color sequences before starting to ensure a cohesive look.
Finishing techniques like weaving in ends neatly and blocking the caddy will give your project a professional and polished appearance.
What yarn is best for a crochet remote control caddy?
Durable cotton or acrylic yarns are recommended for strength and easy cleaning.
Can beginners make a crochet remote control caddy?
Yes, this project is ideal for beginners and only uses basic stitches.
How long does it take to complete?
Depending on size and complexity, 3–6 hours for a small to medium caddy.
Do I need to line the caddy?
A lining is optional but recommended for additional stability and structure.
Can it be machine washed?
Most cotton and acrylic yarns can be hand washed or machine washed on gentle cycles.
Can the caddy hold other items besides remotes?
Yes, it can store glasses, phones, small notebooks, or any household items.
Can I add decorative features?
Absolutely. Tassels, buttons, textured stitches, and color patterns make your caddy unique.
What is the best size for a crochet remote control caddy?
A medium size is ideal, roughly 8×10 inches for the base with sides 6–8 inches tall, adjustable to fit your remotes.
Is this project suitable for gifting?
Yes, handmade caddies make thoughtful, functional gifts for any occasion.
The Crochet Remote Control Caddy Pattern is a simple yet highly rewarding project. It combines functionality, creativity, and the satisfaction of handmade work.
From choosing the yarn and stitch patterns to adding decorative touches, this project allows for complete customization. Remember to consider the intended use and size for maximum efficiency.
With the tips, techniques, and FAQ provided, you are now ready to make your own crochet remote control caddy.


