
Crochet Heart Rooster Rug Pattern – The Best Techniques and Tools

Crochet Pumpkin Keychain Free Pattern is a delightful project that allows crafters to create a small, festive accessory perfect for autumn and Halloween.
The appeal of a crochet pumpkin keychain free pattern lies in its simplicity and versatility. Unlike larger crochet projects, this keychain can be completed in just a few hours, making it an ideal gift or personal accessory.
You can use a variety of yarn colors, from classic orange with green stems to creative alternatives like white, yellow, or even pastel shades for a whimsical touch.
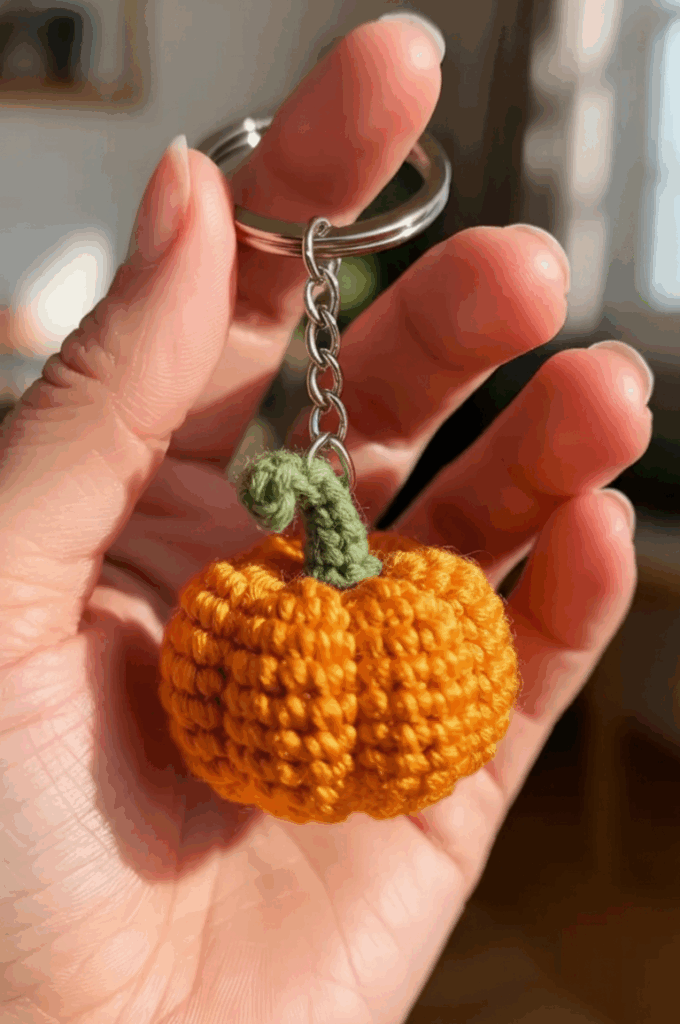
The compact size makes it easy to carry around, and its handmade charm makes it a conversation starter wherever you go.
Beyond its decorative purpose, a crochet pumpkin keychain free pattern also serves as an excellent way to practice essential crochet skills. Techniques like single crochet, increasing, and decreasing stitches are commonly used, making this project both fun and educational. Creating small items like keychains is perfect for honing your stitch consistency and tension, while also allowing for creative customization in color, texture, and embellishments.
Before starting your crochet pumpkin keychain free pattern, it is important to gather all necessary materials. For the body of the pumpkin, worsted weight yarn in classic orange is recommended. For the stem, green yarn adds a realistic touch, though you can experiment with other colors if desired. Small amounts of brown or beige yarn can also be used for detailing.
You will need a crochet hook appropriate for the yarn weight, typically a 3.5mm to 4mm hook. A keyring or lobster clasp is essential for transforming your pumpkin into a functional keychain. Additional tools include a yarn needle for sewing parts together, scissors, and stitch markers if needed.
Stuffing is required to give your pumpkin its round, plump shape. Polyester fiberfill is ideal, as it is lightweight and easy to work with. Make sure not to overstuff, as this could distort the shape of your pumpkin and make it difficult to attach to the keyring.
Optional embellishments such as small beads, embroidery thread, or tiny felt leaves can enhance the final look of your pumpkin. These details help give the keychain a professional and polished appearance, adding charm and personality to your finished piece.
Having all materials ready ensures a smooth crocheting experience. Proper preparation prevents interruptions and makes it easier to follow each step of the crochet pumpkin keychain free pattern accurately and efficiently.
To begin the crochet pumpkin keychain free pattern, start with a magic ring. This technique creates a tight, neat center for the pumpkin. Work single crochet stitches into the ring, gradually increasing the stitch count with each round to form the base of the pumpkin.
Once the base reaches your desired width, continue crocheting in rounds without increasing. This forms the sides of the pumpkin. Maintaining even tension is key to achieving a uniform, round shape. Regularly check your work to ensure symmetry and consistent stitch size.
When the pumpkin body is almost complete, add stuffing gradually. This helps maintain the shape and prevents lumps. Continue crocheting until the pumpkin reaches the desired height, then close the top using decreases to create a neat, rounded finish.
For the stem, use green yarn and crochet a small cylinder. Attach the stem securely to the top of the pumpkin using a yarn needle. Ensure it is centered and stable, as this is the point where the keyring will attach.
Finally, attach the keyring or lobster clasp. Use sturdy yarn or thread to loop it through the stem securely. Optionally, you can add small embellishments like a crocheted leaf, bead, or embroidery for extra detail.
Completing these steps results in a cute, functional crochet pumpkin keychain free pattern that embodies the essence of autumn in a small, handmade accessory.
A crochet pumpkin keychain free pattern can be easily customized to match your personal style or seasonal theme. Changing the yarn color is the simplest way to create unique pumpkins. White pumpkins evoke a Halloween or fall decoration vibe, while pastel colors are perfect for whimsical or modern designs.
Texture variations can also make your keychain stand out. Using different stitches, such as bobble stitches for a ridged effect, gives your pumpkin added dimension and a more realistic look. Alternating yarn textures like smooth and fuzzy can also create a fun tactile experience.
Adding faces or embellishments transforms your pumpkin into a fun character. Small embroidered eyes, a smile, or tiny felt details can turn your pumpkin keychain into a Halloween-themed accessory. Tiny beads or buttons can also serve as decorative seeds or features.
Another variation is creating mini pumpkin sets with different sizes. You can make a collection of keychains or even attach multiple pumpkins to a single ring for a playful cluster effect. This is perfect for gifts or seasonal décor for bags and backpacks.
For a more functional twist, crochet a tiny pouch inside the pumpkin to hold coins or small items. This adds practicality to the cute design and enhances its appeal as a gift item.
The crochet pumpkin keychain free pattern is highly adaptable, allowing you to create a variety of styles that suit your needs while maintaining the cozy, autumnal charm that makes it special.
If you are new to crochet, a crochet pumpkin keychain free pattern is an ideal project to start with. Its small size and simple construction make it less intimidating while providing excellent practice for basic stitches and techniques like single crochet, increasing, and decreasing.
Start with a medium-weight yarn and a compatible hook, as this combination is easier to manage. Avoid overly thick or fuzzy yarn, which can obscure stitches and make it difficult to follow the pattern accurately.
Take your time with stuffing and shaping. Overstuffing can distort the pumpkin, while understuffing may result in a floppy, unsatisfactory shape. Gradually add fiberfill and check the form as you work.
Practice sewing the stem securely to the pumpkin. This ensures that your keychain is durable and functional. Using a sturdy thread and reinforcing stitches will help your pumpkin withstand regular use.
Don’t worry about small imperfections. Handcrafted items are unique, and slight variations add to the charm. Enjoy the process and celebrate each finished keychain as a creative accomplishment.
With patience and attention to detail, a beginner can successfully complete a crochet pumpkin keychain free pattern, resulting in a cute, functional, and festive accessory.
What yarn is best for a crochet pumpkin keychain?
Medium-weight acrylic or cotton yarn works best for durability and ease of use.
Can beginners make this pumpkin keychain?
Yes, it is beginner-friendly, using basic stitches and small-scale construction.
How do I attach the keyring?
Securely loop the keyring through the stem using yarn or thread, ensuring it is firmly attached.
Should I stuff the pumpkin?
Yes, stuffing gives the pumpkin a plump, rounded shape, making it look realistic and sturdy.
Can I customize the color of the pumpkin?
Absolutely. Orange is traditional, but white, yellow, and pastel colors are fun alternatives.
How long does it take to make a pumpkin keychain?
Typically, 1–2 hours, depending on skill level and the amount of detailing added.
A crochet pumpkin keychain free pattern is a fun and practical project that brings the warmth and charm of autumn into a small, handmade accessory.
From selecting materials to creating variations, this project is suitable for crocheters of all levels and offers endless opportunities for personalization.
Each keychain reflects creativity and seasonal spirit, making it a perfect gift or personal keepsake. If you found this guide helpful, share your honest feedback and suggestions for future patterns.


