
Crochet Heart Rooster Rug Pattern – The Best Techniques and Tools

Creating crochet pumpkin baby booties free pattern is one of the most adorable ways to celebrate autumn and welcome new little ones.
These charming booties combine the warmth of crochet with the festive spirit of pumpkins, making them perfect for fall-themed baby showers or Halloween.
Learning to make pumpkin baby booties is not only a delightful craft project but also a practical skill for anyone who loves crocheting gifts for babies.
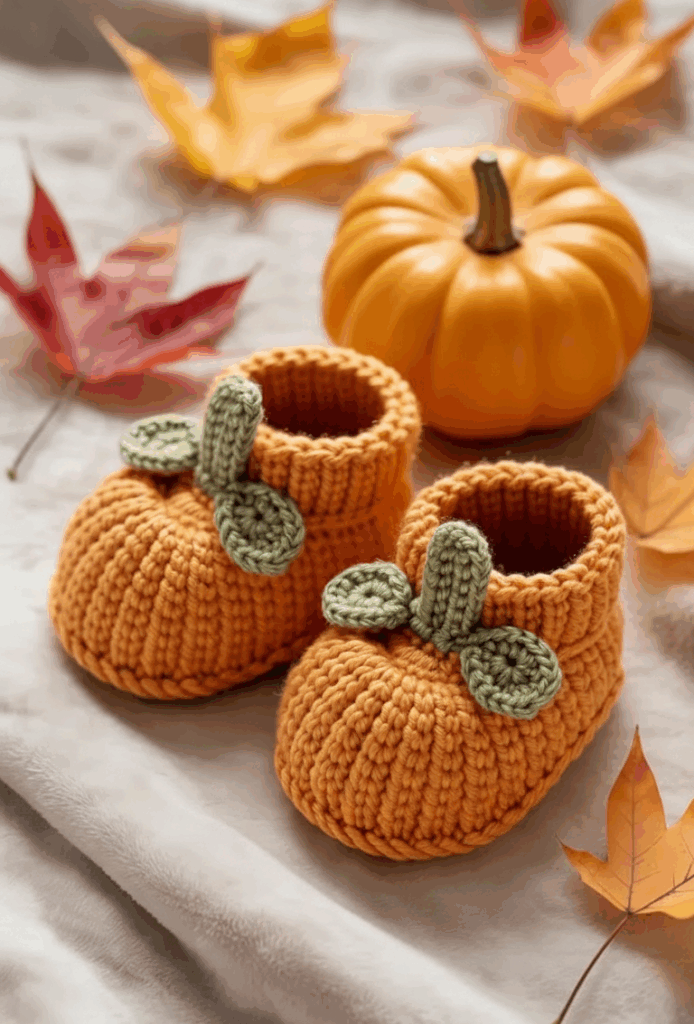
Crocheting a pumpkin baby booties free pattern is beginner-friendly, yet it offers a lot of room for creativity. You can experiment with different shades of orange, green, and even yellow to create unique pumpkin designs.
The pattern also allows customization, from adding little stems on top to creating matching hats or mittens. By following a structured step-by-step approach, anyone can turn simple yarn into a cute pumpkin-themed accessory that’s ready to wear or gift.
These crochet pumpkin baby booties are more than just decorative—they’re functional, soft, and gentle on baby skin. Choosing the right yarn and hook size ensures comfort while maintaining a sturdy structure. Plus, making a pair yourself adds a personal touch that store-bought items rarely offer. This article will guide you through everything you need to know to crochet your own pumpkin baby booties, from materials to finishing touches, making the process enjoyable and stress-free.
Before starting the crochet pumpkin baby booties free pattern, it’s important to gather the right materials. You will need soft baby yarn in pumpkin orange, green for the stem, and optionally brown for detailing. Cotton or acrylic blends work well because they’re soft, durable, and easy to care for, which is perfect for baby items.
Choose a crochet hook appropriate for your yarn. Typically, a 3.5mm to 4mm hook works best for baby booties, providing a snug yet flexible stitch. Make sure you maintain consistent tension throughout the project so that your booties have a smooth, even texture.
Other essential tools include scissors, stitch markers, and a yarn needle. Stitch markers are particularly useful for keeping track of rounds, which helps maintain the pumpkin shape. A yarn needle will be needed for weaving in ends and finishing off details like the stem.
Optional materials for embellishments include buttons, ribbons, or tiny leaves made of felt. While not necessary, these details can enhance the overall pumpkin aesthetic. If you plan to gift the booties, consider adding a small decorative tag or matching accessory for an extra touch of charm.
Lastly, set up a comfortable workspace with good lighting. Crocheting small items like baby booties requires precision, and having a tidy, well-lit area helps reduce mistakes and makes the process more enjoyable.
Learning how to crochet pumpkin baby booties is easier than it looks when you break it down into simple steps. Begin by creating the sole of the bootie using the orange yarn. Chain the required number of stitches according to your desired size, then work single crochets back and forth to form an oval base. This ensures a comfortable fit for tiny feet.
Once the sole is complete, start building the sides by crocheting in rounds. Increase stitches evenly to shape the pumpkin body. The goal is to create a slightly rounded structure that mimics a pumpkin’s shape while maintaining enough room for the baby’s foot.
After forming the pumpkin shape, switch to green yarn to create the little stem on top. This can be done by crocheting a short tube of single crochets, which is then attached securely to the bootie. Some patterns also suggest adding small ridges around the orange body to simulate the pumpkin’s natural texture.
Pay attention to finishing details. Weave in all loose ends neatly using a yarn needle. Optionally, sew tiny leaves or buttons around the stem for extra cuteness. These finishing touches make the crochet pumpkin baby booties free pattern look professional and adorable.
Finally, try on the booties or compare them to a baby’s foot to ensure proper sizing. Adjust the number of stitches or rounds if necessary. With practice, you’ll find it easy to customize your pumpkin booties for different sizes and styles.
One of the joys of following a crochet pumpkin baby booties free pattern is the freedom to experiment with creative variations. You can try using variegated yarns for a multicolor pumpkin effect, adding texture by crocheting ridges or bumps, or even incorporating a small face to create a pumpkin character for Halloween.
Another popular variation is combining the booties with a matching pumpkin hat or mittens. This creates a complete baby outfit that’s perfect for photography sessions, holidays, or themed celebrations. Coordinating colors and textures ensures that the set looks cohesive and stylish.
For a playful twist, consider using soft pastel shades instead of traditional pumpkin colors. Light peach, mint green, or buttery yellow gives the booties a whimsical and modern appearance, while still maintaining the pumpkin-inspired design. This approach works well for gender-neutral gifts.
Some crafters like to add tiny embellishments like embroidered leaves, tiny bows, or crochet acorns. These details enhance the visual appeal without compromising comfort. Keep the design simple for everyday use, or go all out for special occasions.
Adjusting the size of the booties is another creative option. You can make mini booties for newborns or slightly larger ones for older babies. Scaling the pumpkin design while maintaining proportion ensures that the aesthetic remains charming and functional.
Finally, experiment with stitch patterns. While the basic single crochet works well, adding puff stitches, bobbles, or half-double crochets can create a unique texture that makes your pumpkin booties stand out.
Even experienced crocheters benefit from tips when creating crochet pumpkin baby booties free pattern. Start by checking your tension consistently. Uneven tension can distort the pumpkin shape, making the booties look sloppy or uncomfortable. Use stitch markers to track increases and decreases, especially when shaping the sides.
Choosing high-quality, baby-friendly yarn is crucial. Babies have sensitive skin, so soft, hypoallergenic yarns prevent irritation while maintaining structure. Washable yarns are recommended since booties will likely need frequent cleaning.
When attaching the stem, make sure it’s secure. Babies tend to pull on loose parts, so using tight stitches or sewing the stem firmly ensures durability. Optional decorative elements like leaves or buttons should also be securely fastened.
Blocking is optional but can help your pumpkin booties maintain their shape. Lightly dampen the booties and shape them with your hands, letting them dry flat. This ensures a professional finish and enhances the pumpkin design.
Practice makes perfect. Your first pair may not look flawless, but each attempt improves your technique. Experiment with color combinations, stitch types, and size adjustments until you achieve the desired look.
Finally, enjoy the process. Crocheting pumpkin baby booties is as much about creativity and relaxation as it is about crafting. Celebrate the small achievements and have fun experimenting with different designs and textures.
1. Are pumpkin baby booties suitable for beginners?
Yes! The crochet pumpkin baby booties free pattern uses basic stitches, making it beginner-friendly. Beginners can follow the step-by-step instructions easily.
2. What yarn type is best for baby booties?
Soft cotton or acrylic yarn is ideal. These fibers are gentle on baby skin, durable, and easy to care for.
3. How do I adjust the size?
Increase or decrease the number of chains in the sole and adjust rounds accordingly. Always check the size against a baby’s foot.
4. Can I make a matching hat or mittens?
Absolutely! Many crafters create sets using the same pumpkin design, which makes adorable gifts.
5. How do I attach the stem securely?
Use tight stitches or sew the stem firmly to the top of the bootie. Ensure all embellishments are secure to prevent choking hazards.
6. Can I wash these booties?
Yes, choose washable yarns and follow the care instructions. Most acrylic and cotton blends can be gently machine washed or hand washed.
Learning how to crochet pumpkin baby booties free pattern is a rewarding and fun experience for both beginners and experienced crocheters.
These charming booties are perfect for fall, Halloween, or as a special gift for a newborn. With the right materials, careful attention to detail, and a little creativity, you can create cozy, stylish, and utterly adorable pumpkin-inspired footwear for babies.
Now that you know the materials, step-by-step instructions, variations, and tips, it’s your turn to craft a pair of pumpkin baby booties. Experiment with colors, textures, and sizes to make each pair unique.
Don’t forget to leave your honest opinion and suggestions—your feedback can inspire others and improve your own future projects!


