
Crochet Heart Rooster Rug Pattern – The Best Techniques and Tools

If you’ve been searching for a friendly, detailed, and beginner-safe tutorial on a Crochet Heart Key Pattern, you’re in the right place.
Why a Crochet Heart Key Pattern? It’s compact, takes very little yarn, and offers instant gratification—often in under an hour when you get the hang of it.
This tutorial keeps everything Adsense-friendly, practical, and fun. We’ll emphasize clarity, repeatable results, and good finishing techniques that make your Crochet Heart Key Pattern look polished rather than “homemade”.
To start your Crochet Heart Key Pattern, gather medium-weight (category 4) cotton yarn. Cotton is a star here because it holds shape, resists fuzz, and keeps stitches defined, which makes the heart crisp and durable on a keyring. If you prefer a softer, plush look, try velvet or chenille yarn, but note that those fibers can hide stitch definition and slightly change the size of your heart.
Choose a hook that matches your yarn—commonly 4.0–4.5 mm for worsted cotton. Use a slightly smaller hook than the label suggests to create a tight fabric that won’t leak stuffing. Tight stitches are essential for amigurumi-style pieces like a Crochet Heart Key Pattern, especially if you plan to stuff the heart.
You’ll also want fiberfill stuffing, a yarn needle for seaming and weaving ends, and small scissors. For hardware, pick a split key ring plus a short chain and jump ring, or a swivel lobster clasp if you want to clip your Crochet Heart Key Pattern to a bag. Pliers make opening jump rings much easier and safer.
Gauge isn’t fussy for this project, but consistency matters. Work a quick swatch in single crochet (sc) to check your tension. If you can’t keep stuffing from peeking through, drop your hook size. A well-stuffed, tight-stitched heart won’t deform as you use your keys, which is essential for a professional finish on any Crochet Heart Key Pattern.
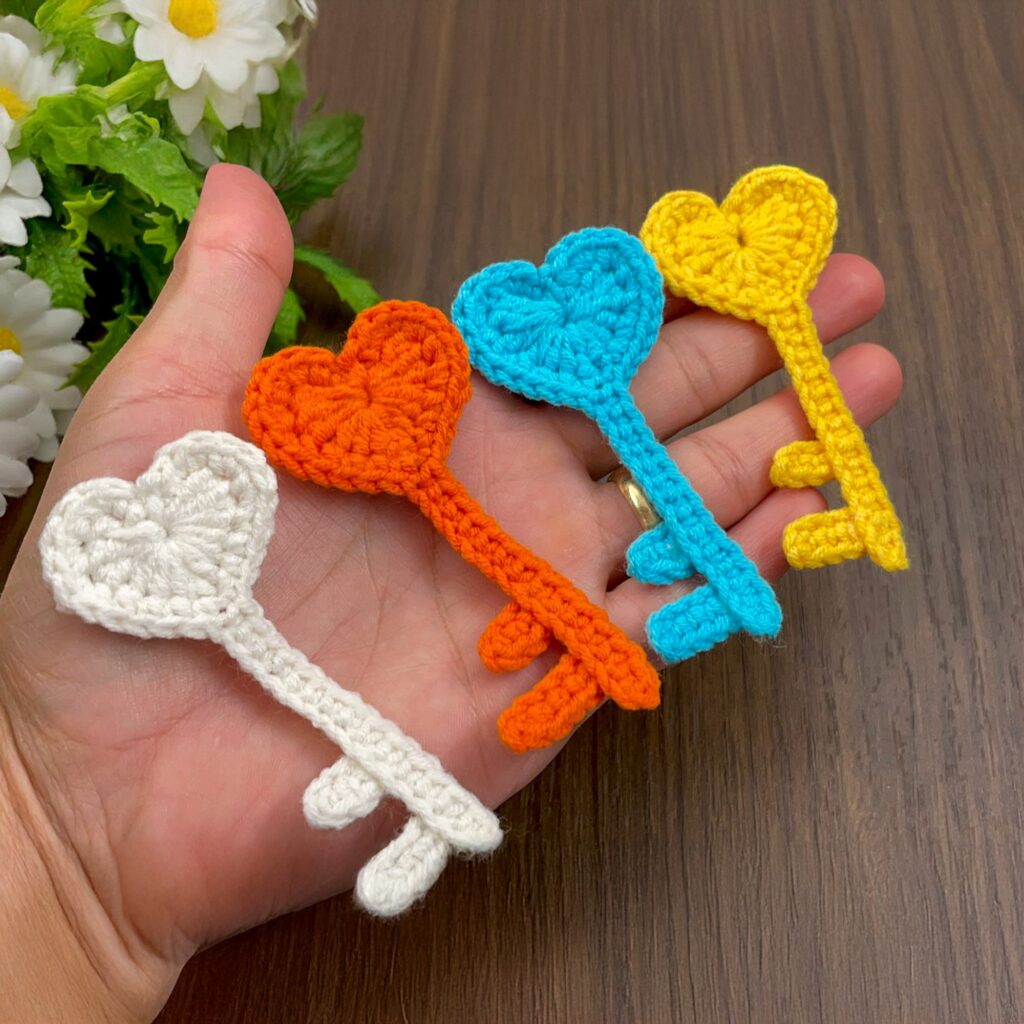
Color strategy matters for aesthetics and SEO imagery. Solid brights pop in photos, while neutrals look premium and giftable. Consider seasonal palettes—reds and pinks for Valentine’s Day, pastels for spring, jewel tones for winter. When you show multiple colorways, shoppers can easily visualize a Crochet Heart Key Pattern that matches their style.
Safety and durability count. If the heart is for kids, avoid small detachable charms. Weave ends securely and triple-check the jump ring connection to the heart. A strong and neat Crochet Heart Key Pattern not only looks good but withstands daily wear from bags, pockets, and the bottom of a tote.
Begin with two identical heart panels, then seam and stuff—or work a continuous 3D heart in the round if you prefer. For a quick, flat-ish heart suitable for keychains, two panels offer crisp edges. Either way, the foundation is simple stitches, making this Crochet Heart Key Pattern approachable for new crocheters.
Start with a magic ring (or chain 2 and work into the first chain) and crochet a small circle base using single crochet increases. For example, Round 1: 6 sc in magic ring. Round 2: 2 sc in each stitch around (12). Round 3: 1 sc, inc repeat (18). A dense circle sets the stage for symmetrical heart shaping that’s central to a tidy Crochet Heart Key Pattern.
To create the heart’s lobes, you’ll split the stitch count into two domes at the top. Work a half-round over half the stitches, turn, and shape with decreases at the outer edges. Then repeat for the second lobe. Keep count carefully—mirroring is key to a balanced Crochet Heart Key Pattern. If you’re a visual learner, sketch the stitch counts on paper before you start.
For a plumper 3D version worked in one piece, think of the heart as two small spheres merging and tapering to a point. Crochet two small domes in the round, join them, then continue decreasing evenly on both sides to sculpt the point. This creates a seamless Crochet Heart Key Pattern with no side seam, perfect for a more “amigurumi” look.
When your first panel or 3D half is done, check edges. Unevenness often comes from inconsistent tension when turning at the lobe tops. Blocking a flat panel lightly with steam (for cotton only) can even stitches before assembly. Crisp edges help the Crochet Heart Key Pattern look refined and store-ready.
Finally, make a second identical panel if you’re using the two-panel method. Stack them with right sides out, then single crochet around to join, inserting small tufts of stuffing as you go. Add extra stuffing near the lobes and point to keep the shape symmetrical. A firmly stuffed heart elevates any Crochet Heart Key Pattern from “cute” to “oh wow, where did you get that?”
Decide how to attach hardware. The neatest option is an integrated hanging loop at the top center between the lobes. Before closing the last stitches of your Crochet Heart Key Pattern, chain 6–10, slip stitch to anchor, and fasten off. This loop will receive a jump ring without distorting the fabric.
If you forgot to add a loop, no worries—stitch a tiny tab. Chain 6, work a row or two of single crochet to make a firm strip, then sew it securely between the lobes. A small tab distributes stress better than piercing stitches directly, preserving your Crochet Heart Key Pattern over time.
Use pliers to open a jump ring sideways (not prying it apart front-to-back), slip it through the loop or tab, add a short chain if desired, and attach to a split ring or swivel clasp. Close the jump ring by twisting back until the ends meet. Clean hardware connections are part of a premium Crochet Heart Key Pattern experience.
Weave in ends meticulously. Feed the tail through several stitch paths, alternating directions to lock it. Trim only when you’re sure the end won’t pop out. Good finishing transforms a decent Crochet Heart Key Pattern into a product you’re proud to gift or sell.
Consider embellishments sparingly. Tiny embroidery (a smile, initials, or a date) personalizes your heart. A surface slip stitch can outline the lobes for definition. Just keep add-ons flat so they won’t snag in a pocket. Minimalist embellishment lets the Crochet Heart Key Pattern shine while staying functional.
Before calling it done, perform a stress test: tug gently on the hardware, squeeze the heart to check stuffing distribution, and ensure the point is sharp and the lobes are even. These checks take seconds and ensure your Crochet Heart Key Pattern holds up in the real world.
Mini size is great for zipper pulls. Use sport or DK yarn with a 3.0–3.5 mm hook, keep stuffing minimal, and reduce your base increases. The smaller footprint makes a dainty Crochet Heart Key Pattern that complements wallets or cosmetic bags.
Go plush with bulky yarn. A chenille or velvet fiber and a 5.0–6.0 mm hook yields a squishier, larger heart. Because the fabric is thicker, work tighter than usual and insert more stuffing to prevent dents. This version turns your Crochet Heart Key Pattern into a soft charm for backpacks.
Try color blocking: make the lobes in one color and the body in another by changing yarn after the lobe section. Or use stripes every two rows for a candy-inspired effect. High-contrast colorwork photographs beautifully and makes your Crochet Heart Key Pattern stand out in product listings.
Add texture with stitches. While single crochet is classic, you can sprinkle half double crochets or a few puff stitches for a quilted feel. Keep textures balanced so the heart’s outline remains clear—shape clarity is crucial for a recognizable Crochet Heart Key Pattern.
Personalize with monograms. Chain a slim cord and stitch it in place as a letter, or embroider with satin stitches. Couples’ initials, team letters, or short words like “JOY” transform a basic Crochet Heart Key Pattern into a custom gift for holidays and weddings.
Level-up finishing: block cotton hearts lightly with steam to relax uneven edges (avoid steaming acrylic directly). Use invisible decrease techniques to prevent gaps on the taper. The cleaner your decreases, the higher-end your Crochet Heart Key Pattern appears in photos and in person.
If you plan to sell, track your time and materials. Hearts are quick, but factor in assembly and hardware. Pricing fairly supports your craft and communicates value. Display multiple colorways together so buyers can pick a Crochet Heart Key Pattern that matches their mood or bag.
Use descriptive product titles and meta descriptions. Include the main keyword—Crochet Heart Key Pattern—once in the title and naturally in the first sentence of your listing or post. Add secondary descriptors like “beginner friendly,” “quick gift,” or “amigurumi-style heart keychain” to improve discoverability without keyword stuffing.
Photograph in natural light with a clean background. Show the keychain on a neutral surface and in action clipped to keys or a tote. Close-ups should reveal neat stitches and secure hardware—visual proof that your Crochet Heart Key Pattern is well made.
Write scannable descriptions. Break details into short paragraphs with benefits up front: “soft but sturdy cotton,” “no stuffing leaks,” “gift-ready.” Mention care instructions—wipe with a damp cloth, avoid machine washing if hardware is attached. Clear copy builds trust around your Crochet Heart Key Pattern.
Respect pattern designers. If you adapt techniques from others, credit appropriately and avoid sharing paid instructions. Offer your own tips, sizing tweaks, and photography but keep the core ethical. Community goodwill helps everyone’s Crochet Heart Key Pattern offerings thrive.
Encourage engagement. Ask customers or readers to share their color choices and uses. More comments and photos boost social proof and inspire others to try the Crochet Heart Key Pattern themselves. This natural interaction supports both community and visibility.
What size hook is best for a Crochet Heart Key Pattern?
Use a hook slightly smaller than your yarn label suggests—often 4.0–4.5 mm for worsted cotton. Tighter stitches prevent stuffing from showing and keep the heart firm on a keyring, which is ideal for a Crochet Heart Key Pattern.
Can beginners make a Crochet Heart Key Pattern?
Absolutely. The project uses basic stitches (mostly single crochet, increases, and decreases). Start with two flat panels you seam together; it’s forgiving and produces a clean Crochet Heart Key Pattern without advanced shaping.
How do I keep the heart symmetrical?
Count stitches carefully, especially around the lobes. Mirror your decreases on both sides and pause to compare shapes before joining. Light blocking for cotton helps even edges on any Crochet Heart Key Pattern.
What yarn works best—cotton or acrylic?
Cotton holds shape, resists fuzz, and shows crisp stitches, making it great for daily-use keychains. Acrylic is softer and lighter but may pill sooner. Choose based on the look and durability you want for your Crochet Heart Key Pattern.
How do I attach the key ring securely?
Create a crocheted loop or tab between the lobes, then use a jump ring (opened sideways with pliers) to connect hardware. Avoid piercing random stitches; a dedicated loop preserves fabric strength on your Crochet Heart Key Pattern.
Why is stuffing showing through my stitches?
Your tension may be loose or your hook too large. Drop down a hook size and stuff gradually. Push small tufts into corners—the point and lobes—so your Crochet Heart Key Pattern stays smooth.
Can I make a mini version for zipper pulls?
Yes. Switch to DK or sport yarn with a 3.0–3.5 mm hook, reduce base increases, and keep stuffing light. Minis are adorable and functional variants of the Crochet Heart Key Pattern.
How do I add initials or tiny designs?
Embroider letters after assembly or surface-stitch a chain into place. Keep embellishments flat so they won’t snag in pockets. Personalized details elevate your Crochet Heart Key Pattern gifts and listings.
Is there a no-sew option?
Try a 3D heart worked in one continuous piece: two small domes joined and tapered to a point. This seamless Crochet Heart Key Pattern reduces finishing steps and looks ultra-polished.
What if my heart looks lopsided after seaming?
Gently adjust stuffing, focusing on the thinner side. If needed, add a subtle corrective stitch along the edge to nudge the outline. With practice, every Crochet Heart Key Pattern becomes more consistent.
You now have everything you need to make a polished, gift-worthy Crochet Heart Key Pattern—from choosing yarn and tools to shaping, assembling, and finishing like a pro.
We covered sizing, texture options, color ideas, hardware attachment, and practical SEO-minded tips for photographing and describing your makes.


