
Crochet Heart Rooster Rug Pattern – The Best Techniques and Tools

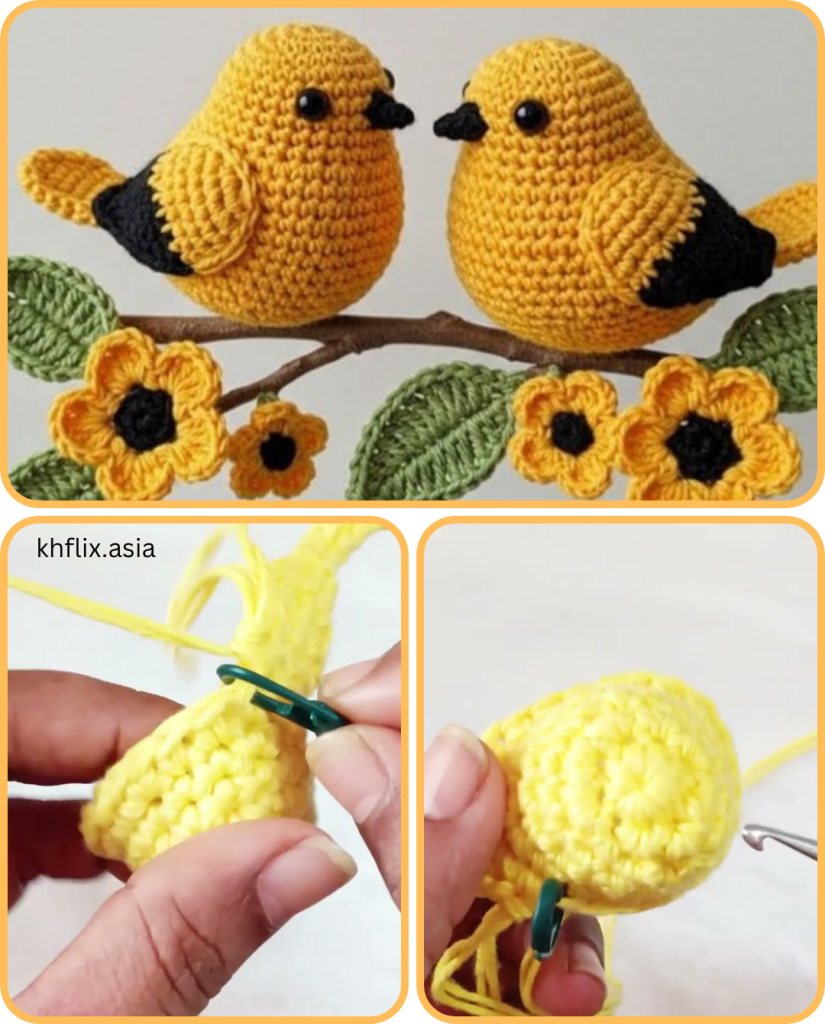
Crochet a Beautiful Sparrow Free Pattern is the perfect project if you want a charming, nature-inspired amigurumi that looks intricate yet remains friendly for confident beginners.
Many makers fall in love with bird amigurumi because they merge approachable techniques with eye-catching results.
To keep things organized and SEO-friendly, this article is structured with clear steps, practical checklists, and miniature “skill boosts” that reinforce key ideas.
When you begin Crochet a Beautiful Sparrow Free Pattern, gather smooth, non-fuzzy yarns so the bird’s features remain crisp and defined. Cotton and cotton-blend sport-weight yarns create clean stitches that showcase the sparrow’s color transitions beautifully. Keep your palette neutral: warm browns, soft grays, creamy off-white, and a touch of black for facial details.
Hook size matters because it controls density. For Crochet a Beautiful Sparrow, choose a hook slightly smaller than your yarn’s label suggests to prevent gaps. A tight fabric keeps stuffing hidden and preserves the sparrow’s realistic silhouette, especially around the breast and tail.
Safety eyes or embroidered eyes both work for this pattern. Safety eyes offer a glossy, lifelike look, while embroidery ensures a baby-safe finish. Either way, position the eyes symmetrically and slightly forward of center to capture that alert, curious bird expression.
Start the head with a magic ring and tight single crochet stitches. Increase evenly to form a smooth dome; this builds the sparrow’s gentle forehead while keeping the crown round and compact.
Transition to the body by increasing more aggressively on the lower front than the back. This trick sculpts the sparrow’s characteristic chest puff, a defining detail in Crochet a Beautiful Sparrow projects.
As you reach the mid-body, introduce subtle color changes. One or two rounds of gray between brown sections add the impression of feathers without complex intarsia or many strands to manage.
Begin decreasing along the back to taper toward the tail. Keep decreases staggered to avoid visible seams; invisibility is the hallmark of a polished Crochet a Beautiful Sparrow Free Pattern.
Stuff as you go. Add small amounts after each couple of rounds, pressing gently from the outside to distribute evenly. Pay special attention to the chest to maintain that natural bird contour.
Close the body with firm decreases at the tail base. Before fastening off, ensure the sparrow balances upright. A pinch more stuffing at the bottom can help the finished bird “perch” steadily.
Crochet the wings as small ovals worked in the round. A slight increase at the leading edge gives them a gentle curve that reads as aerodynamic instead of flat.
Add a color stripe across each wing to mimic layered feathers. This simple stripe makes Crochet a Beautiful Sparrow look advanced without adding complicated stitch patterns.
Sew wings slightly behind the body’s midline, angled upward just a touch. This placement suggests motion and keeps the silhouette lively from every angle.
For the tail, create a narrow panel with minimal increases. A short row or two at the center adds a subtle fan that’s characteristic of sparrows.
Light surface embroidery can define feather groupings. Use backstitch or split stitch in a tone just darker than the base yarn so the effect remains realistic and soft.
If you prefer no embroidery, block the wings and tail lightly. Steam or mist helps the pieces relax into their final shape—small effort, big payoff for Crochet a Beautiful Sparrow Free Pattern.
Shape a tiny cone beak with just a few rounds. Switching to a smaller hook ensures a sharp point and secure attachment with minimal bulk.
Choose eye spacing that matches the beak’s proportion. Eyes too far back look sleepy; too close together appears cartoony. Aim slightly forward and level to keep Crochet a Beautiful Sparrow alert.
Add a micro “mask” around the eyes using a single round of darker yarn. This dramatic yet easy touch adds depth and reads like natural sparrow markings.
Start with three main colors: warm brown for back and wings, gray for head accents, and cream for the chest. A small amount of black defines eye lines and beak trim.
If your stash differs, prioritize contrast over exact matches. A medium brown still sells Crochet a Beautiful Sparrow as long as the chest remains brighter than the back.
Cotton yarns emphasize stitch definition, while acrylic adds bounce and softness. Either works; consistency across colors matters more than fiber type.
Before assembly, weave in tails inside the body cavity where possible. Hidden tails reduce friction points and help Crochet a Beautiful Sparrow keep its shape over time.
Attach wings first, tail second, head details last. This order keeps your hands clear of delicate features while you position larger pieces.
If gifting to a child, choose embroidered eyes and double-secure the beak. Safety testing begins with sturdy attachment, not just cute results.
Lead with the exact phrase Crochet a Beautiful Sparrow Free Pattern in your post title and first sentence. Consistent phrasing improves discoverability.
Use related terms naturally: “sparrow amigurumi,” “bird crochet pattern,” and “crocheted sparrow toy.” These support Crochet a Beautiful Sparrow without keyword stuffing.
Structure your post with clear headings, short paragraphs, and descriptive alt text for images. Readability signals quality to users and search engines.
How long does it take to make a sparrow?
Most crafters finish Crochet a Beautiful Sparrow in a weekend. Expect 4–6 hours of stitching plus an hour for assembly and finishing touches, depending on your pace.
What skill level is required?
Confident beginners can succeed. If you know single crochet, increases, decreases, and magic ring, you can complete Crochet a Beautiful Sparrow Free Pattern with patience and careful counting.
Which yarn works best?
Smooth cotton or cotton-blend sport weight is ideal. It highlights stitches and keeps the small beak and tail crisp, essential for lifelike Crochet a Beautiful Sparrow details.
Can I embroider the eyes instead of using safety eyes?
Absolutely. Embroidered eyes are great for baby-safe gifts and travel-friendly crafting. They also give you fine control over the sparrow’s expression.
How do I avoid visible color change jogs?
Use a standing stitch to start the new color and slip stitch to the first stitch of the round. These small tweaks reduce lines in Crochet a Beautiful Sparrow Free Pattern transitions.
What if my sparrow won’t sit upright?
Add a coin or a small flat pebble at the base before closing. Position it centered and add stuffing around it to anchor Crochet a Beautiful Sparrow securely.
Can I scale the pattern up or down?
Yes. Use thicker yarn and a larger hook to scale up, or lighter yarn and a smaller hook to scale down. Maintain tight tension to preserve the proportions.
How do I keep seams invisible?
Seam with the whipstitch through back loops only, and match yarn color to the piece you’re attaching. Gentle blocking after seaming refines Crochet a Beautiful Sparrow joins.
What colors feel most realistic?
Earthy browns, soft grays, cream, and a touch of black mirror natural sparrows. Keep contrast gentle so the Crochet a Beautiful Sparrow Free Pattern looks cohesive.
How should I care for the finished sparrow?
Dust by hand and avoid machine washing. If it loses shape, a light steam and gentle reshaping will restore the Crochet a Beautiful Sparrow silhouette.
You’ve learned how to plan materials, sculpt the body, add wings and tail, place facial details, and finish your bird with polish—all while keeping Crochet a Beautiful Sparrow Free Pattern accessible and enjoyable.
From color planning to invisible seams, each step contributes to a tidy, lifelike result that’s a joy to display or gift.


