
Crochet Heart Rooster Rug Pattern – The Best Techniques and Tools

Starting your crochet journey with an Amigurumi Rooster Free Pattern is one of the most delightful and rewarding experiences you can have as a crafter.
Creating an Amigurumi Rooster involves more than just following a written pattern. It’s about combining your creativity, patience, and attention to detail.
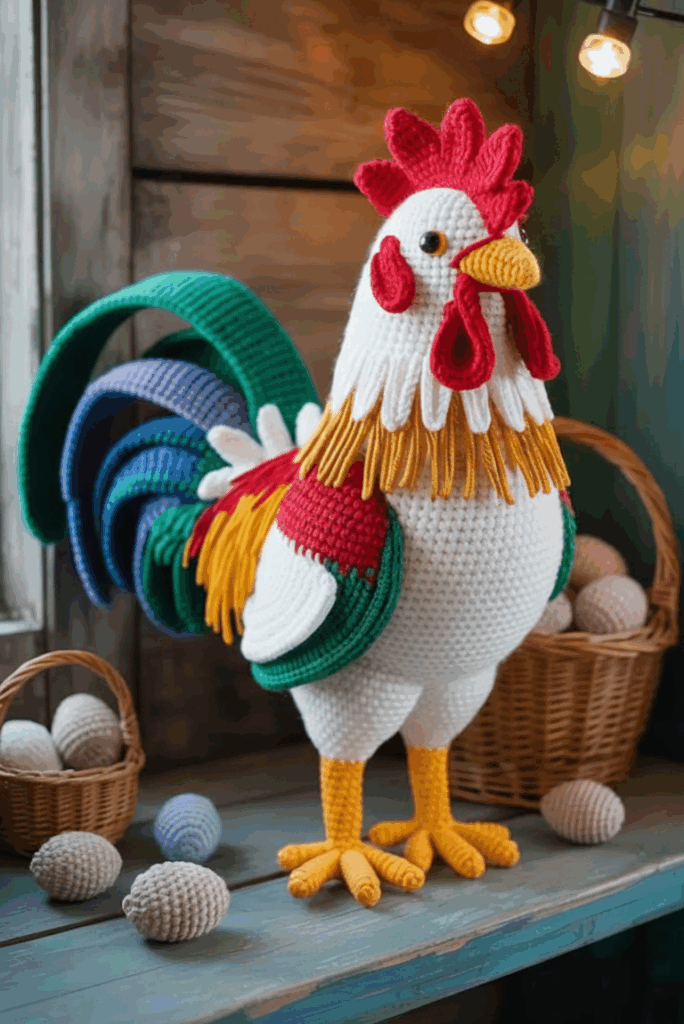
What makes the Amigurumi Rooster Free Pattern especially popular is that it can be customized in endless ways. You can create a classic rooster with bold red, orange, and yellow tones, or design a whimsical version using pastel shades.
When starting your Amigurumi Rooster Free Pattern, one of the most important decisions you’ll make is selecting the right yarn. Acrylic yarn is the most common choice because it is affordable, durable, and comes in a wide variety of colors. Cotton yarn, on the other hand, provides a more defined stitch, which can make your rooster look neater and more professional. Always choose a yarn thickness that matches the hook size recommended in the pattern for the best results.
Color selection plays a huge role in how your Amigurumi Rooster turns out. Traditional roosters are often made using red, yellow, orange, and brown shades, with a pop of green or blue for feathers. However, don’t be afraid to experiment with unusual colors to create a more playful or decorative piece. Bright and contrasting colors bring vibrancy to your rooster and make it stand out as a centerpiece.
Another essential material is the crochet hook. Most Amigurumi Rooster Free Pattern designs recommend smaller hook sizes, usually between 2.0 mm and 3.5 mm, depending on your yarn. A smaller hook helps keep the stitches tight, ensuring the stuffing doesn’t show through the fabric. It’s important to use the right combination of hook and yarn to maintain a solid structure for your amigurumi.
Stuffing is equally important for the final look of your Amigurumi Rooster. Polyester fiberfill is the most popular stuffing material because it is lightweight, soft, and easy to work with. Be sure to stuff your rooster evenly and firmly to help it hold its shape. Too little stuffing will make the rooster floppy, while too much may distort the stitches.
You’ll also need safety eyes or embroidered eyes to give your rooster character. Safety eyes are quick to install and provide a polished look, but embroidery offers a safer option if your rooster is intended for young children. The choice depends on the purpose of your project and your preferred style.
Finally, don’t forget about additional tools like stitch markers, yarn needles, and scissors. Stitch markers help you keep track of rounds, which is crucial since most Amigurumi Rooster Free Patterns are worked in continuous spirals. A yarn needle will be necessary to sew the parts together neatly, while sharp scissors ensure clean cuts for finishing.
The first step in most Amigurumi Rooster Free Patterns is creating the body, usually starting with a magic ring. The magic ring technique allows you to begin crocheting in the round without leaving a hole at the center. This method is essential for making a tightly closed and professional-looking amigurumi piece. As you increase stitches, you’ll see the body take shape.
Once the body is finished, you’ll move on to the head. The head is usually crocheted in the same way as the body, with careful shaping to ensure it looks proportional. Many crafters choose to add the safety eyes at this stage before fully closing the head. This makes it easier to position them symmetrically and avoid difficulties later.
The next step in making your Amigurumi Rooster is crocheting the wings and tail feathers. These parts are smaller but add a lot of character to the rooster. Tail feathers can be made using different colors to highlight the rooster’s vibrant personality. You may create longer feathers with simple chains or short rows, depending on the pattern instructions.
The comb and wattle are iconic features of a rooster. They are usually crocheted in red yarn and stitched onto the top of the head and under the beak. Even though these are small details, they are what make the rooster instantly recognizable. Taking time to shape and sew them carefully ensures your rooster looks authentic and expressive.
After completing all the separate parts, it’s time to assemble your Amigurumi Rooster. This process requires patience and precision. Position the wings symmetrically, attach the tail securely, and sew the head onto the body with strong stitches. Assembly is where your rooster truly comes to life.
Once assembled, you can add finishing touches like embroidered details, blush on the cheeks with fabric paint, or even accessories like a small scarf. These creative additions give your Amigurumi Rooster personality and make it stand out as a one-of-a-kind piece.
If you are new to amigurumi, starting with an Amigurumi Rooster Free Pattern may feel intimidating, but with a few tips, you can enjoy the process. First, always practice your stitches on a small swatch before beginning the actual project. This helps you adjust your tension and get comfortable with the hook and yarn.
Use a stitch marker at the beginning of each round to avoid losing track of where you started. Amigurumi is usually worked in continuous spirals without joining rounds, so it’s easy to lose count. A simple stitch marker can prevent mistakes and save you time.
Another important tip is to stuff as you go rather than waiting until the end. Adding stuffing gradually allows you to shape your Amigurumi Rooster more evenly. If you wait until the body is completely closed, it may be harder to fill all the small areas properly.
Be patient with sewing the parts together. Many beginners find this step the most challenging. Use long strands of yarn and secure your stitches tightly. Take time to position each piece before sewing it permanently. This extra care will make your rooster look neat and well-structured.
Don’t be afraid to undo stitches if something doesn’t look right. Crocheting is forgiving, and pulling back a few stitches is better than leaving a mistake that bothers you. Practicing this mindset helps you grow as a crafter and ensures you end up with a rooster you’re proud of.
Finally, remember that no two Amigurumi Roosters will look exactly alike, and that’s part of their charm. Embrace the uniqueness of your creation and see it as a reflection of your style and effort.
Once you’ve finished your Amigurumi Rooster Free Pattern, you might wonder what to do with your new creation. One popular option is to give it as a gift. Handmade gifts carry a special meaning because they represent time, care, and creativity. A crocheted rooster is a thoughtful present for birthdays, baby showers, or even as a good luck charm.
Your Amigurumi Rooster can also serve as a cheerful decoration in your home. Place it in the kitchen, on a shelf, or as part of a seasonal display. Roosters symbolize new beginnings and positivity, making them perfect for brightening up any space. They are especially fitting as part of farmhouse-style décor.
For those with children, the rooster can become a playful toy. Amigurumi toys are soft, safe, and durable, making them ideal for kids to cuddle and enjoy. Just remember to use embroidered eyes instead of safety eyes if the toy is intended for very young children.
Another creative use is incorporating the rooster into holiday decorations. For example, it can be part of an Easter basket, a spring centerpiece, or even a festive Christmas display with added accessories like a tiny hat or scarf. The versatility of amigurumi makes it adaptable to many themes and occasions.
Crafters who sell handmade items can also benefit from making Amigurumi Roosters. These charming toys often attract buyers at craft fairs and online shops because of their unique look and cultural symbolism. Offering customizable color options can make your products even more appealing.
Lastly, don’t forget that making an Amigurumi Rooster can simply be a form of relaxation and personal satisfaction. Many people crochet as a way to relieve stress and enjoy a sense of accomplishment. The rooster is a fun project that combines creativity with mindfulness.
What is an Amigurumi Rooster?
An Amigurumi Rooster is a handmade crocheted stuffed toy designed to look like a rooster, created using specific crochet techniques.
Is the Amigurumi Rooster Free Pattern suitable for beginners?
Yes, many free patterns are beginner-friendly, but they do require basic knowledge of crochet stitches such as single crochet, increase, and decrease.
What materials do I need for an Amigurumi Rooster?
You’ll need yarn in different colors, a crochet hook, stuffing, a yarn needle, and either safety eyes or embroidery thread for the eyes.
How long does it take to make an Amigurumi Rooster?
The time varies depending on your skill level, but most crafters can complete a small rooster in one or two days of casual crocheting.
Can I customize the colors of my Amigurumi Rooster?
Absolutely! You can use traditional rooster colors or experiment with fun and unique shades to create a personalized design.
Are Amigurumi Roosters safe for children?
Yes, but if the toy is for very young children, it is recommended to use embroidered eyes instead of safety eyes to avoid choking hazards.
In this article, we explored everything you need to know about the Amigurumi Rooster Free Pattern—from choosing materials to step-by-step instructions, tips for beginners, and creative ways to use your finished project.
Whether you are crafting for yourself, for a loved one, or as part of a handmade business, the Amigurumi Rooster is a fun and versatile project.
Now that you have a complete guide, we encourage you to share your thoughts. Leave your honest opinion and suggestions, and let us know how your rooster turned out!


