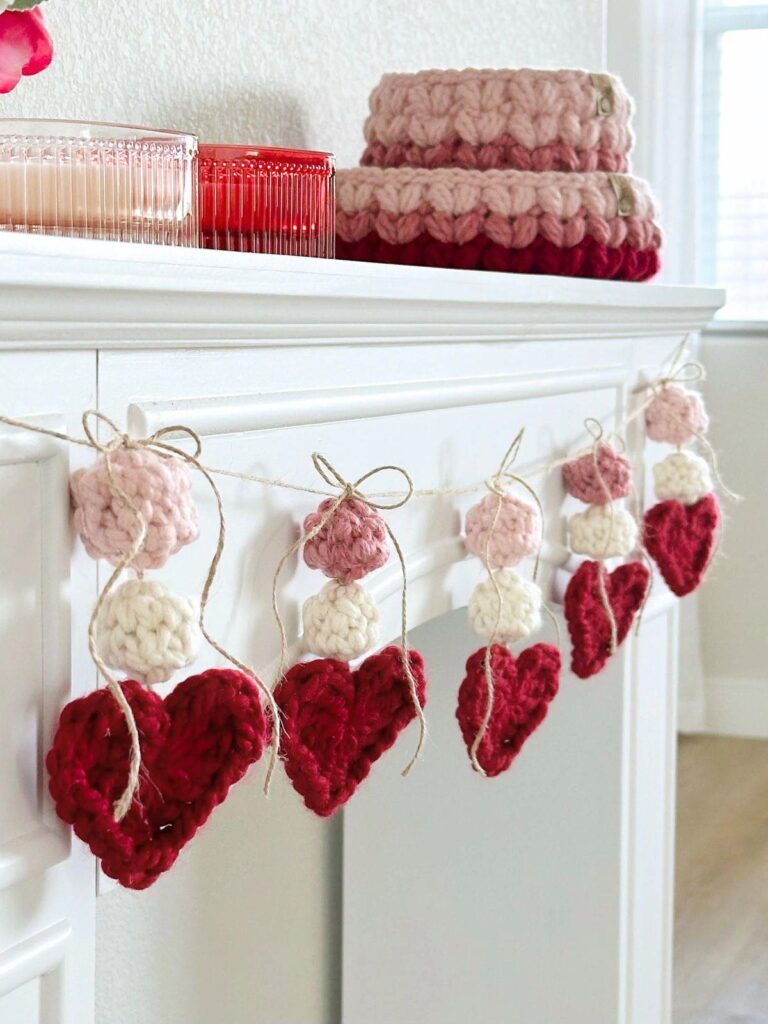
Crochet Hearts Garland Pattern


Amigurumi Cars Free Crochet Pattern is a delightful way to combine the love of crochet with the fascination for miniature cars.
Using an Amigurumi Cars Free Crochet Pattern can spark creativity while improving your hand-eye coordination. Every stitch adds life to your tiny car, making it a fun and rewarding project.
This free crochet pattern provides clear instructions for making cars of various shapes and colors. You don’t need extensive experience to start; even beginners can follow along with patience and care.
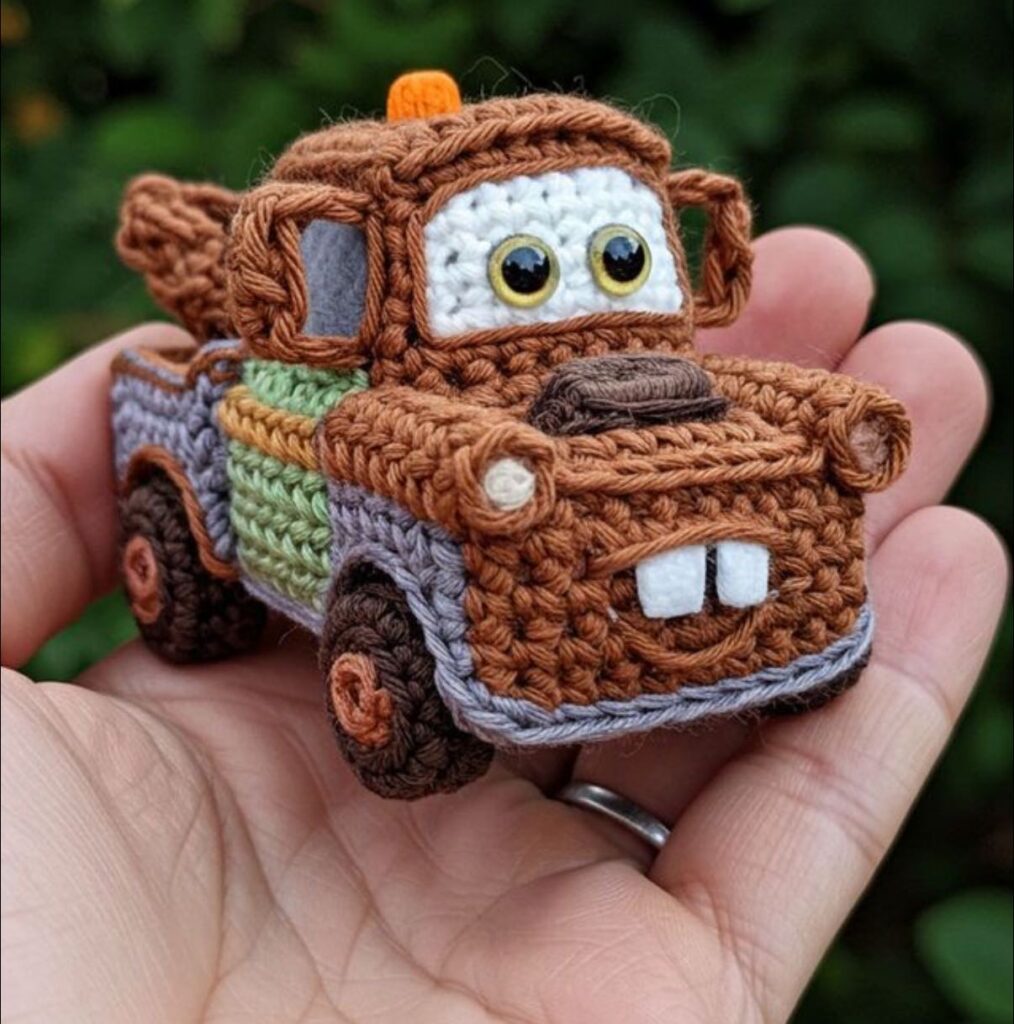
The Amigurumi Cars Free Crochet Pattern is designed to be accessible for all skill levels. It typically uses basic crochet stitches like single crochet, increase, and decrease, making it easy to follow.
Each pattern includes a detailed list of materials, including yarn types, hook sizes, and stuffing materials. This ensures your cars come out soft, durable, and visually appealing.
By following a free pattern, you can create a variety of car models, from sports cars to classic sedans. Experimenting with colors and designs allows you to personalize each vehicle.
One key aspect of amigurumi is tight stitching, which prevents stuffing from showing and ensures a neat final product. This is particularly important in small toys like cars.
Most patterns also include step-by-step instructions with images or diagrams. This visual guidance makes it easier to track your progress and avoid mistakes.
Amigurumi is more than just a hobby; it can also serve as decorative items or gifts, adding a personal touch that store-bought toys cannot match.
Creating cars using an Amigurumi Cars Free Crochet Pattern helps enhance fine motor skills. Each stitch requires precision, improving dexterity and focus.
It also encourages creativity, as you can choose colors, patterns, and accessories for your miniature cars. The process becomes both a relaxing and imaginative activity.
Another benefit is cost-effectiveness. Using a free pattern and simple materials, you can produce beautiful toys at a fraction of the price of store-bought items.
These handmade cars can be personalized gifts for children, friends, or family members. Adding a small name tag or using favorite colors makes each piece unique.
Amigurumi cars can also become collectibles. Craft enthusiasts often enjoy creating themed sets, such as racing cars, classic vehicles, or holiday editions.
The process of crocheting cars reduces stress and promotes mindfulness. Focusing on a creative task allows your mind to relax and recharge.
Selecting the right yarn is essential for your Amigurumi Cars Free Crochet Pattern. Cotton or acrylic yarns are popular due to their durability and color variety.
Hooks should match your yarn weight to create tight stitches that hold stuffing in place. Typically, smaller hooks produce firmer shapes.
Stuffing material can be polyester fiberfill or cotton, ensuring that the cars maintain their shape without becoming too heavy.
Safety eyes or embroidered features can be added to give personality to your cars. Avoid small parts for toys intended for young children to prevent choking hazards.
Color choices enhance the final look of your vehicles. Using contrasting colors for wheels, windows, and bodywork can make the car more realistic and attractive.
You may also incorporate embellishments like ribbons or felt patches to add extra detail and creativity to your amigurumi cars.
Start by creating the car body with a simple oval or rectangle shape, depending on the model you want to craft. Single crochet is usually used for these main pieces.
Next, crochet the wheels separately and attach them securely to the body. Wheels can be black with colored hubs or fully customized based on your preference.
Add smaller details like windows, doors, and bumpers using contrasting yarn colors or embroidery techniques. This step brings the car to life.
Stuff the car lightly to retain shape while keeping it soft. Avoid overstuffing, as it may stretch the stitches or distort the shape.
Once assembled, review all pieces to ensure that they are firmly attached. Loose parts can compromise safety and durability, especially if the toys are meant for children.
Finally, explore variations. Make multiple cars in different sizes or styles to create a mini collection, enhancing the fun and educational value of your project.
Always read through the entire Amigurumi Cars Free Crochet Pattern before starting. Understanding the steps helps prevent mistakes and ensures smoother progress.
Start with simple car designs before attempting more complex models. Gaining confidence with basic shapes makes advanced projects less intimidating.
Keep your tension consistent. Uneven tension may cause cars to appear lopsided or irregular, affecting the overall aesthetic.
Use stitch markers to mark rounds or specific points on the car. This is especially helpful when counting stitches for the wheels or roof.
Don’t hesitate to undo and redo sections if something seems off. Crocheting allows corrections without ruining the entire project.
Join online communities or forums to share your creations and get advice. Fellow crafters often provide helpful tips and inspiration for amigurumi cars.
Q: What is an Amigurumi Cars Free Crochet Pattern?
A: It is a crochet pattern designed to create small, stuffed car toys using basic crochet stitches and minimal materials.
Q: Can beginners use this pattern?
A: Yes. Free patterns are usually designed with clear instructions suitable for beginners and experienced crocheters alike.
Q: What materials are required?
A: You need yarn (cotton or acrylic), crochet hooks, stuffing, stitch markers, and optionally safety eyes or embroidery thread for details.
Q: How long does it take to make a car?
A: It varies based on complexity, but a small beginner-level car can take 2–4 hours to complete.
Q: Are these toys safe for children?
A: Yes, if you avoid small detachable parts and securely attach all features, these cars are safe for children.
Q: Can I sell my amigurumi cars?
A: Many crafters sell handmade amigurumi, but ensure you follow copyright and pattern licensing rules if using someone else’s design.
Q: How do I clean my crocheted cars?
A: Hand wash gently in cold water with mild detergent and air dry to maintain shape and color.
Q: Can I customize the cars?
A: Absolutely! Change colors, add accessories, or make themed sets to personalize your creations.
Q: Where can I find more free patterns?
A: Many crafting communities, blogs, and social media groups share free amigurumi patterns that you can use for personal projects.
Q: What skills do I need before starting?
A: Basic crochet knowledge, including single crochet, increase, decrease, and reading patterns, is recommended.
By following this guide, you can create soft, colorful, and personalized car toys that serve as gifts, collectibles, or decor.
We covered essential aspects, from choosing the right materials and mastering crochet stitches to assembling detailed cars.
We hope this guide helps you dive into the charming world of amigurumi cars. Share your creations, leave an honest opinion, and suggest new patterns or improvements for future projects.
