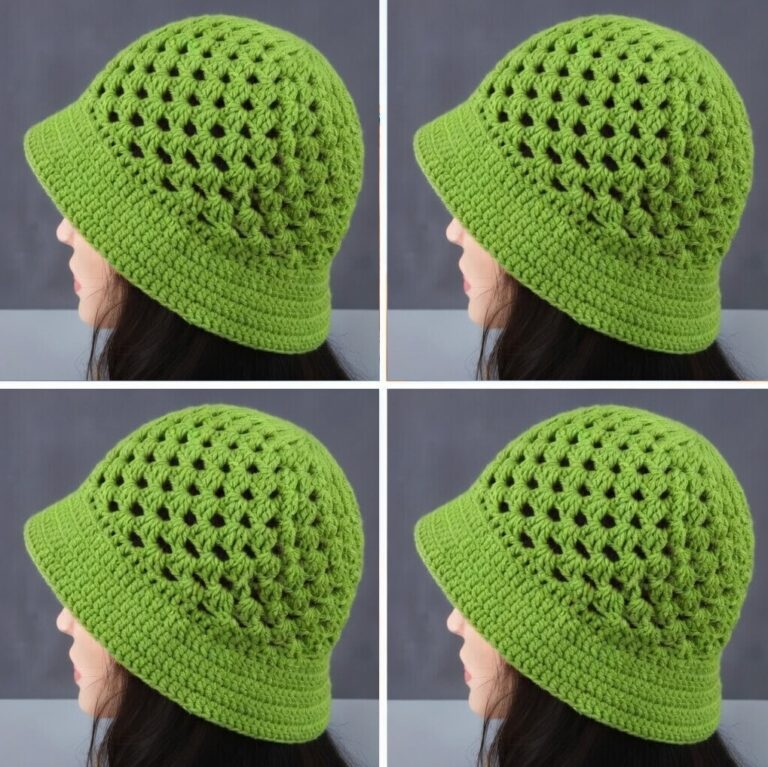
American Granny Square Bucket Hat Pattern

If you’ve ever wanted to create your own stylish headwear, learning how to make an easy crochet bucket hat is a perfect project to start with.
This cozy and fashionable accessory is not only trendy but also simple enough for beginners to make. With just a crochet hook, yarn, and a little patience, you can craft a beautiful crochet bucket hat that’s perfect for any season.
In this comprehensive tutorial, you’ll learn each step clearly — from selecting materials to finishing touches — so you can make your own easy crochet bucket hat with confidence and creativity.
Crochet bucket hats are loved for their versatility and timeless appeal. Whether you’re going for a classic minimalist look or a colorful festival vibe, this handmade accessory complements almost any outfit.
The best part is that you can customize your easy crochet bucket hat with different yarn colors, stitch patterns, and sizes. It’s a fun and relaxing project that lets your personality shine through while helping you develop your crochet skills.
In this guide, we’ll explore the essential tools, the step-by-step process, helpful techniques, and useful tips for achieving professional-looking results. By the end, you’ll know how to make an easy crochet bucket hat that looks stylish, feels comfortable, and fits perfectly.
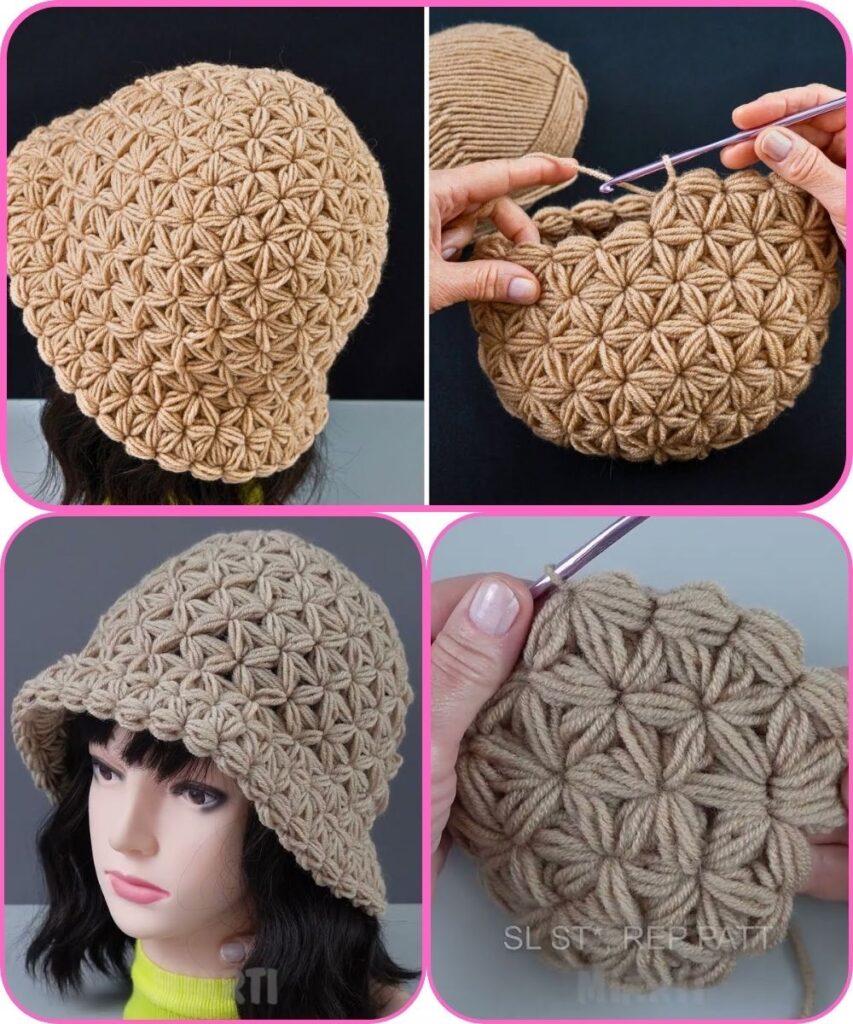
Before diving into the details of how to make an easy crochet bucket hat, it’s important to understand the structure of the hat itself. A bucket hat typically consists of three parts: the crown (top of the hat), the body (the sides that form the head shape), and the brim (the flared edge that provides shade and style). Each part can be crocheted separately or worked continuously in rounds, depending on your chosen pattern.
When learning how to make an easy crochet bucket hat, the key is to start with a flat circle for the crown. This is achieved through gradual increases in each round, allowing the hat to expand evenly. Once the crown reaches the desired diameter, you’ll stop increasing and begin working evenly around the edge to form the body. Finally, you’ll widen your stitches again to create the brim.
The best part about crochet bucket hats is their flexibility. You can make them in various sizes, from small for children to large for adults, by simply adjusting the number of rounds or using thicker or thinner yarn. The shape is classic and flattering, making it one of the most enjoyable crochet projects to complete.
Selecting the correct materials is a crucial step when learning how to make an easy crochet bucket hat. The quality of your yarn and tools will directly affect the hat’s comfort, durability, and appearance.
For an easy crochet bucket hat, choose a medium-weight cotton yarn. Cotton yarn provides structure while remaining breathable and lightweight — perfect for warm weather. If you want a cozier version for colder seasons, you can use acrylic or wool yarn. Just make sure to check the yarn label for recommended hook sizes.
The crochet hook size depends on your yarn. Generally, a 4.0mm to 5.0mm hook works well for medium-weight yarn. A larger hook will make your stitches looser, resulting in a softer, more flexible hat. A smaller hook creates tighter stitches and a firmer shape.
When making a crochet bucket hat, stitch markers help you track where each round begins. This ensures consistency in your stitch count, especially important for maintaining the hat’s symmetry.
A pair of sharp scissors is essential for cutting yarn neatly, and a yarn needle helps you weave in ends cleanly for a polished finish.
Accurate measurements are key to ensuring your easy crochet bucket hat fits properly. Measure your head circumference before you start, so you can adjust your pattern accordingly.
Now that your materials are ready, let’s move on to the fun part — making your hat! Follow this step-by-step crochet bucket hat tutorial carefully to achieve a perfect finish.
Start by making a magic ring, which forms the base of your hat. Chain two and then crochet 10 double crochets into the ring. Pull the loop tight to close the circle. This forms the first round of the crown.
For each following round, you’ll increase evenly: two double crochets in each stitch for round two, then one increase every two stitches for round three, and so on. Keep expanding until the circle’s diameter matches the size of the top of your head (typically around 6–7 inches for adults).
Once the crown is complete, it’s time to build the sides of your easy crochet bucket hat. Stop increasing and continue crocheting one stitch per stitch around. This will cause the sides to start curving downward naturally. Continue for 10–12 rounds, depending on how deep you want the hat to sit on your head.
To form the brim, begin increasing stitches again. Add one extra stitch every three to four stitches in the first few rounds of the brim. This gradual increase will give your hat a natural flare without looking stiff. The brim can be as narrow or wide as you prefer — 4 to 6 rounds usually create a classic bucket hat shape.
Once the desired shape is achieved, fasten off your yarn and use a yarn needle to weave in loose ends. If desired, lightly block your hat to smooth out any uneven stitches. Blocking simply means dampening the hat and shaping it while it dries.
Now comes the fun part — customization! Add stripes, change colors every few rounds, or attach small decorations like crochet flowers or patches. You can even add a drawstring or ribbon for a stylish twist.
The most rewarding moment of this easy crochet bucket hat tutorial is trying on your finished creation. Adjust the fit if necessary, and enjoy wearing your new handmade accessory with pride.
If this is your first time learning how to make an easy crochet bucket hat, these tips will help ensure success:
Q1: How long does it take to crochet a bucket hat?
A1: It usually takes between 3–6 hours, depending on your skill level and the complexity of your design.
Q2: Can I make a bucket hat using leftover yarn?
A2: Absolutely! Mixing colors and yarn types can result in a creative, one-of-a-kind hat.
Q3: What if my hat is too big or small?
A3: If it’s too big, try using a smaller hook size next time. If it’s too small, add extra rounds to the crown or sides.
Q4: Can I machine wash my crochet bucket hat?
A4: Most cotton and acrylic yarns are machine washable, but it’s best to hand wash and air dry to maintain shape.
Q5: What’s the best stitch for a beginner?
A5: The double crochet stitch is simple and creates a nice texture for bucket hats, making it perfect for beginners.
Q6: How can I make my brim stiffer?
A6: You can use a slightly smaller hook for the brim or apply a light fabric stiffener after finishing.
Learning how to make an easy crochet bucket hat is one of the most enjoyable crochet projects for both beginners and experienced crafters. It combines simplicity, creativity, and practicality in one stylish accessory. With the right materials and a little patience, you can craft a hat that perfectly fits your style — whether for sunny beach days, casual outings, or cozy winter walks.
We hope this easy crochet bucket hat tutorial has inspired you to pick up your hook and start crocheting today. If you followed this guide, share your experience — we’d love to hear your thoughts and suggestions for future tutorials!