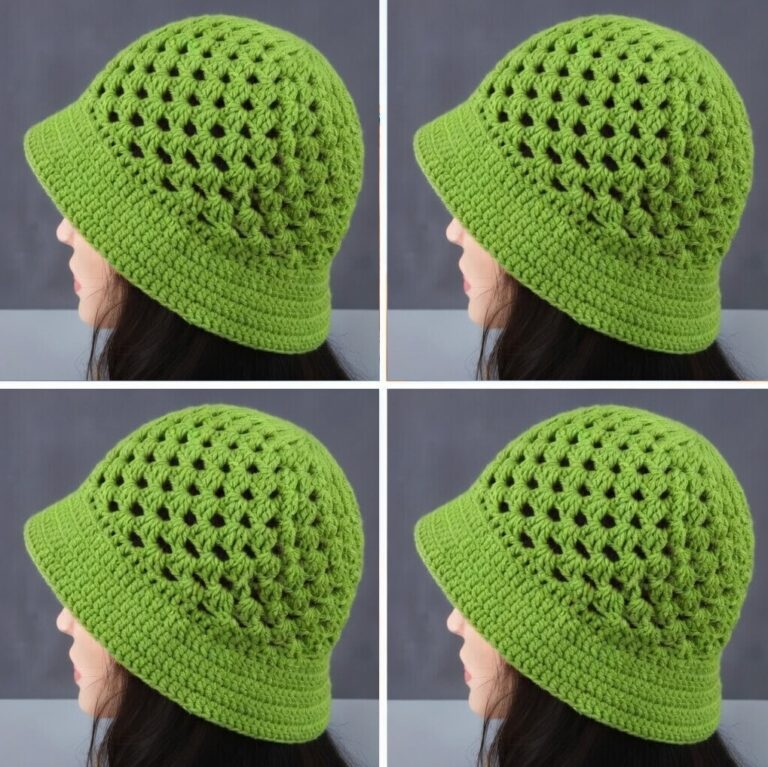
American Granny Square Bucket Hat Pattern

If you are looking for a fun and fashionable project, the Crochet Scallop Shell Bag is the perfect choice. This bag combines elegance with practicality, making it an accessory that stands out in any wardrobe.
By following this guide, you will learn how to transform simple stitches into a stylish bag that feels both modern and timeless.
Crocheting accessories like this helps you combine your love for crafting with functional fashion. The scallop shell design is not only pretty but also durable, giving the bag structure and character.
When starting your scallop shell bag, materials play an important role in shaping its final look and durability. The yarn you select determines how soft, firm, or textured your bag will be. Cotton yarn is a popular choice because it provides strength and holds shape well, making it ideal for everyday use. However, for a more luxurious finish, you can opt for blends that include silk or bamboo fibers. Each option gives your bag a unique personality.
Another critical aspect is the crochet hook size. Using the recommended size ensures that your stitches remain consistent and that the bag maintains its structure. A smaller hook size than the yarn suggests can add firmness to your bag, which is excellent if you want it to hold shape without lining. On the other hand, sticking to the recommended size creates a softer, more flexible texture, which works well for slouchy bag styles.
Handles and straps are equally important when personalizing your crochet scallop shell bag. You can crochet sturdy handles using the same yarn or add pre-made leather straps for a chic finish. Choosing the right closures, such as zippers, buttons, or magnetic snaps, also elevates the design and makes the bag more functional. Finally, lining your bag with fabric helps protect the stitches from stretching and gives your accessory a professional look.
Experimenting with different yarn colors allows you to make each bag unique. Neutral tones like beige, gray, or cream create a sophisticated accessory, while bold colors like coral, teal, or mustard make a statement. You can even add stripes or gradient yarns to emphasize the scallop design. Your choice of embellishments, such as tassels, beads, or crochet flowers, will make your creation truly one-of-a-kind.
The beauty of crochet is in its flexibility, and this bag showcases that perfectly. With the right combination of yarn, hooks, and accessories, you can craft a bag that suits your lifestyle and fashion sense. Starting with carefully chosen materials sets the stage for a successful and enjoyable project.
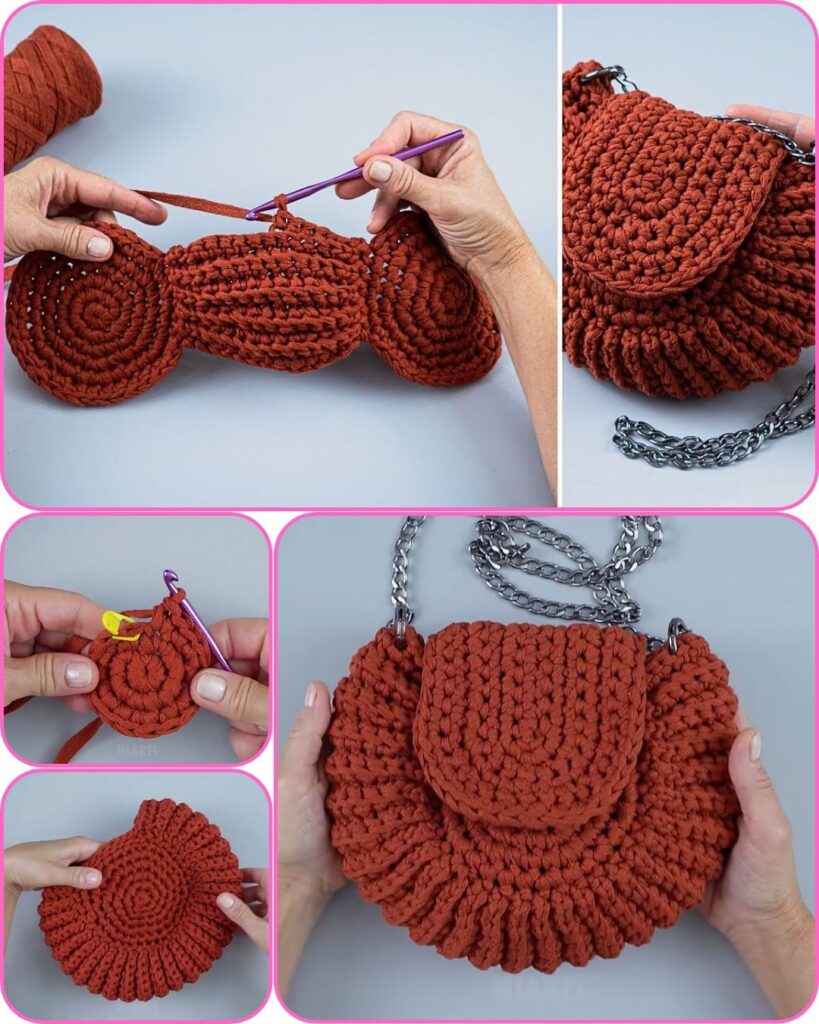
The highlight of this scallop shell bag is the stunning stitch that gives it its name. The scallop shell stitch creates a textured, wavy pattern that resembles seashells, adding both charm and structure to the design. It might look intricate, but it’s surprisingly simple once you break it down into basic crochet steps.
To create the shell stitch, you usually work multiple double crochets into a single stitch or space, which forms the rounded “shell” shape. By alternating these shells with spaces or single crochets, you develop a repeating pattern that builds the bag’s body. The result is a fabric that’s not only decorative but also durable enough to hold items inside.
The rhythm of the scallop stitch makes it an enjoyable technique for beginners and experienced crocheters alike. Once you memorize the sequence, it becomes almost meditative, allowing you to relax while creating. This stitch also works up quickly, meaning you’ll see your bag take shape in no time.
Adding variations to the stitch can make your bag even more stylish. For example, you can use two different yarn colors to create contrasting shells that pop visually. Another option is to alternate the shell size by working more or fewer double crochets per shell, giving your bag a playful and dynamic appearance.
While learning the stitch, practicing on a swatch before starting your bag helps you get comfortable with tension and consistency. This practice ensures that when you move on to the actual bag, the pattern looks neat and uniform. Mastering the shell stitch is the key to giving your bag its signature look.
Once you’ve created enough rows of the scallop shell stitch, it’s time to assemble your bag. This step is where your project starts to transform from a flat piece of fabric into a functional accessory. The process usually begins by folding your crocheted piece in half and seaming the sides together with a slip stitch or whip stitch. These seams should be sturdy to support the weight of items inside the bag.
After the body is assembled, the next step is adding the handles or straps. If you prefer a casual tote style, crocheted straps using tight stitches will work well. For a more polished look, attaching leather straps can elevate your bag’s appearance. Ensure that handles are securely attached, especially if you plan to carry heavier items.
Adding a lining is optional but highly recommended. A fabric lining prevents small items from poking through the stitches and adds structure. You can sew a simple rectangle of fabric to match the bag’s dimensions and hand-stitch or machine-sew it inside. For extra strength, consider adding an interfacing layer between the fabric and the crochet.
The finishing touches bring personality to your bag. Adding a magnetic snap, button, or zipper closure keeps your belongings safe. Decorative elements like tassels, pom-poms, or even crocheted flowers can make your bag stand out as a statement accessory. Don’t be afraid to experiment with details until you find a style you love.
Assembling is the most rewarding stage because you see your project come together as a stylish, functional piece. Each step reflects your effort and creativity, turning yarn into a fashion item you’ll be proud to carry.
Your crochet scallop shell bag is more than just a handmade project—it’s a versatile accessory that fits a variety of occasions. Whether you’re pairing it with casual jeans and a T-shirt or dressing up for an evening out, this bag adds a touch of unique charm. Its textured pattern makes it a standout piece, complementing simple outfits beautifully.
One way to style your bag is to match its color with your wardrobe palette. A neutral-colored bag becomes a go-to accessory, while bold colors make it a focal point of your look. Adding seasonal elements, like soft pastels for spring or rich jewel tones for winter, makes your bag feel fresh year-round.
Your bag is also practical for daily use. Thanks to the durable scallop shell stitch, it can handle carrying essentials like a wallet, phone, and keys. For larger tote versions, you can even use it for groceries or beach trips. Just remember to reinforce the seams and straps for added strength.
Because it’s handmade, your bag is a reflection of your personality. It’s a conversation starter, and many people will admire its unique design. If you’re gifting it, this bag makes a thoughtful and stylish present that shows care and creativity.
Taking care of your bag ensures it lasts for years. Hand-washing in cold water and laying flat to dry keeps the stitches in good condition. Avoid overloading it with heavy items to prevent stretching. With proper care, your crochet bag will stay chic and functional.
The best part is that you now have the skills to experiment with variations of the scallop shell bag. You can adjust its size, shape, and details to suit different occasions, making it a staple project in your crochet journey.
What level of crochet skill do I need for this bag?
The scallop shell bag is beginner-friendly, though some familiarity with basic stitches like single crochet and double crochet is helpful.
How long does it take to make a scallop shell bag?
On average, it takes a few evenings or a weekend, depending on the size of the bag and your crochet speed.
Do I need to line my bag?
Lining is optional but highly recommended for durability and to prevent stretching.
Can I use any type of yarn?
Cotton yarn works best, but blends like bamboo or silk can add different textures and finishes.
What closures work best for this bag?
Magnetic snaps, zippers, or buttons are all excellent choices depending on your style preference.
Can I customize the size of the bag?
Yes! Simply adjust the number of stitches and rows to make the bag larger or smaller.
From selecting materials to mastering the scallop shell stitch and assembling the final piece, every step allows you to personalize your accessory. With its unique texture and fashionable appeal, this bag is sure to become a favorite in your collection.
Now that you’ve learned how to create and style this beautiful bag, I’d love to hear your thoughts. Share your honest opinion about this guide and let me know what variations or ideas you would like to see in future crochet projects.
