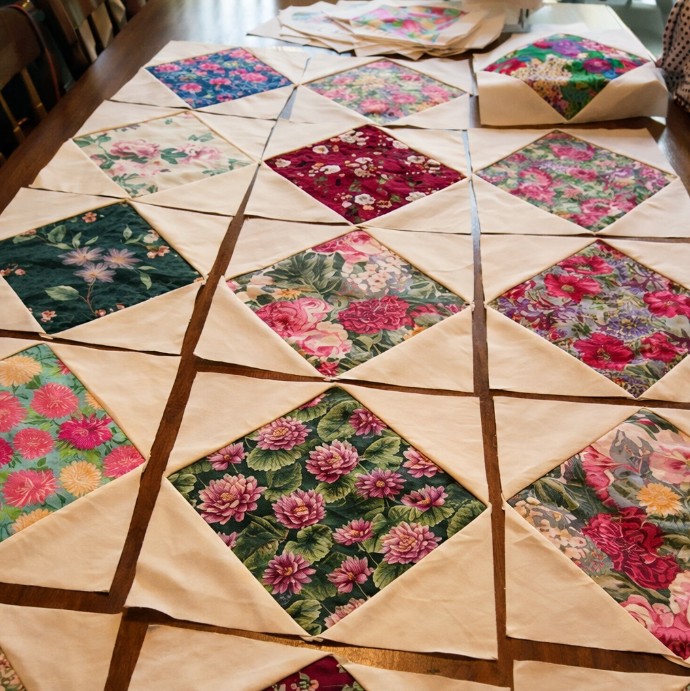
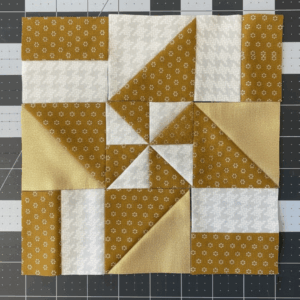
Patchwork Square Design Block Pattern

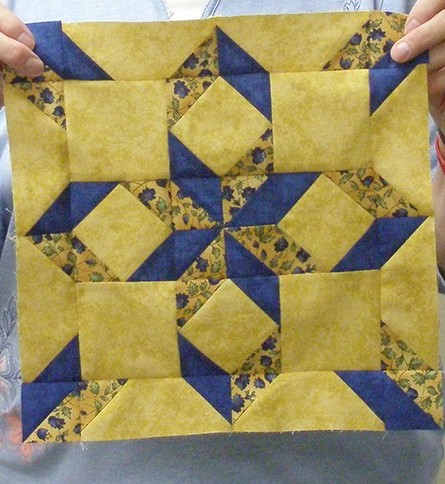
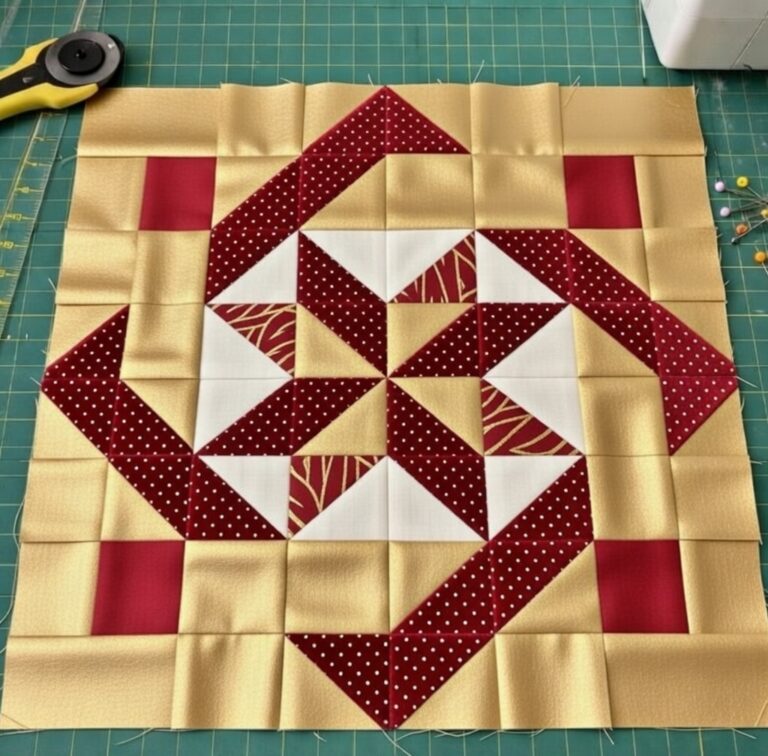
West Virginia Star Block Free Pattern is a timeless quilt motif that blends classic Americana geometry with approachable construction, making it perfect for beginners who want a confidence-boosting win and for seasoned quilters seeking a striking focal block.
Before we dive into the steps, let’s talk about what makes the West Virginia Star Block so appealing. At its heart, this star is built from right-angle units—HSTs (half-square triangles), flying geese, and simple squares—that come together to form a bold eight-point star framed by secondary diamonds.
Equally exciting is how adaptable the West Virginia Star Block can be. Make one oversized block for a statement mini quilt or pillow, or stitch a whole set for a throw or bed quilt.
Choosing fabric is where the West Virginia Star Block begins to develop personality. A star lives or dies by contrast, so pair a light background with medium-to-dark star fabrics or invert the scheme for a moody, night-sky feel. Blenders and solids help your points read cleanly, while tiny prints add texture without overwhelming the geometry. Reserve your boldest hue for the star points to honor the classic lines of the West Virginia Star Block Free Pattern.
Think in values as much as colors. Place light values in the background squares and darker values in the star points; that contrast makes the angles pop. If you’re going scrappy, keep all background fabrics within one value family so the star remains the hero. You can also audition fabrics by snapping a grayscale photo; if the star shape is clear in black-and-white, your West Virginia Star Block will sing in color.
Consider scale, too. Small-scale prints work best in narrow star points because large motifs can get chopped up and lost. If you have a novelty print you love, feature it in the center square and let the rest of the block support it. A fussy-cut center can tell a story—florals for spring, school colors for a graduation gift, or blues and creams for a coastal vibe—while still staying true to the West Virginia Star Block Free Pattern layout.
To keep this West Virginia Star Block Free Pattern accessible, we’ll use common, beginner-friendly units: squares, half-square triangles (HSTs), and flying geese. For a popular finished size of 12″, plan on a 4×4 grid where each finished unit measures 3″. That means cutting 3½” squares for plain units and working with HSTs trimmed to 3½”, which finish at 3″ in the block. With that target, your West Virginia Star Block will piece together smoothly.
Start by cutting: (1) a center square, (4) corner squares, (4) background squares, (8) HST components, and (4) flying geese units. If you’re using the “two-at-a-time” HST method, cut two squares at 4″ from each of the two fabrics you want to combine, draw a diagonal line, stitch ¼” on either side, cut, press, and trim to 3½”. This gives the star its angled arms—core to the West Virginia Star Block Free Pattern silhouette.
For flying geese measuring 3½”×6½” (to finish at 3″×6″), use the four-at-a-time no-waste method. Cut one large 7¼” square from your geese “body” fabric and four 3¾” squares from your “sky” fabric. The no-waste approach minimizes trimming and keeps points intact, which is vital for the sharp look the West Virginia Star Block is celebrated for.
Lay out all units before sewing. Visualizing the finished West Virginia Star Block on your design board (or a clean table) helps catch value errors early. The star points should radiate from the center, with flying geese forming the longer rays and HSTs completing the diagonals. Seeing the full West Virginia Star Block Free Pattern arrangement ensures you won’t accidentally rotate a unit.
Piece the block in rows. Sew the first row across, then the second, and so on. This row-by-row construction keeps seams manageable and preserves alignment. Use a scant ¼” seam if your machine tends to “eat” a little fabric; consistency matters more than perfection, and consistent seams make the West Virginia Star Block finish at the right size.
Pressing strategy is crucial. Press seams in opposing directions on adjacent rows so they “nest” when you join them. Nesting locks intersections, reducing slippage and helping star points stay sharp. For flying geese, press toward the “sky” if you want less bulk at the point or press open if your layers are thick. Either approach works for the West Virginia Star Block Free Pattern as long as you’re consistent.
The simplest way to change the mood of the West Virginia Star Block Free Pattern is through color placement. Try a monochrome star on low-volume background for a refined, modern quilt, or flip it with a dark background and luminous star fabrics for a dramatic night-sky effect. Even subtle tweaks create big visual shifts in the West Virginia Star Block.
Scrappy lovers can assign each point a different print while keeping the background unified. The repeating geometry ties it all together, so your scrap bin becomes a treasure trove of possibilities. Consider grouping scraps by color family—warm reds and oranges for one quadrant, cool blues and greens for another—to amplify movement across your West Virginia Star Block Free Pattern layout.
Fussy-cut centers (or even fussy-cut geese bodies) add storytelling power. Center a floral bouquet, a favorite animal, or a motif with personal meaning. Because the center square is uninterrupted, it’s the perfect place to showcase a motif that anchors the West Virginia Star Block composition.
Once you’ve made multiple blocks, decide on sashing and borders. Sashing frames each West Virginia Star Block and can reduce visual noise, especially in scrappy quilts. Narrow sashing (1½” finished) preserves the star-to-star conversation, while wider sashing creates breathing room and a clean, modern look aligned with the West Virginia Star Block Free Pattern simplicity.
For layout, a straightforward grid highlights the graphic star shape, but you can rotate every other block 90° to emphasize secondary diamonds. Cornerstones in sashing add tiny “sparkles” throughout the quilt, echoing points from the West Virginia Star Block and tying colors together.
Quilting designs should complement, not compete. Straight-line quilting in a radiating star pattern is elegant and beginner-friendly. You can stitch in the ditch to secure the structure and then add echo lines around the star points. This approach reinforces the sharp geometry of the West Virginia Star Block Free Pattern without overwhelming the fabrics.
If your points get “clipped,” your seam allowance may be too generous. Aim for a consistent scant ¼” and test on a sample. A quick measurement after sewing two squares—should be 6½” if each was 3½”—will confirm. Correct sizing keeps the West Virginia Star Block Free Pattern true to its proportions.
Wavy edges usually mean stretching on bias seams. Handle HST and flying-geese edges gently, press (don’t iron) by lifting and setting the iron, and let fabric cool flat. Stabilizing spray before cutting can dramatically improve the accuracy of your West Virginia Star Block.
If units aren’t meeting, trim them. Square up HSTs and flying geese to the exact unfinished size. Trimming might feel like extra work, but it’s the secret to a crisp West Virginia Star Block Free Pattern and makes final assembly much smoother.
What is the West Virginia Star Block?
The West Virginia Star Block is a traditional eight-point star quilt block composed of squares, HSTs, and flying geese. It’s admired for strong geometry, clear points, and versatility, making it ideal for the West Virginia Star Block Free Pattern approach used by beginners and experts alike.
What size should I make first?
A 12″ finished block is a friendly starting size because units trim to 3½”. This scale balances visibility of the star with manageable pieces, aligning perfectly with the West Virginia Star Block Free Pattern guidance in this article.
Can I make it scrappy?
Absolutely. Keep backgrounds within a similar value so the star stands out, and use coordinated scraps for the points. Scrappy stars celebrate your stash while preserving the striking outline of the West Virginia Star Block.
You’ve learned how to plan, cut, piece, and finish the West Virginia Star Block Free Pattern, from fabric selection and unit sizing to pressing, assembly, and creative variations.
With accurate cutting, consistent seams, and mindful pressing, your West Virginia Star Block will display crisp, show-stopping points every time.
