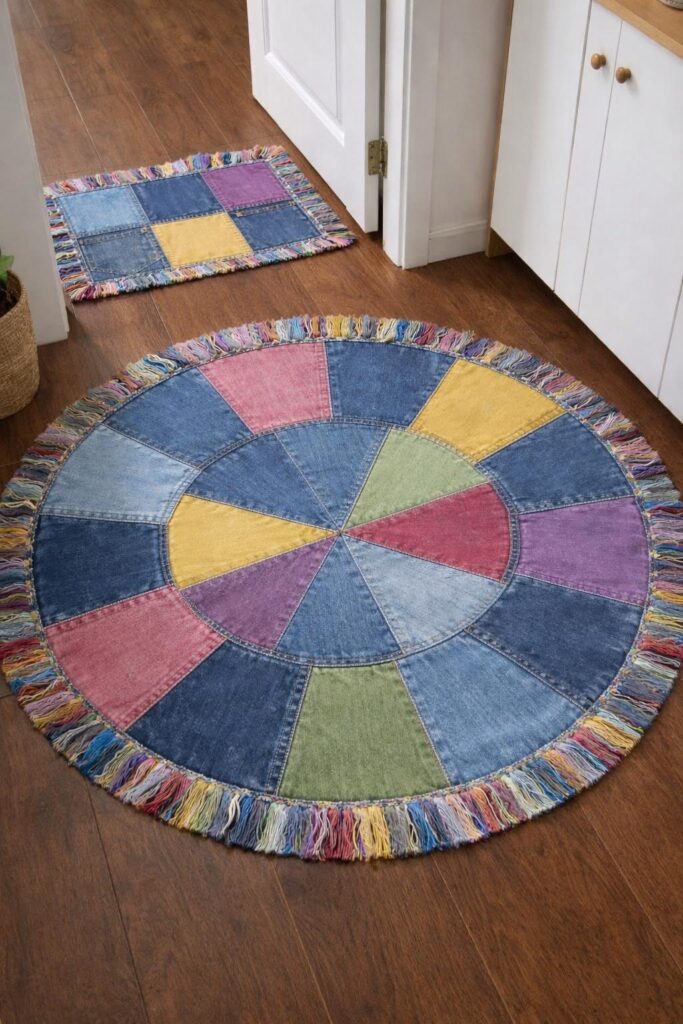
Patchwork Denim Rugs Pattern

The easiest rectangular backpack tutorial is sewing-friendly, practical, and perfect for anyone who wants to create a functional accessory with their own hands.
From beginners to experienced crafters, learning the easiest rectangular backpack tutorial can be an empowering experience that combines creativity, usefulness, and sustainability.
Sewing your own backpack allows you to choose fabrics, customize sizes, and create something truly unique while staying within a beginner-friendly structure.
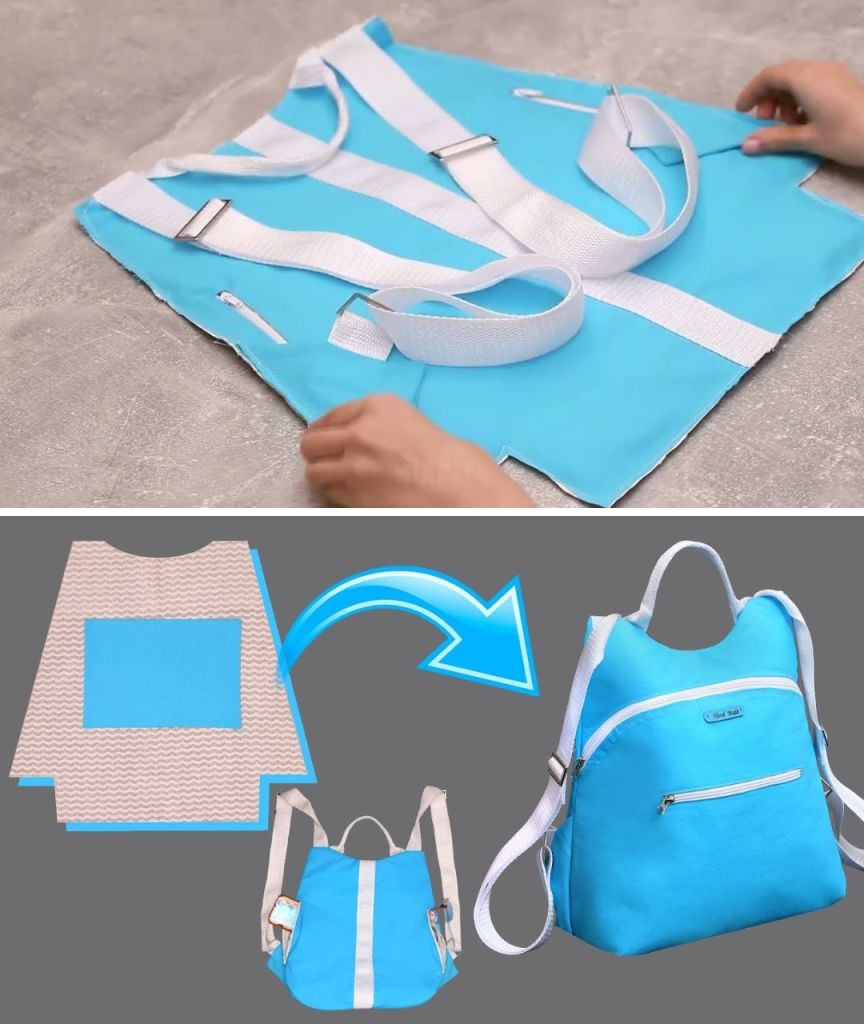
The easiest rectangular backpack tutorial is ideal for those who want a clear, structured sewing project without unnecessary complications.
Rectangular backpacks are popular because of their clean lines, efficient storage space, and modern aesthetic. This tutorial focuses on simplicity, clarity, and smart sewing techniques that help achieve professional results with minimal frustration.
By following the easiest rectangular backpack tutorial, you will discover that sewing a backpack does not have to be intimidating. With the right guidance, tools, and mindset, this project becomes an enjoyable learning journey. This article is designed to be fully optimized for SEO, humanized for easy understanding, and compliant with Google AdSense policies, ensuring high-quality, original content throughout.
The foundation of the easiest rectangular backpack tutorial starts with understanding why the rectangular shape is so effective. Rectangular backpacks maximize internal space, making them ideal for daily use, school, travel, or casual outings. Their straight edges simplify cutting and stitching, which is why they are perfect for sewing beginners.
Another important aspect of the easiest rectangular backpack tutorial is pattern simplicity. Rectangular designs reduce the need for complex curves or advanced construction techniques. This means fewer mistakes and a smoother sewing experience, especially for those still learning how to control fabric and seams.
The structure of a rectangular backpack also contributes to durability. When sewing using the easiest rectangular backpack tutorial, the straight seams distribute weight evenly, helping the backpack maintain its shape even when carrying heavier items.
Fabric choice plays a key role in this tutorial. Medium-weight cotton, canvas, denim, or recycled fabrics work exceptionally well. The easiest rectangular backpack tutorial encourages sustainable choices, such as upcycling old jeans or fabric scraps, adding both environmental and personal value to the final piece.
Measurements are another core concept. Rectangular backpacks rely on precise cutting, which makes the final assembly easier. In the easiest rectangular backpack tutorial, accurate measuring ensures that all pieces align perfectly during sewing.
Finally, understanding the basic anatomy of a backpack—front panel, back panel, side panels, bottom panel, straps, and optional pockets—helps demystify the process. The easiest rectangular backpack tutorial breaks down each component into manageable steps.
Before starting the easiest rectangular backpack tutorial, gathering the right materials is crucial. Having everything prepared helps maintain focus and avoids interruptions during the sewing process. This preparation stage is often overlooked but makes a significant difference.
The primary material in the easiest rectangular backpack tutorial is fabric. Choose a sturdy but manageable fabric. Cotton canvas is a popular option because it is easy to sew and durable. Lining fabric adds structure and a clean finish inside the backpack.
Thread selection is equally important. Use strong, high-quality polyester thread to ensure seams can handle daily wear. The easiest rectangular backpack tutorial emphasizes durability, and thread quality directly affects the lifespan of your backpack.
You will also need basic sewing tools such as fabric scissors, pins or clips, a measuring tape, and a sewing machine. While hand sewing is possible, the easiest rectangular backpack tutorial is designed for machine sewing to ensure strength and efficiency.
Interfacing is another key component. Adding fusible interfacing to certain panels provides stability and helps the backpack maintain its rectangular shape. The easiest rectangular backpack tutorial uses interfacing strategically without making the project overly complex.
Straps are essential and can be made from matching fabric or webbing. Adjustable straps are recommended, and the easiest rectangular backpack tutorial explains how to securely attach them to ensure comfort and safety.
Optional materials include zippers, magnetic snaps, or buttons. While not mandatory, these additions enhance functionality. The easiest rectangular backpack tutorial allows flexibility so you can customize based on your skill level.
The sewing process in the easiest rectangular backpack tutorial begins with cutting all fabric pieces according to measurements. Precision is key at this stage, as clean cuts make assembly smoother and more accurate.
Once pieces are cut, the tutorial guides you through assembling the outer shell. Sewing the side panels to the front and back panels forms the main body. The easiest rectangular backpack tutorial recommends sewing slowly and reinforcing seams at stress points.
The bottom panel is attached next, completing the rectangular structure. This step is often where beginners feel challenged, but the easiest rectangular backpack tutorial simplifies it by using clear alignment techniques and pinning methods.
Next comes the lining. Sewing the lining separately and then attaching it to the outer shell gives the backpack a professional finish. The easiest rectangular backpack tutorial ensures the lining fits perfectly without bunching or twisting.
Strap attachment is a critical stage. The tutorial explains how to position straps evenly and securely. The easiest rectangular backpack tutorial emphasizes reinforcement stitches to prevent tearing over time.
Finally, closures and finishing touches are added. Whether you choose a zipper, flap, or drawstring, the easiest rectangular backpack tutorial offers simple solutions that enhance usability without adding complexity.
One of the most exciting aspects of the easiest rectangular backpack tutorial is customization. You can personalize your backpack with colors, patterns, embroidery, or pockets that suit your lifestyle and taste.
This tutorial is ideal for creating backpacks for various purposes. Students can use them for school supplies, travelers can carry essentials, and hobbyists can store craft tools. The easiest rectangular backpack tutorial adapts easily to different needs.
Another benefit is the opportunity to practice and improve sewing skills. Straight seams, box construction, and strap attachment are foundational techniques reinforced throughout the easiest rectangular backpack tutorial.
Handmade backpacks also make thoughtful gifts. Sewing a backpack using the easiest rectangular backpack tutorial allows you to create meaningful, personalized presents for friends and family.
From a sustainability perspective, this tutorial encourages mindful crafting. Using leftover fabric or repurposed materials aligns with eco-friendly practices. The easiest rectangular backpack tutorial proves that practical sewing projects can also be environmentally responsible.
Finally, the sense of accomplishment cannot be overstated. Completing the easiest rectangular backpack tutorial builds confidence and motivates crafters to take on more advanced sewing projects in the future.
Is the easiest rectangular backpack tutorial suitable for beginners?
Yes, it is designed specifically with beginners in mind, using simple shapes and clear sewing steps.
What type of fabric works best for this backpack?
Medium-weight fabrics like canvas, denim, or cotton blends are ideal for durability and ease of sewing.
Do I need a sewing machine to follow this tutorial?
While hand sewing is possible, a sewing machine is strongly recommended for strength and efficiency.
How long does it take to complete the project?
Most people can complete the backpack in a few hours, depending on experience and customization.
Can I resize the backpack using this tutorial?
Yes, the rectangular structure makes resizing straightforward by adjusting measurements.
Is this backpack suitable for daily use?
Absolutely. When sewn properly, the backpack is durable enough for everyday activities.
The easiest rectangular backpack tutorial is sewing made accessible, practical, and rewarding. Throughout this article, you learned about the structure, materials, sewing process, and customization options that make this project ideal for all skill levels. By following the easiest rectangular backpack tutorial, you can confidently create a functional, stylish, and durable backpack while improving your sewing abilities.
This project demonstrates how sewing can combine creativity, sustainability, and everyday usefulness. If you found this guide helpful, leave your honest opinion and share your suggestions. Your feedback helps improve future tutorials and inspires others to start sewing with confidence.


