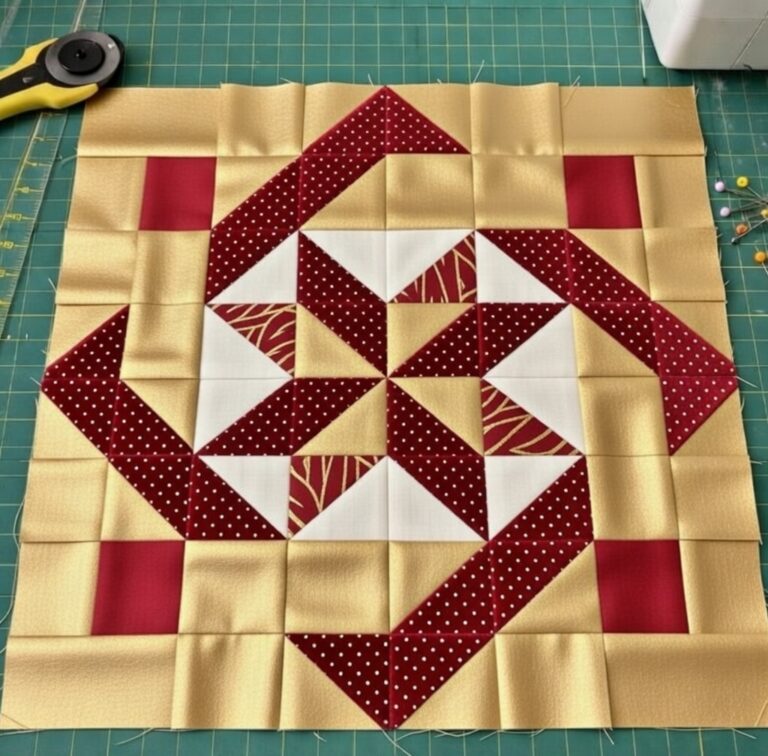
Patchwork Square Design Block Pattern

Sewing Teddy Bear Pattern is a timeless topic loved by crafters, handmade toy enthusiasts, and anyone who enjoys creating meaningful items with their own hands.
A well-designed Sewing Teddy Bear Pattern allows you to transform simple fabric into a charming, cuddly companion that can become a gift, keepsake, or decorative piece.
In this article, you will learn everything you need to know about working with a Sewing Teddy Bear Pattern, from understanding its basics to mastering details that elevate your final result.
Creating a teddy bear is more than just stitching pieces of fabric together. A Sewing Teddy Bear Pattern represents creativity, patience, and emotional value.
Handmade teddy bears are often associated with childhood memories, comfort, and love, making them especially popular as gifts for babies, children, and even adults. Because of this emotional connection, learning how to properly use and understand a Sewing Teddy Bear Pattern is essential for achieving a professional and heartfelt result.
From an SEO perspective, content related to Sewing Teddy Bear Pattern remains highly searched because people are always looking for clear guidance, beginner-friendly instructions, and creative inspiration. This article is structured to help you fully understand the process while remaining compliant with Google AdSense policies. It focuses on educational, family-friendly, and creative content that provides real value to readers interested in sewing and handmade crafts.
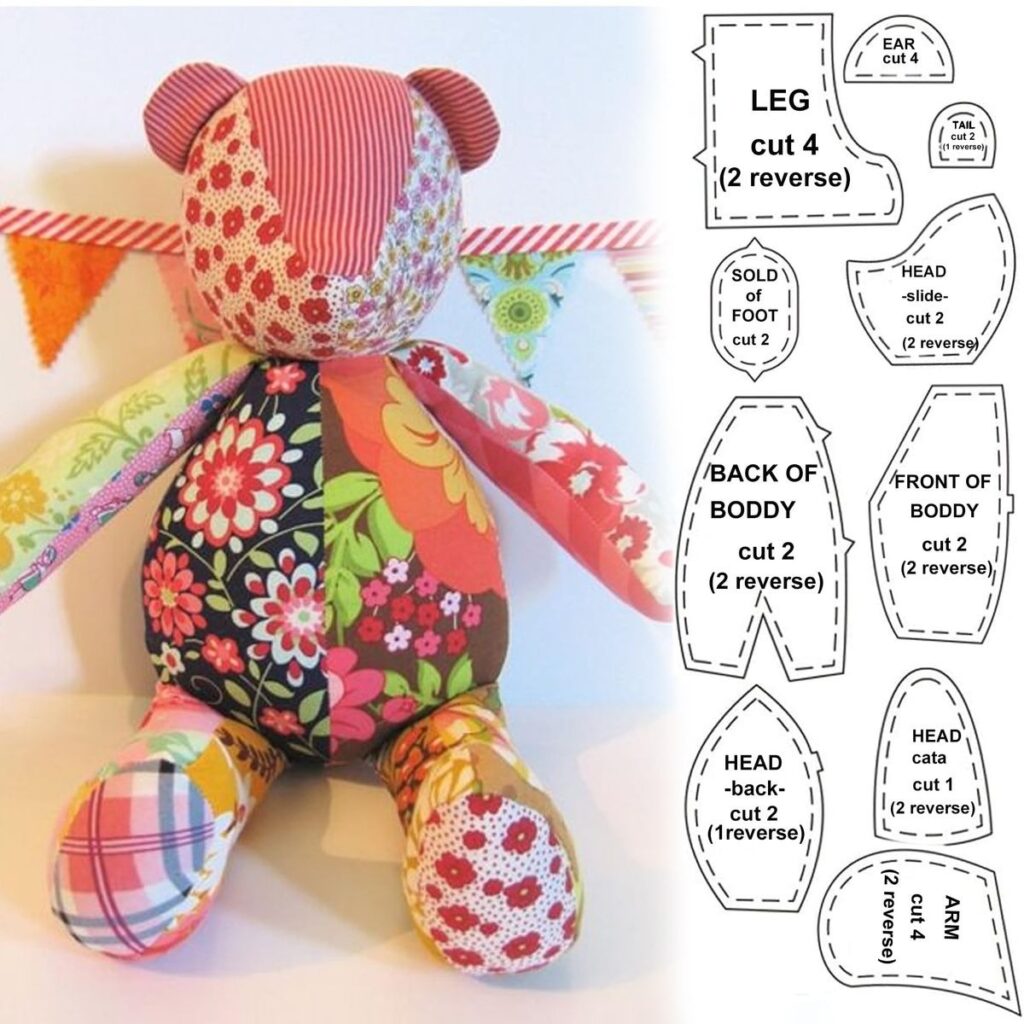
A Sewing Teddy Bear Pattern is essentially a blueprint that guides you through cutting and assembling fabric pieces to create a teddy bear. These patterns usually include templates for the head, body, arms, legs, and ears, ensuring that all parts fit together correctly. Understanding the layout of the pattern is the first step toward success.
Most Sewing Teddy Bear Pattern designs are beginner-friendly, but they still require attention to detail. You need to recognize grain lines, seam allowances, and notches marked on the pattern. These elements help maintain symmetry and ensure that the teddy bear holds its shape after sewing.
Fabric choice plays a major role when working with a Sewing Teddy Bear Pattern. Cotton, fleece, felt, and minky fabric are among the most popular options. Each fabric offers a different texture and appearance, allowing you to customize your teddy bear according to your personal style or the recipient’s preference.
Another important aspect of a Sewing Teddy Bear Pattern is size. Patterns can range from small, palm-sized bears to larger, huggable versions. Beginners often start with medium-sized patterns because they are easier to handle and less prone to mistakes.
Reading through the entire Sewing Teddy Bear Pattern instructions before starting is crucial. This helps you understand the sequence of steps, identify tricky sections, and prepare all necessary materials in advance.
Finally, remember that a Sewing Teddy Bear Pattern is a guide, not a rulebook. As you gain confidence, you can adjust proportions, add accessories, or personalize details to make your teddy bear truly unique.
Using the right materials is essential when following a Sewing Teddy Bear Pattern. Fabric is the foundation, and choosing high-quality material ensures durability and a polished finish. Soft fabrics are especially recommended if the teddy bear is intended for children.
Stuffing is another key component in any Sewing Teddy Bear Pattern project. Polyester fiberfill is commonly used because it is lightweight, washable, and maintains shape over time. Proper stuffing techniques help the teddy bear look balanced and cuddly rather than lumpy.
Basic sewing tools are necessary to complete a Sewing Teddy Bear Pattern successfully. These include sharp scissors, pins or clips, needles, matching thread, and a sewing machine or hand-sewing tools. Precision tools make a noticeable difference in the final result.
Safety features are particularly important when sewing for children. Many Sewing Teddy Bear Pattern instructions recommend embroidered eyes instead of plastic ones to avoid choking hazards. This ensures the finished toy is safe and family-friendly.
Marking tools such as fabric chalk or washable pens help transfer pattern markings accurately. These small details ensure that the pieces align properly during assembly, which is critical for symmetry.
Lastly, patience is an often-overlooked tool. Working with a Sewing Teddy Bear Pattern takes time, especially if you are new to sewing. Taking breaks and working carefully leads to better results and a more enjoyable crafting experience.
The first step in using a Sewing Teddy Bear Pattern is cutting the fabric accurately. Lay the pattern pieces on the fabric according to the grain direction and pin them securely before cutting. Accuracy at this stage prevents fitting issues later.
Next, you begin assembling smaller parts such as the arms, legs, and ears. Most Sewing Teddy Bear Pattern designs recommend sewing these components separately before attaching them to the body. This modular approach simplifies the process.
Turning and stuffing the pieces is where the teddy bear starts to come alive. Use a turning tool or blunt object to gently push out seams. When following a Sewing Teddy Bear Pattern, even stuffing distribution is key to achieving a professional look.
Attaching the limbs and head requires careful alignment. Pinning these parts in place before sewing ensures that the teddy bear sits and stands evenly. This step is often highlighted in any well-written Sewing Teddy Bear Pattern.
Facial features are usually added near the end. Whether you choose embroidery or sewn-on details, this is the stage where personality shines through. A Sewing Teddy Bear Pattern often provides placement guides for eyes, nose, and mouth.
Finally, closing seams and adding finishing touches completes the project. Hand-stitching the final opening neatly ensures durability and a clean appearance. At this point, your Sewing Teddy Bear Pattern has transformed into a finished handmade toy.
One of the greatest advantages of using a Sewing Teddy Bear Pattern is the ability to customize your project. You can change fabric colors, textures, and patterns to create unique designs for different occasions.
Clothing and accessories are popular additions. Many crafters use the same Sewing Teddy Bear Pattern to create themed bears by adding hats, scarves, or dresses. These details enhance visual appeal and gift value.
Embroidery offers another level of customization. Names, dates, or small symbols can be stitched onto the teddy bear, making it a personalized keepsake. A Sewing Teddy Bear Pattern provides a solid base for these creative enhancements.
Seasonal themes are also common. Holiday-themed bears made from a Sewing Teddy Bear Pattern are especially popular during festive seasons. Changing colors and accessories can easily adapt the pattern to different celebrations.
You can also experiment with size adjustments. Scaling a Sewing Teddy Bear Pattern up or down allows you to create a matching set of teddy bears, which is perfect for collections or decorative displays.
Over time, experienced sewists often develop their own signature style using a Sewing Teddy Bear Pattern as a starting point. This creative freedom is what makes sewing teddy bears such a rewarding craft.
What skill level is required for a Sewing Teddy Bear Pattern?
Most Sewing Teddy Bear Pattern designs are suitable for beginners, especially those labeled as easy or beginner-friendly. Basic sewing knowledge is usually sufficient.
How long does it take to complete a Sewing Teddy Bear Pattern?
The time varies depending on complexity and experience, but most projects take between a few hours and a full day to complete.
Can I hand-sew a Sewing Teddy Bear Pattern?
Yes, many people successfully complete a Sewing Teddy Bear Pattern using hand-sewing techniques, although a sewing machine can speed up the process.
What fabric works best for a Sewing Teddy Bear Pattern?
Soft, durable fabrics like cotton, fleece, or minky are ideal choices for a Sewing Teddy Bear Pattern, especially for cuddly toys.
Are Sewing Teddy Bear Patterns safe for children?
When made with embroidered features and secure stitching, a Sewing Teddy Bear Pattern project can be very safe for children.
Can I sell teddy bears made from a Sewing Teddy Bear Pattern?
This depends on the specific pattern’s usage terms, but many patterns allow small-scale handmade sales.
This article explored the complete journey of working with a Sewing Teddy Bear Pattern, from understanding the basics and gathering materials to sewing, customizing, and finishing a beautiful handmade teddy bear. You learned how each step contributes to creating a durable, safe, and emotionally meaningful toy. A Sewing Teddy Bear Pattern is not just a guide—it is an invitation to creativity, craftsmanship, and personal expression.
If this guide helped you or inspired you to start your own project, feel free to leave an honest opinion and share your suggestions. Your feedback is valuable and helps improve future content for fellow craft lovers.
