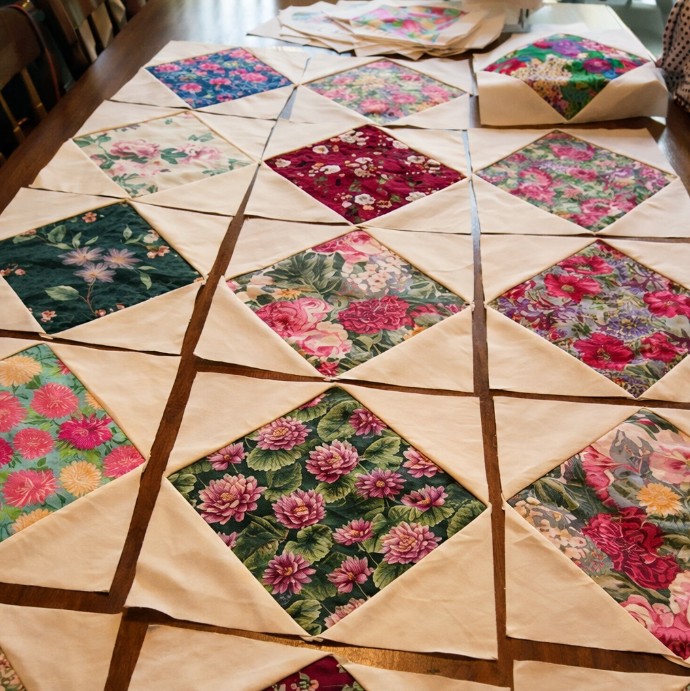
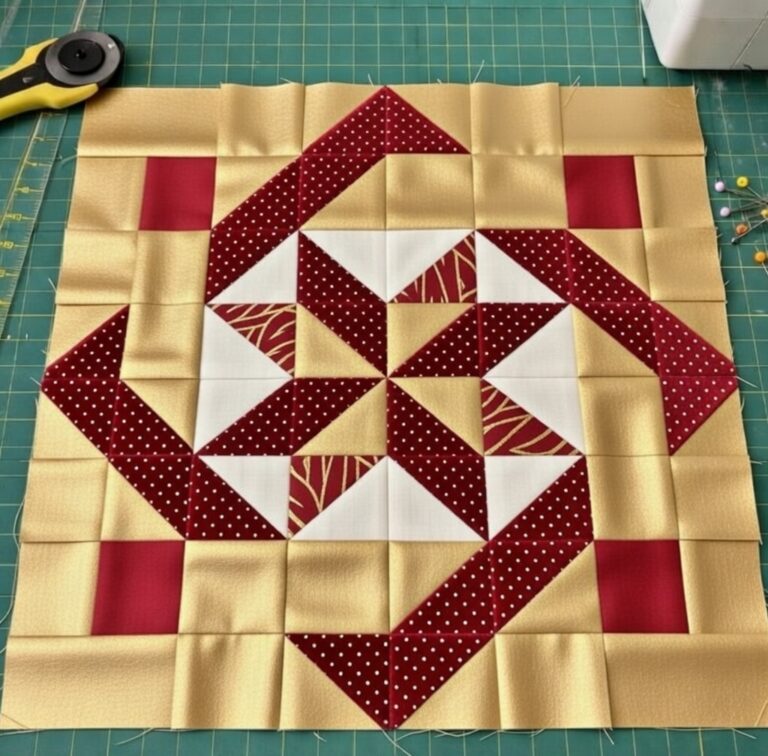
Patchwork Square Design Block Pattern

The Acorn Quilt Block Tutorial is a delightful way to bring the warmth of autumn into your quilting projects while learning important piecing skills.
One of the most important aspects of working on the Acorn Quilt Block Tutorial is learning how to balance simplicity with creativity.
Another key feature of this Acorn Quilt Block Tutorial is the focus on precision. Quilting relies heavily on accuracy in cutting, pressing, and sewing, and this block helps quilters refine those skills.
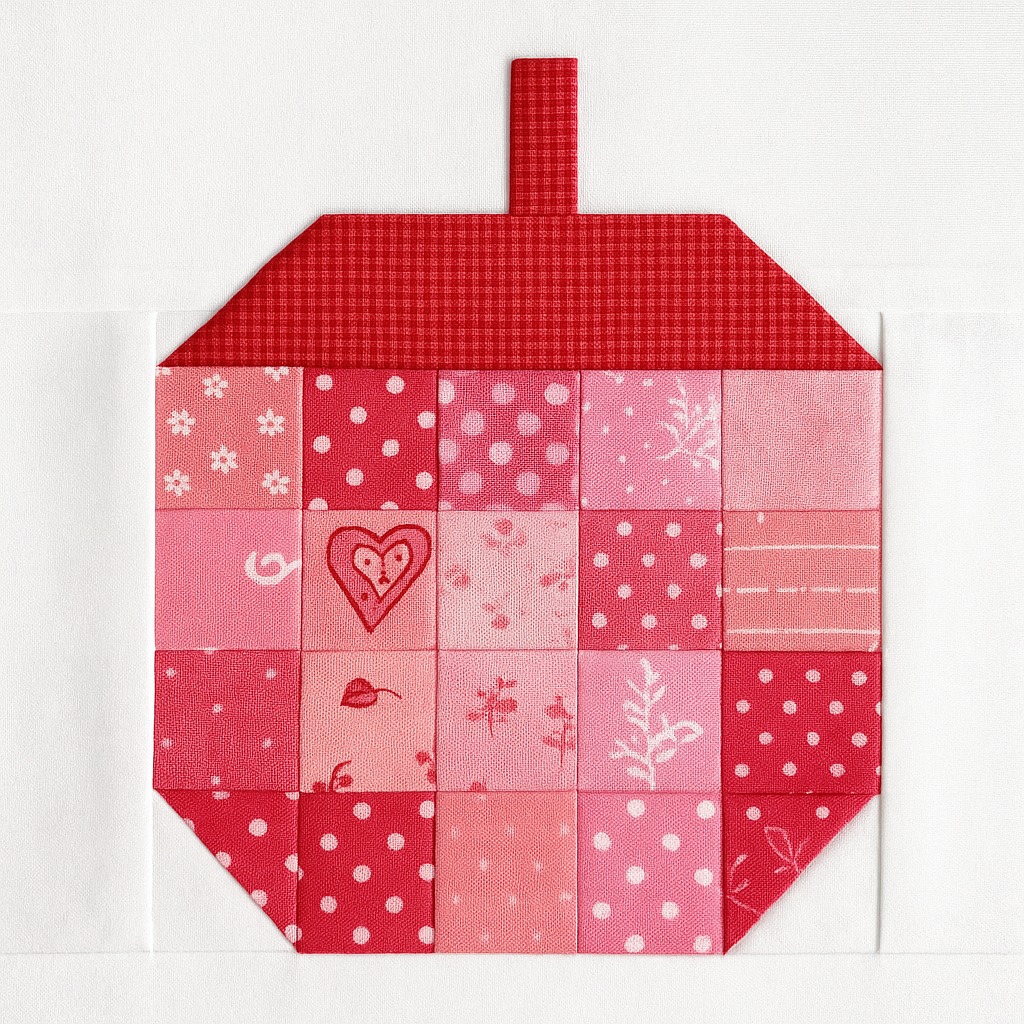
The Acorn Quilt Block Tutorial begins with understanding the basic layout of the design. An acorn block usually features a top section shaped like the cap of the acorn and a bottom section representing the nut. The combination of fabric pieces creates a simple yet recognizable shape. Before starting, quilters often sketch or lay out their fabrics to visualize how the acorn will look when assembled. This planning stage is essential for achieving balance in color and contrast.
When working on the acorn cap portion, many quilters prefer to use darker fabrics or patterns that mimic texture, giving the illusion of a natural acorn cap. This part of the block is made with carefully cut squares and triangles that, when joined, form a sturdy top. The bottom portion, which symbolizes the nut, is often lighter and more uniform, creating a nice contrast. This careful division of tones ensures that the block stands out clearly within a quilt.
An important detail in the Acorn Quilt Block Tutorial is seam allowance. Quilters must maintain a consistent 1/4-inch seam throughout the process to ensure that pieces fit together correctly. Even small deviations can lead to mismatched seams, so accuracy at this stage saves time later. Many quilters recommend pressing seams open or to the side depending on the block’s construction, which also helps achieve a polished finish.
Another valuable aspect of the acorn block is its adaptability. While the traditional version keeps to autumn colors, modern quilters may experiment with unexpected shades like blues, pinks, or even monochrome palettes. This makes the block suitable for quilts beyond the fall season. With the right fabric selection, an acorn block can be transformed into a year-round design element.
The block is also beginner-friendly. Because it mainly involves straight seams and simple shapes, it is a great choice for those just starting out in quilting. At the same time, experienced quilters enjoy the block because it can be quickly assembled and incorporated into larger, more complex quilt designs. This balance between ease and creativity is what makes the Acorn Quilt Block Tutorial so appealing.
Lastly, understanding the acorn block means recognizing its symbolic charm. The acorn has long been considered a symbol of growth, patience, and prosperity. Incorporating this motif into a quilt adds depth and meaning to the project, transforming it into more than just a piece of fabric art. It becomes a quilt with a story.
The Acorn Quilt Block Tutorial emphasizes careful preparation before beginning the actual sewing. Start by selecting fabrics with good contrast between the cap and the nut sections. Cut your fabrics into the required sizes, usually squares and rectangles, depending on the pattern dimensions you are following. Keeping your rotary cutter sharp and ruler steady ensures clean edges, which makes assembly much smoother.
Begin assembling the cap portion by sewing half-square triangles together. These triangles are the key to shaping the pointed top of the acorn. Lay them out first before stitching to confirm placement. Once you are confident, sew with precision, remembering to use your 1/4-inch seam allowance. Press your seams flat to keep the block neat.
Next, work on the body of the acorn. This part usually involves sewing larger squares or rectangles together, which helps create the nut’s rounded shape. The key here is consistency—matching seams correctly so the block looks symmetrical. Once completed, join the cap and nut sections together. This step completes the recognizable acorn design.
To add variety to your quilt, consider making multiple acorn blocks in different fabrics. Each one can showcase unique colors, making the final quilt lively and eye-catching. Even if you stick to an autumn theme, mixing prints such as plaids, florals, or solids can create stunning results.
Another tip in this Acorn Quilt Block Tutorial is to always square up your block after completion. Sometimes, even with precise sewing, blocks may shift slightly. Using a quilting ruler to trim edges helps keep your blocks uniform in size, which is crucial when piecing together a larger quilt.
Finally, once you’ve mastered one block, you can experiment with scaling it up or down. Larger acorn blocks make striking quilt centers, while smaller ones are perfect for borders or accent pieces. The versatility of this tutorial means you can adapt it to fit any project you envision.
The Acorn Quilt Block Tutorial is not just about learning the technique—it also opens the door to countless creative applications. One of the most popular uses is in autumn-themed quilts. A collection of acorn blocks can create a cozy quilt that reflects the season’s beauty. Adding other blocks such as leaves or pumpkins can make the quilt even more festive.
Acorn blocks are also wonderful for smaller projects. For example, you can use a single acorn block to make a decorative pillow cover. It becomes an instant accent piece for a couch or bed during the fall months. Similarly, placemats or table runners made from acorn blocks bring seasonal charm to dining spaces.
Another creative idea is to combine acorn blocks with plain fabric panels to create modern quilts. This approach highlights the acorn design without overwhelming the entire quilt. The balance of negative space and detailed blocks gives a sophisticated look that suits contemporary homes.
Quilters who enjoy personalizing their gifts often turn to the acorn block. A quilt made with this motif can be gifted to friends or family members as a symbol of growth and abundance. It makes the present meaningful, showing care and thoughtfulness.
The Acorn Quilt Block Tutorial includes several tips to help quilters succeed. First, always press your fabric before cutting. Wrinkles and folds can distort measurements, leading to uneven blocks. Taking the time to press ensures accuracy from the very beginning.
Second, organize your fabric pieces before sewing. Labeling or grouping pieces by section—cap and nut—helps avoid confusion. This step is especially helpful if you are making multiple blocks at once.
Third, consider chain piecing when assembling multiple acorn blocks. This technique speeds up the process by sewing several pieces in a continuous line without cutting threads between each one. It saves time and helps maintain rhythm.
Fourth, invest in a good quilting ruler and rotary cutter. These tools are essential for precise cutting, which directly affects the quality of your block. A self-healing cutting mat is also highly recommended to keep your tools sharp.
What size is a standard acorn quilt block?
Most acorn quilt blocks measure around 8 to 12 inches, but the size can be adjusted depending on the pattern or project.
Is the Acorn Quilt Block suitable for beginners?
Yes, the Acorn Quilt Block Tutorial is beginner-friendly, as it uses simple shapes like squares, rectangles, and triangles.
Can I make the acorn block with scraps?
Absolutely. This block is a great way to use up fabric scraps, especially small pieces that still have enough contrast for the cap and nut.
Do I need special tools for this quilt block?
Basic quilting tools such as a rotary cutter, ruler, and sewing machine are sufficient. A quilting ruler is particularly helpful for accuracy.
Can the acorn quilt block be used in modern quilts?
Yes, with the right fabric selection, the acorn block can fit into both traditional and modern quilt designs.
How can I avoid uneven blocks?
Pay close attention to seam allowance and press your seams properly. Squaring up your block at the end also helps keep everything consistent.
The Acorn Quilt Block Tutorial is more than just a step-by-step guide—it’s an invitation to explore creativity, practice precision, and bring a meaningful symbol into your quilting projects.
From understanding the structure of the block to experimenting with fabrics and creative uses, this tutorial provides the foundation for making quilts that are both beautiful and unique.
Now that you’ve learned how to create and customize the acorn quilt block, it’s your turn to try it out and see how it fits into your quilting style.
Share your experiences, leave your honest opinion, and let us know your suggestions—we’d love to hear how this tutorial helped you on your quilting journey.


