
Crochet Heart Rooster Rug Pattern – The Best Techniques and Tools

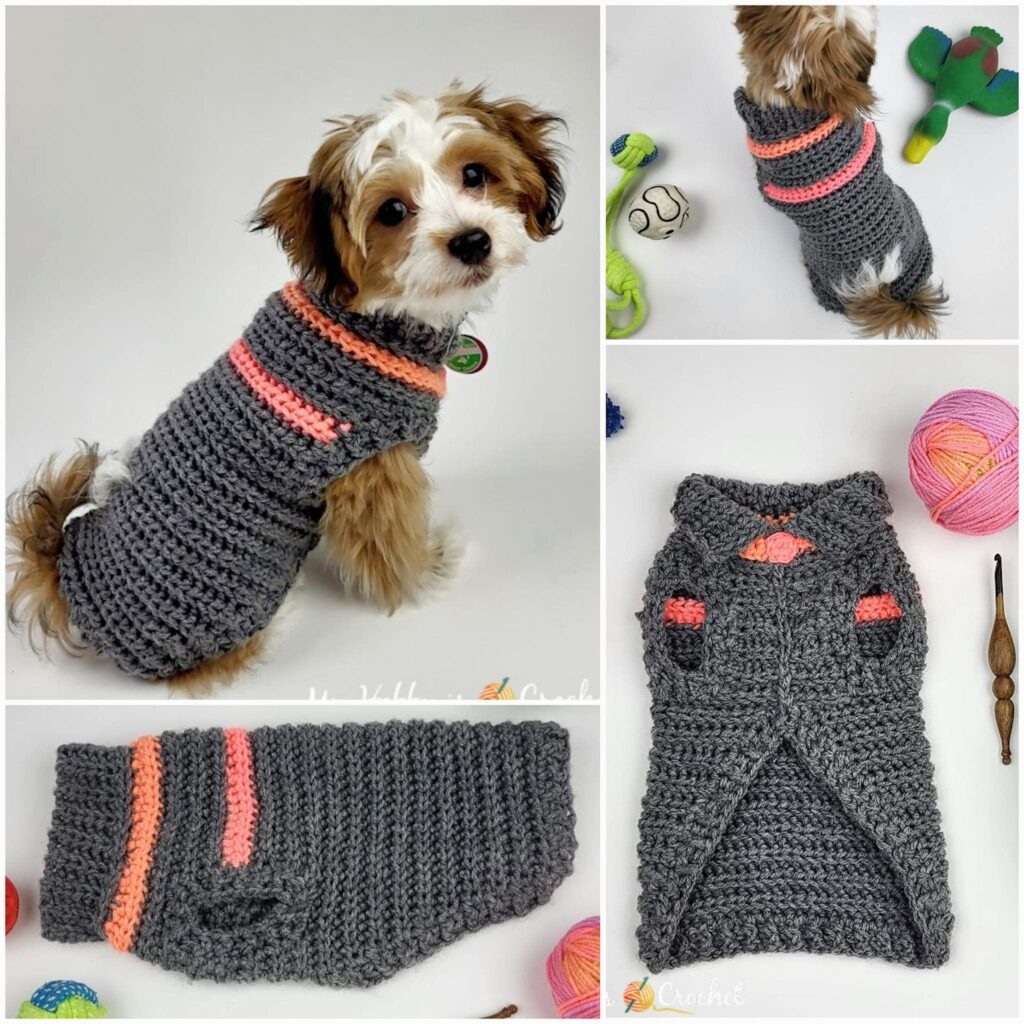
Ribby Dog Sweater Pattern is a delightful crochet project designed to keep your furry friend warm, stylish, and comfortable. Starting with a Ribby Dog Sweater Pattern allows you to create a stretchy, cozy garment that hugs your dog’s body gently while allowing full movement.
Crochet ribbing is known for its elasticity and softness, making it ideal for wearable pet accessories. Whether you’re an experienced crocheter or just beginning, this pattern offers a satisfying blend of practicality and creativity.
Handmade dog sweaters also carry a personal touch—every stitch reflects affection and care for your pet.
Creating a Ribby Dog Sweater Pattern in crochet provides greater customization compared to store-bought clothing. Dogs come in all shapes and sizes, and crocheted ribbing makes it easier to achieve a snug and adjustable fit. The ribbed texture stretches comfortably around the dog’s chest, shoulders, and neck. This flexibility makes the sweater suitable for many breeds, from small companions like Chihuahuas to medium-sized pups like Cocker Spaniels. With the right measurements and simple modifications, you can adjust length, width, and neckline based on your dog’s proportions.
Another advantage of working on a crochet ribbed dog sweater is the simplicity of the stitches involved. Crochet ribbing is often made using half double crochet worked in the back loops only or extended single crochet stitches. These techniques create a fabric that stretches naturally, mimicking knitwear while maintaining the familiar feel of crochet. With a bit of patience and attention to detail, you’ll be able to craft a professional-looking garment that feels soft, warm, and breathable. Let’s explore the essential aspects of this practical and adorable crochet pattern.
The foundation of the Ribby Dog Sweater Pattern lies in its ribbed construction. Crochet ribbing differs from knit ribbing, yet it achieves a similar stretchy effect. Many crafters use half double crochet back loop only (HDC BLO) or single crochet back loop only (SC BLO) to form textured vertical lines. These vertical ridges are what give the sweater its flexibility and form-fitting shape.
Working in the back loops only is simple. Instead of inserting your hook under both loops of the stitch, you insert it only under the loop farthest from you. This lifts one loop forward, forming a ridge. When you build rows of these stitches, the fabric becomes elastic and perfect for sweaters. This technique is beginner-friendly and easy to memorize.
The ribbing also helps the sweater hug your dog’s body without feeling restrictive. Ribbed crochet stretches and returns to shape, so it adapts as your dog moves, sits, or lies down. This feature is especially important for the chest area, where dogs need freedom of movement. A well-made ribbed sweater should feel like a gentle, comfy wrap.
Ribbing also adds visual appeal. The vertical texture makes the sweater look stylish and modern. You can choose neutral tones like gray or cream for a classic look or embrace bright and bold colors. Multicolored yarns create beautiful stripes, and the ribbing highlights the flow of colors naturally.
This technique is also durable. Ribbed crochet forms a thicker, warmer fabric than basic stitches, making it ideal for fall and winter. Your Ribby Dog Sweater Pattern will hold up well during walks, playtime, and everyday wear. With the right care, it can last for years, giving your pet comfort in every season.
Because ribbing is so versatile, you can easily adjust the pattern to create matching human accessories such as hats or scarves. Many pet owners enjoy coordinating outfits, and ribbed crochet makes that both fun and achievable.
The success of your Ribby Dog Sweater Pattern depends heavily on selecting the right materials. Yarn choice comes first. Acrylic yarn or soft wool blends are the most common options. Acrylic is durable, washable, and comfortable for pets, while wool blends provide additional warmth. Cotton is less suitable for winter sweaters but works well for mild climates.
Choose a medium-weight (worsted) yarn for optimal structure and stretch. This weight keeps the sweater warm without making it too thick or heavy. Soft and non-itchy yarn ensures your dog stays comfortable. Always avoid yarn with loose fibers that may shed or irritate your pet’s skin.
A crochet hook that matches the yarn weight is essential. Most worsted yarns work well with a 4.5mm to 5.5mm hook, but always check the yarn label. Using a slightly larger hook can make the ribbing stretchier, while a smaller hook creates a tighter, more fitted sweater. Test a small swatch to find the perfect tension.
You will also need a tape measure to take accurate body measurements. Proper sizing is the key to a successful Ribby Dog Sweater Pattern. Measure your dog’s chest circumference, neck circumference, and the length from the base of the neck to the waist. These measurements help you adjust the starting chain and the number of rows needed.
Scissors and a yarn needle complete your tool kit. The yarn needle helps weave in ends neatly and sew any seams or closures. Some crafters like adding buttons, snaps, or a small harness opening. These details are optional but can improve convenience and usability.
Finally, have your dog nearby during the crafting process, if possible. Trying the sweater on during assembly helps you make real-time adjustments for the perfect fit. Your dog’s comfort and mobility should always guide your design choices.
Your Ribby Dog Sweater Pattern typically begins with creating a long ribbed panel that will wrap around the dog’s chest. The starting chain should match your dog’s body length from neck to waist. Once you establish the width, you crochet rows of ribbing until the piece reaches your dog’s chest circumference.
When the chest panel is complete, you join the ends to create a tube. This tube becomes the main body of the sweater. Be sure the seam is comfortable and smooth so it does not rub against your pet. Ribbed crochet naturally forms a stretchy tube that accommodates different body shapes.
Next, you shape the neck area. This is usually done by reducing stitches or crocheting a narrower ribbed tube. The neck should be snug but not tight. Ribbing makes it easy for the dog to slip its head in comfortably. You can also fold the neck ribbing down to create a turtleneck effect for colder days.
The leg openings are created by working rows back and forth instead of in the round. Leaving small gaps on each side gives your dog room to move freely. These openings should be large enough for comfort but not so large that the sweater shifts excessively. After forming the leg holes, you rejoin your work and continue crocheting in the round.
Once the openings are complete, you finish with a few more rows of ribbing to cover the lower chest and belly. The bottom edge can be straight or slightly curved depending on your dog’s shape. Add buttons or snaps if you prefer an adjustable closure instead of a pull-over style.
Try the sweater on your dog occasionally throughout the process. Ribbing is forgiving, so if it feels too tight or too loose, you can add or remove rows easily. A well-fitted Ribby Dog Sweater Pattern should feel like a soft, stretchy hug—snug enough to stay in place but comfortable enough for running, stretching, and relaxing.
One of the advantages of the Ribby Dog Sweater Pattern is the ability to personalize it. You can use multiple colors to create stripes, gradients, or color-blocking sections. Ribbing highlights color transitions beautifully, making the sweater visually striking.
Adding a small pocket or decorative patch gives the sweater a unique touch. You can crochet a tiny bone-shaped patch, a heart, or an initial representing your dog’s name. These small additions make your crochet project feel even more special.
Textured stitches can also enhance your design. While the ribbing provides the main structure, you can add a decorative panel along the back using puff stitches, bobbles, or basketweave designs. These elements give the sweater character without compromising comfort.
Seasonal variations are another fun route. Use warm, deep colors for winter or pastel tones for spring. You can even create holiday-themed sweaters—red and green for Christmas, orange and black for Halloween, or soft neutrals for everyday use.
A harness opening is an extremely practical customization. Simply leave a small gap or crochet a reinforced buttonhole on the upper back so you can attach a leash easily. This makes the sweater more functional for outdoor walks.
Lastly, consider making matching accessories. A ribbed dog bandana, hat, or bow tie can complement the sweater perfectly. Coordinated pieces look adorable in photos and allow your pet to show off your crochet skills in style.
Is the Ribby Dog Sweater Pattern beginner-friendly?
Yes. The pattern mostly uses basic stitches like single crochet or half double crochet worked in the back loop only.
What yarn is best for a dog sweater?
Acrylic or soft wool blends are ideal because they are warm, washable, and comfortable for pets.
How do I measure my dog for the sweater?
Measure neck circumference, chest circumference, and length from neck base to waist.
Can this pattern fit any dog size?
Absolutely. Ribbing is stretchy and easy to adjust, making the pattern adaptable for most breeds.
Is it washable?
Yes. Most acrylic yarn sweaters can be machine-washed on a gentle cycle. Air-dry for best results.
Should the sweater be tight or loose?
It should be snug but not restrictive. Ribbing allows for natural stretch and comfort.
Creating a Ribby Dog Sweater Pattern in crochet is a rewarding experience that blends creativity, practicality, and love for your furry friend. With customizable sizing, soft ribbed texture, and endless design options, this pattern helps you craft a warm and stylish garment your dog will enjoy wearing.
I hope this guide has helped you understand each step clearly. Please share your honest opinion and suggestions for future tutorials—your feedback is truly appreciated!


