
Crochet Heart Rooster Rug Pattern – The Best Techniques and Tools

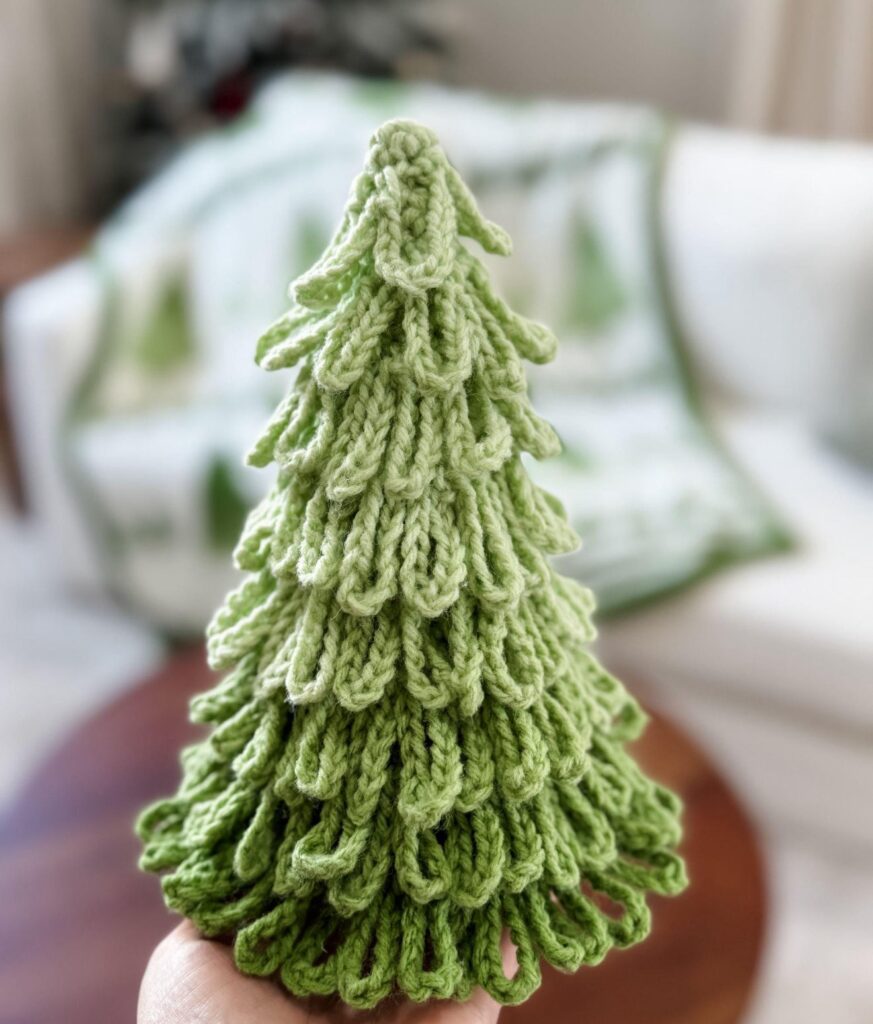
Ombre Loopy Crochet Trees Free Pattern is a beautiful and creative project that combines texture, color transitions, and holiday charm.
The main appeal of this project lies in its unique structure. Instead of creating a flat piece, you build a tree that has depth, dimension, and softness.
It helps beginners understand how to work in the round, how to create consistent loops, and how to use yarn color changes effectively.
When starting this project, the first thing to consider is the type of yarn. Using ombre or gradient yarns is ideal because it naturally creates the fade effect. However, you can also use multiple solid colors and switch them as you progress up the tree. The best yarns are usually medium-weight acrylic or cotton blends, as they hold shape well while still being easy to handle. Choosing yarn with a bit of sheen can also add extra elegance to your finished piece.
The next important tool is the crochet hook. The recommended size will depend on the yarn you select, but most patterns use hooks between 4 mm and 5.5 mm. If you want tighter stitches and a sturdier tree, go with a smaller hook. For a softer and fluffier look, choose a larger hook. Always remember that gauge is not critical for this project, which makes it less stressful for beginners.
Stuffing material is another essential element. Polyester fiberfill works well because it provides structure without being too heavy. Some crocheters also use scrap yarn as stuffing, which is a great eco-friendly alternative. To keep the tree stable, you might want to add a small base made of cardboard or a wooden disc at the bottom. This prevents it from tipping over when displayed.
Scissors and a yarn needle are standard tools for finishing. You will need the scissors to trim excess yarn and the needle to weave in ends securely. Stitch markers can also be useful, especially for beginners who are working in continuous rounds. They help keep track of the starting point and prevent mistakes.
Optional embellishments can take your tree to the next level. Beads, sequins, ribbons, or small ornaments can be sewn onto the loops for extra sparkle. Some crafters even add tiny fairy lights around the trees to make them glow during the holiday season. These personal touches make the Ombre Loopy Crochet Trees Free Pattern more exciting and customizable.
Finally, preparation is key. Gather all your materials in one place before starting, so you can enjoy the crocheting process without interruptions. Having everything ready ensures a smoother experience and helps maintain your creative flow. The beauty of this project is that it does not require expensive supplies, making it accessible to anyone interested in crochet.
The first step in creating your tree is to begin with a magic ring or a small chain circle. This will form the foundation for your tree base. Working in the round is essential, as it allows the project to take on a three-dimensional shape. Beginners may take some time to adjust to crocheting in the round, but with practice, it becomes second nature.
Next, you will increase stitches gradually to expand the base of the tree. The increases should be consistent so that the base remains flat. This step is similar to how you would start a crochet hat or coaster, but instead of staying flat, you will eventually taper upwards. Keeping track of stitch counts here is important to avoid uneven shaping.
Once the base is complete, you will start working upwards to form the cone shape of the tree. This involves alternating rounds of regular single crochet stitches with rounds of loop stitches. The loop stitch is what gives the tree its fluffy and playful texture. If you are new to loop stitches, practicing them separately before starting the main project can be helpful.
As you continue crocheting upwards, you will also incorporate your ombre effect. If you are using gradient yarn, the color changes will happen naturally. If you are working with multiple colors, switch yarns carefully to ensure a smooth transition. Blending the shades gradually is what creates the signature ombre look of this pattern.
Shaping the tree requires tapering the stitches. This means you will decrease occasionally as you move higher, giving the project a cone-like structure. It’s important to decrease evenly so that the tree does not lean to one side. Patience is key here, as small mistakes can change the overall appearance.
Finally, when you reach the top of the tree, you will close it neatly and weave in the ends. At this point, you can also add stuffing to give the tree structure. If desired, you can sew the base onto a disc for stability. Once finished, your Ombre Loopy Crochet Trees Free Pattern project will be ready for display.
One of the best parts about this pattern is how flexible it is. You can easily adjust the size of the tree by changing yarn weight, hook size, or the number of rounds. Smaller trees make perfect ornaments or table decorations, while larger trees can be used as statement pieces for your living room or entryway.
Experimenting with colors is another way to personalize your project. Instead of a traditional green gradient, you might use shades of blue, silver, or even pastel pinks. This opens the door to creating trees for different themes, such as winter wonderland or modern minimalist décor. The ombre effect ensures that no matter what colors you choose, the final piece will have a polished look.
Texture can also be varied. While the loop stitch is the signature element of this design, you can mix in bobble stitches, puff stitches, or even clusters for extra dimension. This allows you to create a collection of trees where each one has its own unique style.
Embellishments add even more creativity. Tiny pearls can give your tree a luxurious touch, while glitter yarn can make it sparkle under the lights. For a rustic effect, add twine bows or wooden beads. The fun lies in experimenting and making the project truly your own.
Another creative idea is to place the trees on stands. Using candlestick holders or wooden dowels can turn your crochet trees into elegant tabletop decorations. This approach works especially well for those who want to create a centerpiece.
Finally, consider gifting these trees. Handmade items carry special meaning, and a set of ombre crochet trees makes a thoughtful holiday present. Whether given individually or as a group, they will be appreciated for their beauty and the time invested in making them.
Consistency is one of the keys to success. Try to keep your loop stitches the same size throughout the project. Uneven loops can make the texture look messy. Using a finger or tool to measure loop length can help maintain uniformity.
Practice patience when switching colors. To achieve a smooth ombre effect, avoid abrupt changes. Blending one shade into another creates a seamless look that enhances the beauty of the tree. Take time to weave in ends neatly, as this will also affect the final appearance.
Blocking is another helpful technique. While not always necessary for small projects, lightly blocking your tree can improve its shape and help the loops sit nicely. Be gentle with steam or water when blocking to avoid flattening the texture.
If you are a beginner, don’t be discouraged by mistakes. The loop stitch may feel tricky at first, but it becomes easier with repetition. Consider making a small practice swatch before starting the full tree. This will boost your confidence and reduce errors.
Time management also plays a role. Although this project is not overly complicated, it can take longer than expected because of the loops. Setting aside dedicated time to work without distractions will help you finish more efficiently.
Lastly, embrace creativity. No two Ombre Loopy Crochet Trees will ever be identical, and that’s part of the charm. Each tree reflects your personal touch, making it a one-of-a-kind decoration.
1. Is the Ombre Loopy Crochet Trees Free Pattern beginner-friendly?
Yes, it is beginner-friendly. While the loop stitch requires practice, the rest of the pattern uses basic stitches, making it accessible for all skill levels.
2. What yarn works best for this project?
Medium-weight yarns, especially acrylic or cotton blends, work well. Ombre or gradient yarns are ideal for achieving the fading color effect.
3. Can I make these trees in different sizes?
Absolutely. Adjusting yarn thickness, hook size, and stitch count allows you to create trees in various sizes.
4. Do I need to stuff the tree?
Stuffing is recommended if you want the tree to hold its shape. Fiberfill or scrap yarn works well as filling material.
5. How long does it take to finish one tree?
The time depends on your skill level and tree size. On average, a medium-sized tree may take a few hours to complete.
6. Can I decorate the trees after finishing them?
Yes, you can add beads, ribbons, sequins, or even small lights for extra charm and customization.
The Ombre Loopy Crochet Trees Free Pattern is a delightful project that combines texture, color, and creativity. It allows beginners to practice new stitches while giving experienced crocheters room for customization.
From choosing yarns to adding embellishments, every step offers opportunities to personalize your work. These trees can serve as decorations, gifts, or meaningful keepsakes that brighten any space.
If you try this project, share your honest opinion and suggestions—we’d love to know how your unique version turned out.


