Sunflower Bracelet Pattern

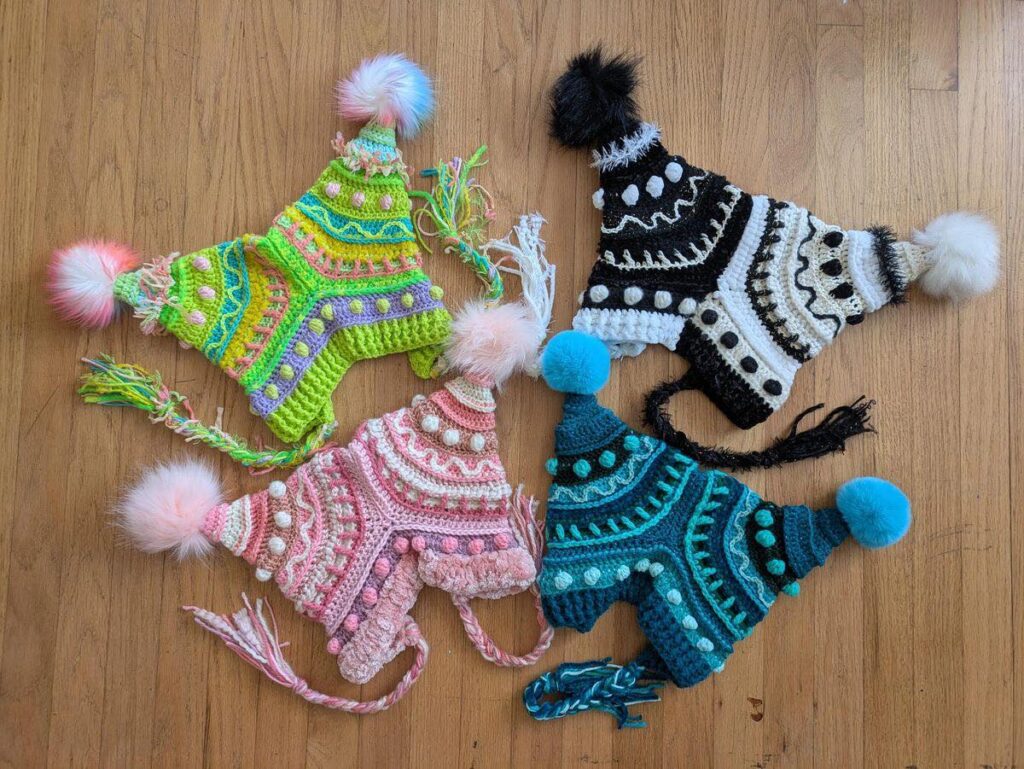
Jester Crochet Beanies Pattern has become one of the most creative and playful crochet trends for those who love mixing fun and fashion.
Whether you’re a beginner learning the basics or an experienced crocheter looking for something new, a jester crochet beanie offers an exciting project that combines color, texture, and imagination.
This pattern allows you to craft a beanie that’s not only comfortable but also bursting with personality, making it perfect for festivals, costumes, or simply standing out during cold seasons.
When people search for a Jester Crochet Beanies Pattern, they’re usually looking for a detailed, easy-to-follow guide that helps them bring whimsical charm into their crochet projects.
The unique jester style—with its pointed corners, pom-poms, and colorful panels—turns an ordinary beanie into a fun statement piece. The versatility of the pattern makes it ideal for all ages and styles, as you can customize the colors and shapes to suit your taste.
In this article, we’ll explore everything you need to know about creating and styling jester crochet beanies, from choosing the right yarn and stitches to adding decorative touches. You’ll learn how to make this pattern work for you, whether you want a traditional jester look or a modern twist. Let’s dive into the vibrant world of crochet creativity and discover how this joyful accessory can brighten up any outfit.
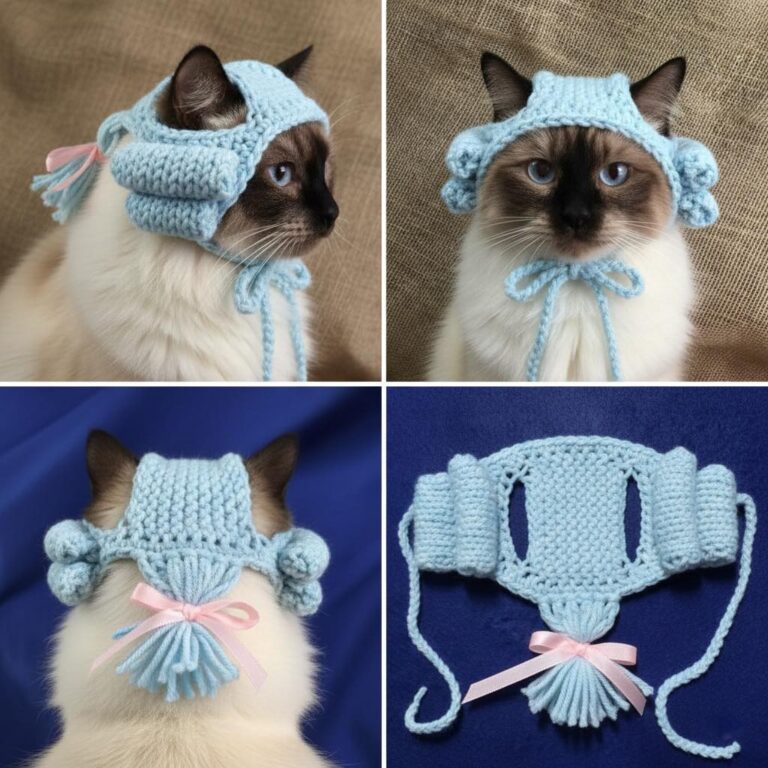
To truly master the Jester Crochet Beanies Pattern, it’s essential to understand its structure and purpose. A jester beanie is inspired by the classic jester hat, often seen in medieval or festive settings. It typically features multiple points or “arms,” each ending with a pom-pom or bell. When crocheted, this design combines both structure and softness, giving it a playful yet wearable aesthetic.
The base of a crochet jester beanie usually starts like a regular beanie—with a circular foundation worked in rounds. As you progress, the pattern expands into separate triangular sections that form the iconic jester shape. The pattern allows for endless color combinations, so you can experiment with bright tones or contrasting shades to create a unique design. Many crafters enjoy making alternating panels using two or more colors to achieve that traditional jester flair.
Another key feature of the Jester Crochet Beanies Pattern is its adaptability. You can adjust the size and number of jester points depending on who the beanie is for. For example, a baby-sized jester hat might only have two or three points, while an adult version could feature four or even six. The customization options make this pattern perfect for gifts or themed occasions, where each hat can be as unique as its wearer.
When working on this pattern, it’s recommended to use medium-weight yarn (also known as worsted weight) to ensure the beanie keeps its shape without becoming too heavy. Acrylic yarn is popular for its durability and wide color selection, while cotton yarn gives a softer and more breathable texture. Choosing the right yarn is the first step toward achieving a perfect balance between structure and comfort.
Lastly, understanding stitch consistency is crucial. Most jester crochet beanie patterns use basic stitches like single crochet, half-double crochet, and double crochet. These are beginner-friendly, yet versatile enough to form the intricate details of the jester design. Once you grasp these techniques, you can easily adapt them to your own creative vision.
Before you start your Jester Crochet Beanies Pattern, make sure you have all the right materials and tools. Having a well-prepared setup helps your project run smoothly and ensures a professional finish. The first thing you’ll need is yarn—and the color choice plays a huge role in defining your hat’s personality. Traditional jester beanies use bright, contrasting colors like red, yellow, blue, and green. However, you can also go for pastel tones, monochrome schemes, or even metallic yarn for a more modern or festive look.
Next, you’ll need the correct crochet hook. For most medium-weight yarns, a 5mm (H-8) hook works well. However, always check your yarn label for the recommended hook size. A comfortable ergonomic handle can make long sessions more enjoyable and prevent hand fatigue.
Other essential tools include scissors, a yarn needle, and stitch markers. Stitch markers help you keep track of your rounds and sections, which is especially useful for multi-pointed patterns like the jester beanie. A yarn needle is important for weaving in ends neatly, ensuring your beanie looks polished and secure.
Optional additions can enhance your final product. Many crafters add pom-poms or bells at the ends of each jester point. These small details bring your creation to life and emphasize its playful theme. Pom-poms can be made with leftover yarn or store-bought for convenience. Bells add a traditional jingle, perfect for holiday costumes or fun winter accessories.
Lastly, it’s a good idea to keep a measuring tape on hand. While crochet projects are flexible, measurements ensure your hat fits properly. The typical adult head size ranges from 21 to 23 inches in circumference, so use this as a reference while working on your pattern. For children or infants, adjust accordingly.
Once you have your materials ready, you can begin crocheting with confidence, knowing every piece of your Jester Crochet Beanies Pattern will come together perfectly.
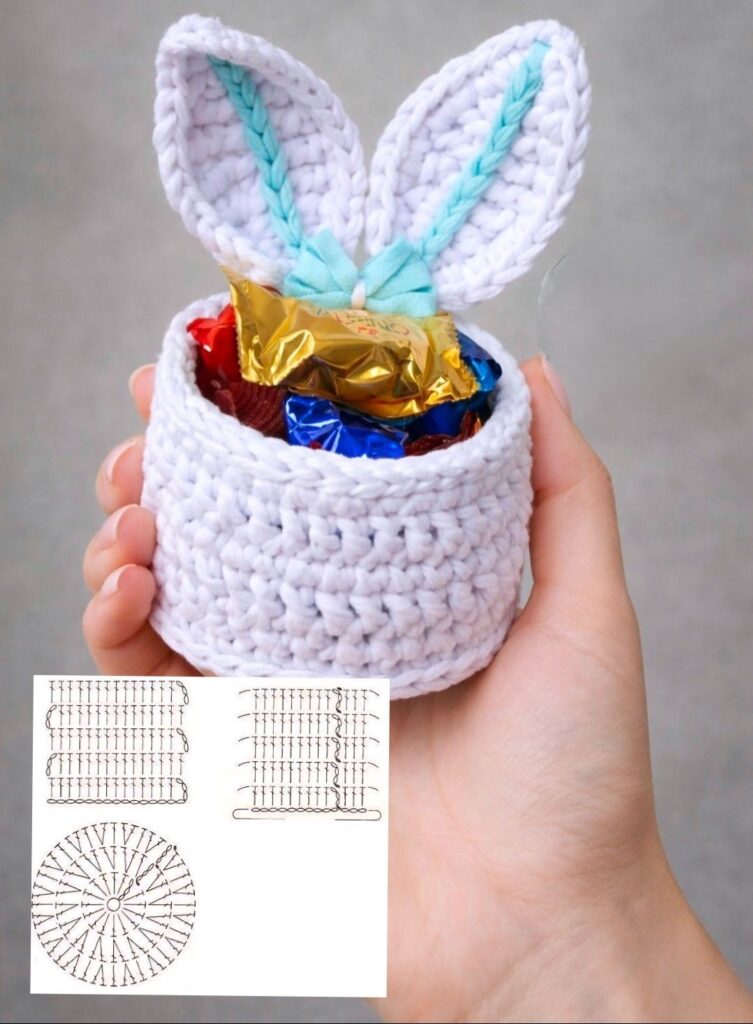
The process of crocheting a Jester Crochet Beanie can be broken into manageable steps. Start by creating a magic circle or chain ring—this will be the crown of the beanie. Work in rounds, increasing gradually until you reach the desired width for your head circumference. This stage forms the foundation, and it’s important to maintain even tension to avoid uneven edges.
After finishing the crown, continue crocheting in rounds without increasing to form the body of the beanie. This section determines how deep your hat will be. A standard adult beanie measures about 8 to 9 inches from crown to edge. Once this base is complete, it’s time to start shaping the jester points. Divide your stitches evenly into sections—usually four—and mark them with stitch markers.
Each section will form one jester point. You’ll crochet each one individually, tapering the stitches to create a triangular shape. As you near the tip, decrease stitches gradually until you form a point. Fasten off and repeat for the remaining sections. Once all the points are done, you can add decorative elements like pom-poms, bells, or tassels to each tip.
To give your Jester Crochet Beanie Pattern a professional touch, finish by adding a ribbed edge or decorative border. A simple single crochet or front post/back post ribbing gives it a clean, stretchy fit. You can also sew on small embellishments such as buttons or patches to make it more personalized.
Remember to weave in all yarn ends neatly using your yarn needle. Blocking the beanie (gently wetting and shaping it) helps even out stitches and ensures the beanie keeps its shape. With patience and creativity, your finished jester crochet beanie will be both stylish and joyful—a true reflection of your craftsmanship.
One of the best things about the Jester Crochet Beanies Pattern is how customizable it is. There are endless ways to modify it according to your preferences and purpose. For example, if you’re making a holiday-themed jester beanie, consider using red, white, and green yarns for a festive touch. You can even attach small golden bells for a cheerful holiday jingle.
For a modern or minimalist style, use neutral tones such as cream, gray, or navy blue. The unique jester shape will stand out even without bright colors. If you enjoy a boho look, mix and match yarn textures—combine cotton with wool or acrylic with metallic fibers for added visual interest.
You can also experiment with stitch variations to create texture. Try using bobble stitches for raised patterns or shell stitches for a decorative edge. Mixing techniques can make your jester beanie one-of-a-kind and elevate it from a simple hat to an art piece.
Another fun idea is making matching family sets. Create smaller versions for children or coordinate colors for family photos. The jester style brings a sense of fun that appeals to both kids and adults alike. It’s also a great project for gifting—handmade beanies always carry sentimental value.
If you’re into sustainability, consider using eco-friendly yarns made from recycled or organic fibers. They not only look beautiful but also reduce your environmental footprint. This approach aligns perfectly with today’s growing interest in handmade, sustainable fashion.
Finally, remember that styling your jester crochet beanie doesn’t stop at crafting it. Pair it with winter coats, scarves, or themed costumes for an eye-catching ensemble. Whether for a festival, cosplay event, or just to brighten a cold day, this beanie is a playful statement piece that never goes unnoticed.
1. What skill level is required for a Jester Crochet Beanies Pattern?
This pattern is beginner to intermediate friendly. If you know basic stitches like single crochet and double crochet, you’ll be able to follow along easily.
2. How long does it take to crochet a jester beanie?
On average, it takes 5 to 8 hours depending on your speed and the complexity of the design. Beginners might take a bit longer.
3. What type of yarn works best for this pattern?
Medium-weight acrylic yarn is ideal for its balance of softness, durability, and wide color range. Cotton is also good for breathable, lightweight versions.
4. Can I wash my crochet jester beanie?
Yes, most can be machine-washed on a gentle cycle, but hand-washing is best to maintain shape and color.
5. How can I make the jester points stiffer?
You can use fabric stiffener, light starch spray, or crochet tighter stitches to help the points stand upright.
6. Can I make this pattern for children or babies?
Absolutely! Just adjust the starting circumference and reduce the number of jester points for smaller sizes.
The Jester Crochet Beanies Pattern is more than just a crochet project—it’s a blend of creativity, color, and personal expression. With its playful shape and endless customization options, it offers both fun and functionality for crafters of all skill levels. Whether you’re making it as a gift, a costume piece, or a cozy winter accessory, this pattern guarantees joy in every stitch.
Now that you’ve learned how to create and personalize your own jester crochet beanie, it’s time to grab your yarn and get started.
Don’t forget to share your honest opinions and suggestions about this guide—your feedback helps keep the crochet community inspired and growing!


