
Crochet Heart Rooster Rug Pattern – The Best Techniques and Tools

Easy Granny Square Crochet Tutorial projects are among the most enjoyable and versatile pieces you can create in the world of crochet.
In this guide, we will explore how to make a beautiful granny square, even if you are a complete beginner. The goal is to provide a detailed and friendly explanation so you can understand every step, while also offering helpful tips that make the process easier and more enjoyable.
Because the granny square technique is timeless, learning it will open the door to countless future projects like blankets, bags, scarves, and decorations.
The charm of an easy granny square crochet tutorial lies in how approachable it is. Unlike complex stitches or advanced techniques, granny squares rely on repetition, making them perfect for practicing tension, stitch consistency, and creative color combinations.
Even experienced crocheters return to granny squares when they want something soothing and relaxing to work on. In addition, these small squares use minimal yarn, so they are wonderful for using leftover scraps and reducing waste while crafting something beautiful.
Throughout this article, you will find structured guidance, beginner-friendly instructions, tips for choosing yarn, and clear explanations of each step. The Easy Granny Square Crochet Tutorial will show you how to start your first square and inspire you to experiment with different styles. More than just a craft, crocheting granny squares is an enjoyable experience that brings joy, creativity, and comfort. Before diving into the first steps, let’s explore everything you need to know to begin this beloved crochet pattern.
To begin your Easy Granny Square Crochet Tutorial, it is essential to gather the right materials. While granny squares are simple, having the proper tools helps make your stitches clean and your project more enjoyable. Start by choosing a medium-weight yarn, often labeled as worsted weight, because it is easy to handle and perfect for beginners. Select a crochet hook size that matches your yarn label to achieve the correct tension.
Another important material is a good pair of scissors. Sharp scissors ensure that your yarn ends are clean and easy to weave in later. Additionally, you will need a yarn needle, which plays a key role in securing your loose ends once your granny square is complete. Without these small tools, finishing your piece neatly can become more challenging.
Color selection also matters in this tutorial. Many crafters enjoy using multiple colors to give their granny squares a vibrant look, but you can use a single color if you prefer simplicity. Combining three shades is a common choice because it allows each round of the square to stand out beautifully. As you advance, you can experiment with color gradients or random scrap combinations.
Before you start crocheting, make sure your yarn is untangled and your hook is comfortable to hold. Some people prefer ergonomic hooks because they reduce hand strain during long crochet sessions. Comfort is important because a relaxed hand creates smoother stitches and helps maintain even tension throughout the project.
When working through this Easy Granny Square Crochet Tutorial, keep your workspace well-lit. Good lighting helps you see the stitches clearly, especially if using darker yarns. A clean and organized workspace also makes your crafting experience more enjoyable and efficient.
Lastly, remember that patience is your best tool. Granny squares involve repetition, and as you work through each round, your confidence will grow. Even if your first square is not perfect, each one you create will help you improve your technique.
To begin your first stitch, start with a slip knot on your hook. This is the foundation that holds your yarn securely as you begin the magic ring or chain method. In an Easy Granny Square Crochet Tutorial, the magic ring is often recommended because it allows the center to close neatly, but chaining four stitches and joining them into a ring works beautifully as well.
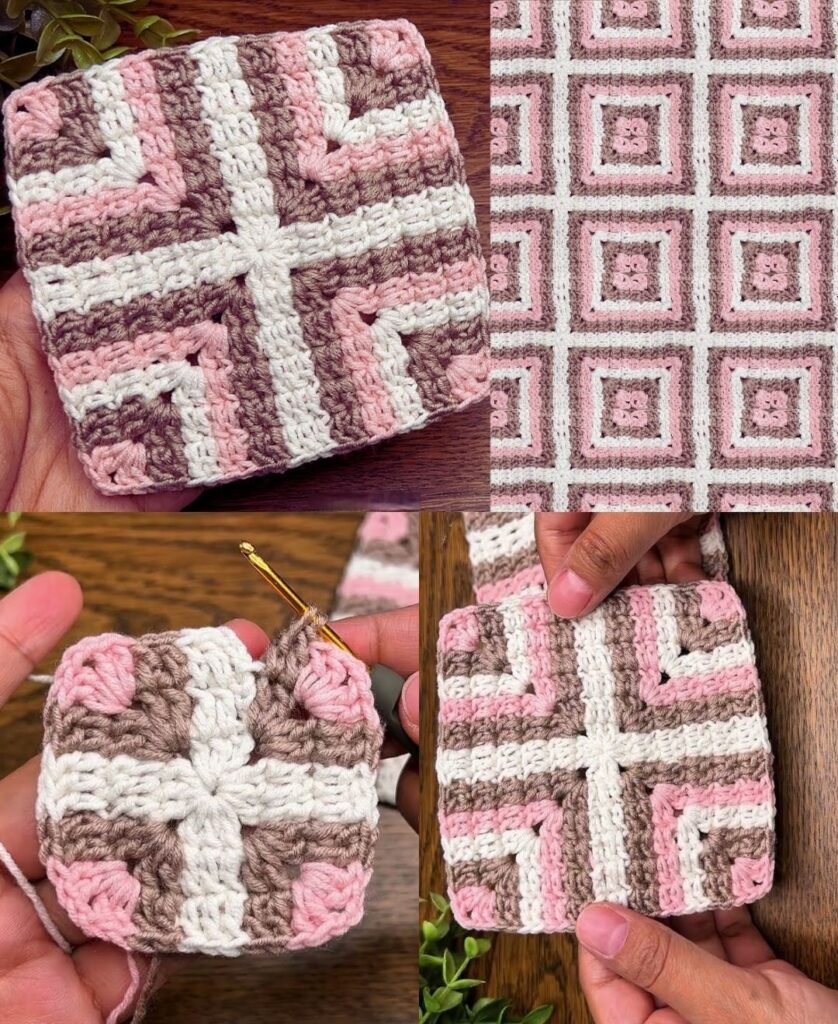
Once your ring is ready, crochet a series of double crochet stitches to form the first cluster. A standard granny square begins with three double crochets in the same space. These clusters form the base of the iconic square design, and you will create them repeatedly in each round. Between each cluster, add a chain to separate the stitches and define the structure of your square.
As you move on to the second round, work into the spaces created by the chains of the first round. This technique helps give granny squares their open, airy look. Creating two clusters in each corner helps the shape expand evenly. Make sure to chain between clusters to maintain symmetry and prevent your square from curling inward.
In the third round, repeat the same process, placing clusters in the chain spaces and maintaining two clusters in each corner. By now, your granny square should start showing its recognizable shape. Remember to crochet with even tension, because uneven stitches can cause the square to warp or twist. Consistency is key to a neat and polished finish.
Round after round, your granny square will grow. You can continue adding rounds until it reaches the size you desire. Whether you want a small coaster, a medium piece for a bag, or a large panel for a blanket, simply keep repeating the same stitch pattern.
Once you finish your final round, fasten off your yarn securely. Use the yarn needle to weave in all loose ends by hiding them within the stitches. This step ensures your square remains durable and will not unravel over time.
One of the best parts of following an Easy Granny Square Crochet Tutorial is discovering how customizable these squares can be. A simple change in color can make your project look completely new. You can alternate colors every round, create ombre effects, or even mix random shades for a playful patchwork design.
Another way to personalize your square is by experimenting with stitch variations. While traditional granny squares use double crochet clusters, you can introduce puff stitches, bobble stitches, or half-double crochet variations for added texture. These creative modifications allow you to develop your own unique style.
Try using different yarn fibers to change the overall look and feel of your granny square. Cotton yarn creates a firm and sturdy square, perfect for coasters and functional pieces. Acrylic yarn produces soft and warm squares, ideal for blankets and scarves. Wool blends add additional warmth and texture for winter projects.
You can also change the shape of your granny squares. With small adjustments, you can transform them into hexagons, triangles, or even circular motifs. These alternative shapes allow you to design more complex and artistic crochet pieces while still using the familiar granny technique.
If you enjoy embellishments, consider adding decorative touches after finishing your square. Attaching small buttons, beads, or embroidery can make your creation stand out. Even simple details, such as adding a scalloped border or picot edging, can enhance the overall look.
Finally, think about the purpose of your granny square. Whether you plan to join many squares together or use a single one as a centerpiece, your design choices should complement the final project. This is one of the reasons granny squares are loved—they adapt effortlessly to any creative vision.
After mastering your Easy Granny Square Crochet Tutorial, the next step is learning how to join multiple squares. The most common joining technique is whip stitching with a yarn needle. This method is simple and creates a clean, nearly invisible seam. It is also perfect for beginners who prefer straightforward techniques.
Another popular joining method is the join-as-you-go technique. This crochet-based method connects the squares during the final round, eliminating the need for sewing. It creates a seamless look and is great for large projects like blankets or shawls. While it may require some practice, the result is worth the effort.
If you prefer a decorative approach, crocheted borders can be used to join squares. Creating a row of single crochet stitches around each square and then attaching them gives the project a bold and structured appearance. This technique works well for bags, rugs, and home décor items.
Once your squares are joined, you can create a variety of beautiful projects. Granny square blankets remain the most popular choice because they are customizable in size, color, and pattern. Whether you prefer vintage charm or modern minimalism, granny square blankets can reflect your personal style.
You can also make clothing items such as sweaters, vests, cardigans, and even skirts. Granny squares allow endless combinations and layouts, giving each garment a unique and artistic touch. Smaller projects like bags, pillow covers, and table runners are also very rewarding.
For decorative purposes, granny squares are perfect for wall hangings, plant pot covers, chair cushions, or holiday ornaments. Their versatility ensures that once you learn the method, you can easily adapt the technique for any creative project.
1. Is a granny square good for beginners?
Yes, granny squares are perfect for beginners because they use simple stitches and repeatable patterns that help you improve consistency.
2. How long does it take to crochet a granny square?
Depending on your skill level and size, a standard granny square may take between 20–40 minutes.
3. What yarn is best for granny squares?
Worsted-weight acrylic or cotton yarn is ideal because it provides good stitch definition and is easy to work with.
4. Can I make a large project using only granny squares?
Absolutely. Many blankets, bags, garments, and home décor items are made entirely from joined granny squares.
5. Why is my granny square curling or twisting?
Uneven tension or skipping corner stitches can cause curling. Make sure to add two clusters in each corner and maintain consistent tension.
6. Can I add more rounds to make the square bigger?
Yes, simply continue the repeating pattern until your granny square reaches the desired size.
7. How do I keep my color changes neat?
Fasten off securely when changing colors and weave in all loose ends with a needle to maintain a polished appearance.
8. Are granny squares always square?
No, by adjusting stitch placement, you can create different shapes such as circles, hexagons, and triangles.
This Easy Granny Square Crochet Tutorial has guided you through the materials, basic techniques, customization ideas, and creative ways to use your finished squares. Whether you are making a single piece or designing a larger project, granny squares offer endless possibilities.
I hope this tutorial has inspired you to explore this classic crochet pattern with confidence and joy. If you enjoyed this article, please leave your honest opinion and share any suggestions for future topics. Happy crocheting!


