Free Calliope Coffee Bag Crochet Pattern

If you’re searching for an Easy Crochet Slippers Pattern, you’ve just landed in the right place. These cozy handmade slippers are perfect for beginners looking to dive into the world of crochet or for seasoned crafters who want a quick and satisfying project. Whether you’re making them as a thoughtful gift or for personal use, crochet slippers are not only practical but also a stylish way to keep your feet warm.
The charm of creating crochet slippers lies in the simplicity and freedom it offers. You can choose your favorite yarn colors, play with textures, and adjust the size to fit perfectly. Even better, these slippers are made using basic stitches, making this project approachable for crafters at any skill level. Plus, the end result is a soft, comfortable, and customizable pair of slippers that you’ll be proud to wear or give away.
In this article, you’ll find a detailed guide to help you make your own easy crochet slippers pattern from scratch. We’ll cover everything from materials and tools to step-by-step instructions and pro tips for a polished finish. Whether you’re crocheting for fun, relaxation, or utility, this project is sure to inspire and satisfy.
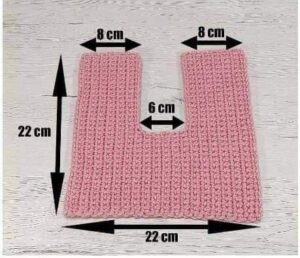
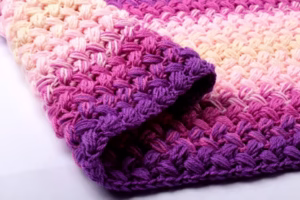
IMAGE FROM PINTEREST
The first step to successfully making an Easy Crochet Slippers Pattern is gathering the right materials. The choices you make here will directly affect the comfort, durability, and appearance of your finished slippers.
Start by selecting a soft, medium-weight yarn (like worsted weight or category 4). Acrylic yarns are a favorite for slippers due to their affordability, color variety, and ease of care. Cotton yarns are also a great option if you prefer natural fibers, especially for warmer weather.
Your crochet hook size should match the yarn you choose. For worsted weight yarn, a 5.0 mm (H-8) hook is typically recommended. Always check your yarn label for hook size guidance and adjust as needed to meet gauge.
You’ll also need a yarn needle for weaving in ends and scissors for trimming. Optional tools include stitch markers to help you track your rounds and rubber soles or grippers if you want to add slip resistance to the bottoms of your slippers.
When choosing yarn colors, consider who the slippers are for. Neutral tones like grey, cream, or navy are classic and versatile. Bright colors and fun patterns can add a personal touch, especially for kids or festive gifts.
Finally, make sure to have a quiet, comfortable workspace and good lighting. Crocheting is not just about the result—it’s about enjoying the process. Having a peaceful setup will help you stay focused and creative.
Even if you’re a beginner, you can complete this easy crochet slippers pattern with just a few basic stitches. Understanding these foundational techniques is essential before diving into the pattern itself.
The chain stitch (ch) is the most fundamental crochet stitch. It forms the base of most patterns and is used to start your slippers. Make sure your tension is even so the base is not too tight or loose.
The single crochet (sc) is the next stitch to master. It’s dense and strong, making it ideal for creating a snug fit and sturdy soles. You’ll use this stitch often throughout the slippers.
Half double crochet (hdc) is another beginner-friendly stitch that provides a little more height and texture than single crochet. It’s great for adding stretch and softness to the slipper body.
The slip stitch (sl st) is used to join rounds or finish sections. It helps keep your work neat and structured without adding bulk. This stitch is also useful when transitioning between rows smoothly.
To shape your slippers, you’ll also need to learn increasing and decreasing. These techniques help you form the toe and heel, ensuring a contoured and snug fit. Don’t worry—they’re easier than they sound and often involve simply adding or skipping stitches.
Before starting the actual pattern, take a few minutes to practice these stitches on a scrap piece of yarn. Getting comfortable with them will make your crocheting smoother and more enjoyable.
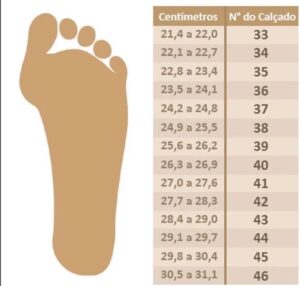
IMAGE FROM PINTEREST
Now that you know your stitches and materials, let’s get into the actual easy crochet slippers pattern. These steps are broken down to help you follow along with ease, even if it’s your first project.
Step 1: Start with the sole. Make a chain long enough to match the length of the foot. Typically, this will be around 20-24 chains for an adult. Work single crochet stitches across the chain, then add a few stitches in the end to curve the toe. Continue around to form an oval shape.
Step 2: Build up the sides. Once the sole is complete, work a few rounds of single or half double crochet around the base. This forms the sides of the slipper. Keep your stitches even and count carefully to maintain symmetry.
Step 3: Shape the toe. Begin decreasing stitches near the front to gently close the toe. This can be done by skipping or combining stitches in a pattern. Try the slipper on occasionally to ensure a good fit.
Step 4: Form the heel. Depending on the pattern, you might crochet back and forth in rows or in the round to create the heel area. Again, decrease stitches to form a snug fit that wraps comfortably around your heel.
Step 5: Add a cuff (optional). If you want your slippers to be more secure or decorative, you can crochet a simple ribbed cuff using front and back post stitches. This gives a sock-like feel and keeps the slippers from slipping off.
Step 6: Finishing touches. Weave in all loose ends using your yarn needle. You can also sew on non-slip pads, buttons, or embellishments to personalize your slippers. Make sure everything is secure and comfortable.
Creating your own crochet slippers opens up endless opportunities for customization. You’re not limited to one style, color, or fit—you can truly make each pair unique.
If you’re making slippers for children, adjust the length of the starting chain and overall stitch count. Always measure the foot beforehand to ensure a comfortable fit. Use bright colors or themed yarns for extra fun.
Want your slippers to be warmer? Use a double strand of yarn or switch to a chunky weight yarn. This not only adds thickness but also makes the project quicker. Just remember to increase your hook size accordingly.
Add embellishments like pom-poms, bows, or appliqués for a decorative touch. These can turn a simple pair of slippers into a thoughtful, personalized gift. Be sure any additions are securely fastened and not too bulky.
To make your slippers more durable, consider adding a rubber sole. You can sew or glue a pre-cut non-slip pad onto the bottom. This is especially useful if the slippers will be worn on hardwood or tile floors.
Wash your crochet slippers gently to keep them looking fresh. Hand washing in cold water and air drying is usually best. If you must use a machine, place them in a mesh laundry bag and use the gentle cycle.
Lastly, store your slippers in a dry place and keep them away from sharp objects. This helps maintain their shape and prevents snagging. With proper care, your handmade crochet slippers can last a long time.
Q: What is the easiest crochet stitch for beginners making slippers?
A: The single crochet (sc) stitch is the easiest and most commonly used for beginner slipper patterns. It provides a tight, dense fabric that’s perfect for a snug fit.
Q: How long does it take to make a pair of crochet slippers?
A: On average, it takes about 2–4 hours to make a pair of adult-sized crochet slippers, depending on your skill level and the pattern complexity.
Q: Can I use different types of yarn for crochet slippers?
A: Yes! While worsted weight acrylic yarn is most common, you can also use cotton, wool, or even chunky yarn for extra warmth. Just adjust your hook size and gauge accordingly.
Q: Are crochet slippers machine washable?
A: Many crochet slippers are washable, especially if made with acrylic or cotton yarn. Hand washing is preferred, but if machine washing, use a gentle cycle and let them air dry.
Q: How do I make crochet slippers non-slip?
A: You can add a non-slip sole by sewing on rubber fabric, using puff paint on the bottom, or purchasing pre-made slipper soles. This is especially important for safety on smooth surfaces.
Q: Can I sell crochet slippers made from free patterns?
A: In most cases, yes, but always check the pattern’s licensing terms. Many free patterns allow selling finished items as long as credit is given to the designer.
Making your own Easy Crochet Slippers Pattern is a rewarding and enjoyable DIY project. We covered everything you need to know—from choosing the right yarn and tools to mastering the essential stitches and customizing your slippers. Whether you’re making them for yourself, as gifts, or even to sell, crochet slippers are a versatile and fulfilling craft.
We hope this guide has inspired you to grab your hook and start creating. If you enjoyed this tutorial or have any questions, please leave your honest opinion and suggestions in the comments. Your feedback helps us grow and continue sharing valuable content for fellow crochet lovers!


