
Crochet Heart Rooster Rug Pattern – The Best Techniques and Tools

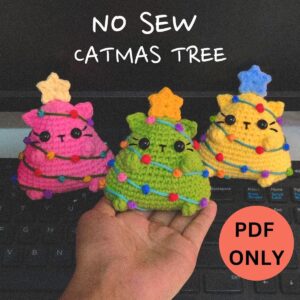
Crochet Trees for Decoration Pattern is a charming and versatile project that adds handmade warmth to any space. Beginning a craft using a Crochet Trees for Decoration Pattern allows you to explore shaping techniques, texture combinations, and creative embellishments while producing beautiful decorative pieces.
These tiny or tall crochet trees can be displayed on shelves, tables, mantels, or festive setups, adding a cozy and artistic touch to your home.
Whether you’re preparing seasonal décor, handmade gifts, or simply experimenting with new crochet forms, this pattern offers an enjoyable and rewarding experience for crafters of all skill levels.

Working with a Crochet Trees for Decoration Pattern helps expand your understanding of crochet shaping. Many tree designs use simple increases and decreases to form cones, while others incorporate bobble stitches, ridges, or textured patterns to mimic natural bark or branches.
As you work through the project, you gain confidence in shaping three-dimensional forms. Seeing the tree gradually take shape in your hands is not only satisfying but also encourages exploration of color, yarn weight, and decorative elements like beads, stars, or small garlands.
Another fantastic benefit of creating decorations with a Crochet Trees for Decoration Pattern is the endless room for customization. You can make minimalistic trees with natural tones, sparkling ones for festive décor, or colorful versions for children’s rooms. Each tree becomes a unique piece of functional art, showcasing your personal style. Before diving into materials, steps, and creative variations, let’s explore why these handcrafted trees have become so beloved among crochet enthusiasts.
A Crochet Trees for Decoration Pattern typically creates a cone-shaped or tiered structure reminiscent of evergreen trees. The base form is usually a triangle or cone made through rounds or rows of stitches. These simple shapes make the project accessible even for beginners. Despite its simplicity, the design can be elevated with textured stitches, decorative yarn, or layered tiers that give the tree a realistic or whimsical appearance.
The cone shape is often created by starting at the base and working upward with gradual decreases. This provides a clean form that holds its structure well. Some patterns include internal support such as stuffing or a small wooden base, while others rely solely on the tightness of the stitches. Both approaches allow the tree to stand firmly as a decorative piece.
Textured patterns are especially popular. Bobble stitches mimic pine cones, while ribbed or front-post stitches create the illusion of layered branches. These textures add dimension and make the tree look more intricate than it actually is. They also invite creative expression, as the textures look stunning in a variety of yarn colors and fibers.
One of the strengths of the Crochet Trees for Decoration Pattern is its adaptability. You can make miniature trees that fit in the palm of your hand, medium trees for centerpieces, or tall statement pieces. Changing yarn thickness, hook size, or stitch density allows for endless variation without altering the basic construction.
Crochet trees also serve as lovely seasonal decorations. They can be displayed during winter holidays, used in rustic décor themes, or styled for woodland-inspired interiors. Many crafters enjoy making full sets in different heights, creating charming table displays that feel handmade and inviting.
Finally, these trees are ideal for gifting. They are lightweight, durable, and customizable to match any aesthetic. A set of three trees makes an excellent handmade present for friends, teachers, or family members who appreciate cozy décor.
To begin your Crochet Trees for Decoration Pattern, select materials that suit your preferred look and texture. Yarn choice greatly influences the final appearance. Cotton or acrylic yarn offers crisp stitch definition and durability. Wool and wool blends create softer, rustic vibes perfect for natural-themed décor. For a festive touch, metallic or glitter yarn adds shimmer.
Yarn weight also matters. Fine yarn produces delicate trees, while bulky yarn creates plush, cozy decorations. Most crafters enjoy experimenting with multiple yarn weights to create sets of varying sizes. Regardless of the yarn you choose, make sure to use an appropriate hook size to maintain tight stitches for structural stability.
A crochet hook suited to your yarn weight is essential. Smaller hooks produce denser stitches, which help your tree stand upright without additional support. Larger hooks create softer, looser shapes that may benefit from light stuffing or a base.
Other important materials include scissors, a tapestry needle for weaving ends, and optional stitch markers to keep track of rounds. If you prefer structured trees, consider adding poly-fiber stuffing, cardboard bases, or wooden dowels to provide additional stability.
Decorative elements enhance your Crochet Trees for Decoration Pattern. Buttons, beads, tiny pom-poms, sequins, small stars, and ribbon garlands allow you to add personality to each tree. You can keep the design simple and minimalistic or go all out with colorful and festive accents.
Finally, consider preparing a hot glue gun or fabric glue if you plan to attach embellishments securely. While sewing is always an option, glue often speeds up the finishing process and works well for lightweight decorations.
To begin your Crochet Trees for Decoration Pattern, start by creating the cone shape. Many patterns begin with a magic ring or chain that forms the tip of the tree. From there, you increase stitches gradually in each round to widen the cone. If working from the bottom up, you start with a large circle and decrease evenly toward the top. Either method is perfectly effective depending on your preferred stitching direction.
As you build the cone, maintain consistent tension to ensure the structure holds its shape. Using single crochet stitches is common because they create tight, dense fabric. Increase or decrease at regular intervals for smooth shaping. Keep a stitch marker at the start of each round to prevent confusion and maintain even work.
To add texture, incorporate bobble stitches, cluster stitches, or front-post stitches. These patterns create the illusion of layered branches and give the tree a dynamic appearance. Textured rows can be spaced evenly or added randomly to mimic a more natural look.
Once your cone shape is complete, finish off by closing the top tightly and weaving in any loose ends. If your tree needs support, lightly stuff it with fiberfill. Small amounts go a long way—avoid overstuffing, as it can distort the shape. If your design calls for a wooden base, attach the tree by inserting a small dowel into the center and securing it onto a wooden disc.
The next step is optional but adds personality: decorating your tree. You can embroider tiny ornaments, place beads throughout the rows, or wrap a thin yarn strand around the tree to mimic a garland. A tiny star on the top adds a delightful final touch.
Repeat the process to create a full set of trees. Vary heights by adding or reducing the number of rounds or adjusting yarn weight. A well-balanced trio of small, medium, and large trees looks beautiful in any room.
One of the most enjoyable parts of crafting a Crochet Trees for Decoration Pattern is personalizing each tree. A simple color change can dramatically shift the aesthetic. Classic green gives a traditional look, while white creates a snowy, wintery feel. Earth tones evoke a woodland theme, and bold colors like red, gold, or turquoise make playful statement pieces.
You can also experiment with different stitches. A tree made entirely with bobble stitches appears plush and textured, whereas a ribbed tree with front-post stitches looks neat and structured. Mixing stitches in layers adds complexity and visual interest without complicating the pattern.
For a natural rustic style, pair wool yarn with wooden bases. Add felt stars or tiny wooden beads to complete the look. If you prefer modern minimalism, stick to monochrome designs with clean shapes and simple textures.
Metallic yarn transforms your Crochet Trees for Decoration Pattern into festive holiday décor. Combine them with tiny ornaments or small bells to enhance the sparkle. These trees look stunning on mantels or holiday centerpieces.
A fun variation involves creating tiered trees using stacked crocheted circles. Each layer widens as you move downward, creating a ruffled, elegant tree shape. This version is perfect for crafters who enjoy more decorative or whimsical designs.
Finally, consider making themed sets. Pastel trees for spring, muted earthy tones for autumn, and glittery trees for winter allow you to use your creations year-round. They also make excellent handmade gifts for special occasions.
Is a Crochet Trees for Decoration Pattern beginner-friendly?
Yes. Most patterns use basic stitches like single crochet and simple shaping.
What yarn works best for crochet trees?
Cotton, acrylic, and wool blends are excellent choices. Each offers unique texture and structure.
Do I have to stuff the tree?
Only if needed. Tight stitches often allow the tree to stand without stuffing.
Can I make the trees in different sizes?
Absolutely. Adjust yarn weight, hook size, or the number of rounds.
How do I keep my tree standing upright?
Use tight stitches, add light stuffing, or attach the tree to a wooden base.
Can children help with this project?
Yes—with supervision. Kids can assist by choosing colors or adding decorations.
Creating a Crochet Trees for Decoration Pattern is a joyful way to bring handmade charm into your living space. From shaping the tree to adding textures and personal touches, each step encourages creativity and offers a relaxing crafting experience. These adorable trees make wonderful gifts, beautiful displays, and meaningful decorations for any season.
I’d love to hear your honest opinion about this tutorial and any suggestions you may have—your feedback helps inspire even more creative ideas!


