
Crochet Heart Rooster Rug Pattern – The Best Techniques and Tools

Crochet Paw Keychain Pattern is the kind of small, lovable project that turns a few minutes of yarn time into a daily smile.
As you follow along, you’ll see the primary keyword “Crochet Paw Keychain Pattern” used naturally throughout the text to support readability and SEO.
Because this Crochet Paw Keychain Pattern is small, it’s a great project for learning essential techniques: shaping with increases and decreases, neat color changes, and clean assembly.
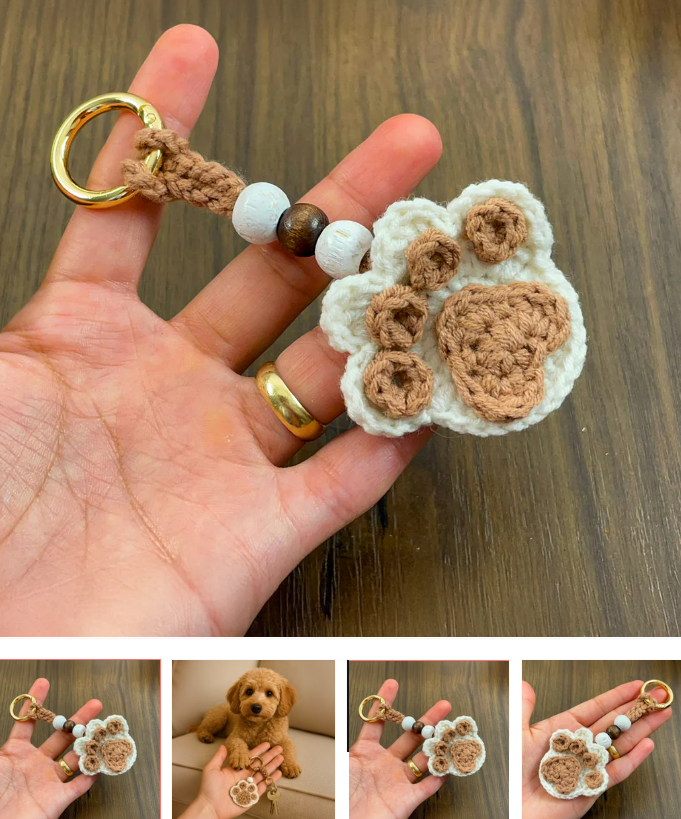
Start with a short list of supplies to keep your Crochet Paw Keychain Pattern simple and budget-friendly. You’ll want a soft worsted-weight yarn (4/medium) in two colors: a main color for the paw pad and a contrast color for the toe beans. Pair that with a matching hook size (often 3.5–4.0 mm for a tighter amigurumi fabric), plus a keychain ring, small split ring, and a lobster clasp if you like extra hardware. A yarn needle, stitch marker, and a pinch of fiberfill are all you need for shaping and finishing.
For a polished result, aim for a firm, even gauge so stuffing doesn’t peek through the stitches. While exact gauge isn’t critical for a keychain, tighter stitches generally create a cleaner outline. If your fabric looks loose, drop your hook size slightly. The finished paw typically measures 2.5–3 inches (6–7.5 cm) tall depending on yarn, hook, and your personal tension. Keep this in mind if you prefer a dainty charm or a bolder, bag-friendly accessory.
Stitch-wise, this Crochet Paw Keychain Pattern leans on the magic ring to start in the round, plus single crochet (sc), increase (inc), and decrease (dec). You’ll work small circles for the toe beans and a larger oval or circle for the main pad, then assemble and lightly stuff. If you’ve never done a magic ring, you can substitute a chain-2 start with your first round worked into the second chain—just pull your starting tail snug to close the center.
Begin the Crochet Paw Keychain Pattern with the toe beans—they’re tiny, satisfying, and help you build momentum. With your contrast color, make a magic ring, work 6 sc into the ring, and tighten. Join if you prefer a closed round or continue in a spiral for a seamless look. For a slightly larger toe bean, work a second round with inc in each st around for 12 sc total. Make four identical pieces and fasten off, leaving a short tail for sewing.
Next, crochet the main paw pad using your primary color. Start with a magic ring and 6 sc, then grow evenly: Round 2 inc in each stitch (12), Round 3 (sc, inc) around (18), Round 4 (2 sc, inc) around (24). For a plump, nicely rounded pad, you can add Round 5 (3 sc, inc) around (30), depending on how large you want the paw. Keep your tension consistent; a stitch marker is handy to track the start of each round.
One joy of the Crochet Paw Keychain Pattern is how many ways you can make it your own. Try monochrome for a minimalist aesthetic, or a two-tone look that mimics your pet’s coloring—cream pad with caramel beans, gray with pink, chocolate with tan. Seasonal palettes are also fun: pastel beans for spring, jewel tones for fall, or classic black-and-white for a chic everyday accessory.
Add personality with surface details. Embroider a tiny heart or a monogram on the main pad using backstitch or chain stitch. If gifting to a friend, their initials in a high-contrast color turn the piece into a keepsake. For craft fairs, consider offering custom color requests and monograms as an upsell—shoppers love personalized items that ship quickly and make wonderful last-minute gifts.
Vary the size strategically. For a mini version, use lightweight DK or sport weight yarn and a smaller hook; for a chunkier bag charm, choose bulky yarn and an appropriately larger hook. Keep the stitches tight relative to your yarn so the fabric remains sturdy. Scale your toe beans accordingly to preserve the paw’s proportions and visual balance..
If the paw looks lopsided, check your increase spacing—uneven increases can pull the circle into a polygon. Redistribute increases evenly across rounds and keep your hook vertical to maintain stitch height. If you still see points, block the piece gently by steaming (hover, don’t touch) and patting into shape with your fingers.
Visible gaps between toe beans and the pad often trace back to sparse seaming. Use a matching yarn tail and make short, close whipstitches all the way around each bean, catching one loop from the bean and one loop from the pad each time. Tug the yarn gently after a few stitches to settle the seam before proceeding. This makes your Crochet Paw Keychain Pattern look seamless and sturdy.
If stuffing shows through, your gauge is too loose or your yarn is too thin for the hook. Drop down a hook size, or try a denser yarn of the same weight. Split your fiberfill into wispy tufts and layer it gradually instead of adding one big clump. A firm but not rigid fill is the sweet spot for a polished paw.
Hardware slipping? Use a split ring as an intermediary; it’s more secure than threading yarn directly through a large key ring. You can also crochet a reinforced loop: chain 8, slip stitch to form a ring, and work a round of sc into it before sewing the ring to the top of the paw. This creates a durable anchor point.
When listing your handcrafted paw or sharing your Crochet Paw Keychain Pattern online, write a clear, human-centered description. Use the keyword naturally in the first 1–2 sentences and sprinkle related terms like amigurumi keychain, paw print charm, pet lover gift, and beginner-friendly crochet throughout. Keep sentences readable and honest; search engines reward helpful, accurate information.
Optimize your images by naming files descriptively (e.g., “crochet-paw-keychain-pattern-pink.jpg”) and adding concise alt text like “Handmade crochet paw keychain in pink and white.” Good alt text improves accessibility and helps your photos appear in image search results, potentially bringing more interested crafters or buyers to your page.
Offer multiple angles in bright, natural light: a close-up to show stitch detail, a scale shot beside a key for size reference, and a lifestyle photo on a bag or backpack. This not only aids shoppers but also enriches your content quality in the eyes of search engines looking for comprehensive coverage.
What yarn and hook size work best for a Crochet Paw Keychain Pattern?
Worsted-weight yarn (size 4/medium) and a 3.5–4.0 mm hook are a great starting point for firm stitches that hold stuffing well. If your fabric looks loose, drop down a hook size for a tighter, more professional finish.
Do I have to use the magic ring to start the circles?
No. If the magic ring feels fiddly, chain 2 and work your first round of stitches into the second chain from the hook. Pull the tail snug to close the center. The result will be slightly different but perfectly acceptable for this Crochet Paw Keychain Pattern.
How do I keep my circles from turning into hexagons?
Distribute increases evenly and keep a steady tension. If points still appear, lightly steam and shape the piece. Consistent stitch height and even spacing are the main keys to a smooth circle.
Should the toe beans be stuffed?
It depends on your look. 6 sc circles are usually left flat; 12 sc circles can take a pinch of stuffing for a puffed “bean” effect. Either choice works—just keep all four beans consistent for symmetry.
You now have a complete, beginner-friendly Crochet Paw Keychain Pattern with materials, step-by-step construction, customization ideas, troubleshooting help, and SEO tips if you plan to share or sell your work.
From crisp cotton versions to fuzzy, plush paws, your options are wide open—and the project stays quick, affordable, and fun. If this guide helped, I’d love to hear your honest opinion and any suggestions for improvements or future patterns you’d like to see. Happy crocheting!


