
Crochet Heart Rooster Rug Pattern – The Best Techniques and Tools

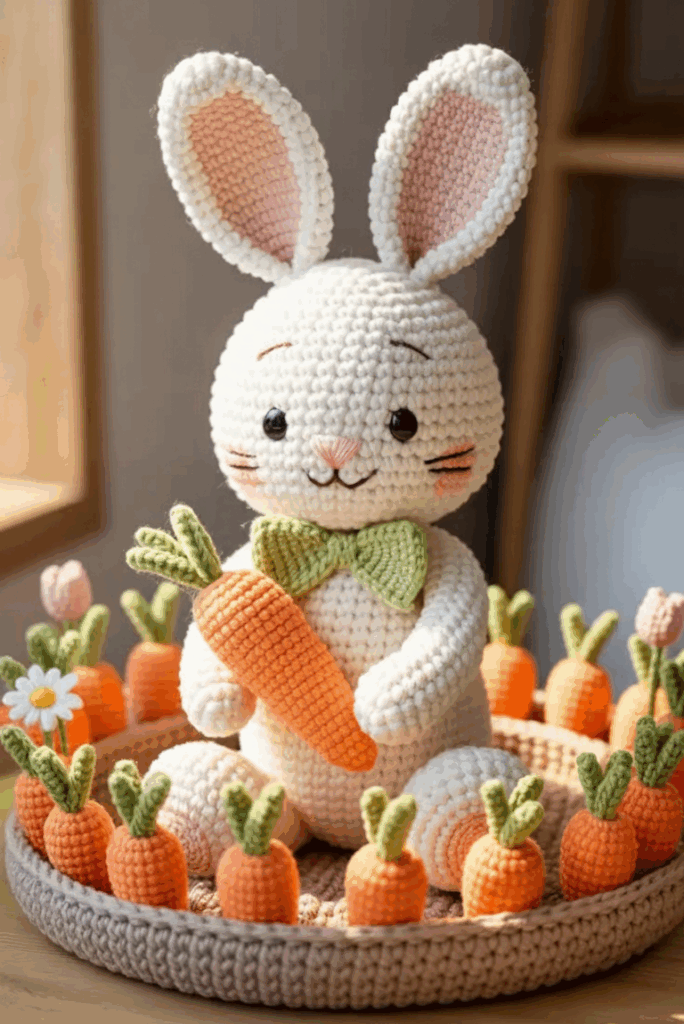
Creating a crochet Easter Bunny in a carrot patch pattern is a delightful and creative project that brings the charm of spring and Easter celebrations to life.
This adorable design features a cute crochet bunny nestled among bright orange carrots, making it a perfect decorative piece for your home or a sweet handmade gift for loved ones.
The combination of soft yarn textures and vibrant colors adds warmth and joy to any space, making this pattern an ideal choice for both beginners and experienced crocheters.
The appeal of the crochet Easter Bunny in a carrot patch pattern lies in its whimsical details and versatility. You can customize the bunny’s expression, the size of the carrots, and even the shape of the patch to suit your personal style.
This makes it not just a crochet project, but a fun artistic experience where your imagination shapes the final result. Whether you prefer a classic pastel Easter theme or a more rustic farmhouse look, the pattern can be adjusted to match your aesthetic.
Working on this charming design encourages relaxation, creativity, and the satisfaction of completing a meaningful craft. Since the crochet Easter Bunny in a carrot patch pattern is typically worked in simple stitches, it’s an enjoyable project for crocheters of all skill levels. Plus, handmade pieces like this often become treasured keepsakes, cherished year after year during the holiday season.
To begin your crochet Easter Bunny in a carrot patch pattern, you’ll need a selection of yarns in essential Easter colors. White or light gray yarn is perfect for your bunny, while bright orange and leafy green shades bring your carrots to life. Choose soft, medium-weight yarn to achieve a cuddly and smooth finish in your final creation.
A crochet hook suited to your yarn weight is essential for getting the right tension and stitch definition. Most patterns use a 3.5 mm or 4.0 mm hook, but always check your yarn label for recommendations. You’ll also need stitch markers, a yarn needle, and polyester fiberfill to stuff the bunny and carrots. These tools ensure your project looks neat, well-shaped, and durable.
Make sure to have safety eyes or embroidery thread on hand to create the bunny’s face. This adds personality and expressiveness to your finished piece. Embellishments like tiny bows or miniature flowers can be added later to make your crochet bunny even more adorable.
A small amount of brown or beige yarn works great for crocheting the carrot patch base. This creates a realistic “garden” setting for the bunny and ties the project together visually. You can also add optional details like crocheted soil mounds or small leaves for extra charm.
Before starting, read through your pattern entirely to ensure you understand each step. Familiarizing yourself with the flow helps avoid mistakes and ensures that your Easter Bunny in a carrot patch comes out exactly as pictured.
Lastly, gather everything in a comfortable workspace. Keeping your materials organized makes the crocheting process smoother and more enjoyable from start to finish.
To begin the crochet Easter Bunny in a carrot patch pattern, start with the bunny’s body. Most patterns use the amigurumi technique, which begins with a magic ring. This helps form a tight, seamless circle for the head or body. Work single crochet stitches in rounds, increasing gradually to shape the bunny.
Once you’ve created the head and body, move on to crocheting the ears. Long, floppy ears give your bunny extra cuteness, but you can adjust the length according to your preference. Stitch the ears to the head securely, making sure they sit symmetrically. This adds balance and personality to your finished figure.
Next, crochet the bunny’s arms and legs using simple tube-like shapes. Stuff them lightly before attaching, so they stay soft yet sturdy. When sewn in place, they give the bunny a charming seated pose that fits perfectly in your carrot patch.
Now it’s time to make the carrots. These are usually crocheted in a tapered shape, beginning with a magic ring and increasing before decreasing again. Bright orange yarn makes the carrot vibrant, and you can add texture by alternating stitches. The leafy tops are typically made with green yarn using chain stitches or small loops for a realistic appearance.
For the carrot patch base, crochet a flat circle or oval using brown yarn. This represents the soil where the carrots grow. You can even add raised details, like small ridges or tiny leaf sprigs, for an extra decorative touch.
Finally, assemble your project. Arrange the bunny among the carrots and sew each piece securely onto the base. This brings your crochet Easter Bunny in a carrot patch pattern to life, creating a delightful handmade decoration full of spring charm.
One of the best aspects of the crochet Easter Bunny in a carrot patch pattern is how customizable it can be. You can easily change the bunny’s color to suit different themes—pastel pink, brown, or even speckled yarn give unique and playful results. Each color brings out a different mood and personality in your bunny.
Adding accessories is another fun way to personalize your project. Consider crocheting a tiny bow tie, a flower crown, or a miniature basket for your bunny to hold. These details elevate the charm and make your finished piece truly one of a kind.
If you enjoy color variations, try using variegated yarn for the carrots or the carrot tops. This gives your patch a whimsical, artistic look that stands out beautifully. You can also make some carrots larger or smaller to create visual depth.
For more advanced crocheters, adding textured stitches like bobble stitches can create realistic soil mounds in the carrot patch. This gives a lifelike appearance and adds a creative twist to the classic design.
You can also create multiple bunnies and arrange them in a larger carrot garden. This transforms your craft into a centerpiece perfect for Easter decorations or family gatherings. Display it on a table, mantle, or shelf for maximum visual impact.
Lastly, consider turning your crochet Easter Bunny in a carrot patch pattern into a gift. It’s a thoughtful handmade present for children, friends, teachers, or anyone who appreciates the charm of crocheted crafts.
To make your crochet Easter Bunny in a carrot patch pattern as polished as possible, keep your tension consistent throughout your work. Amigurumi relies on tight stitches to keep stuffing from showing through, so focus on keeping an even hand.
Stuff the bunny and carrots gradually rather than all at once. This ensures smooth shaping and prevents lumps from forming. Using small pieces of fiberfill helps achieve a more even texture.
When attaching the bunny’s features, position the safety eyes evenly and use pins to test placement before sewing. A well-designed face brings your bunny to life and enhances its personality.
If you’re new to crocheting small pieces, practice making mini components like ears and limbs separately. Once you feel confident, start assembling your final project. This helps reduce mistakes and boosts your confidence.
Always weave in yarn ends securely. This ensures your creation stays intact even with frequent handling or display. A tidy finish is key to professional-looking crochet projects.
Lastly, take your time and enjoy the process. Crafting the crochet Easter Bunny in a carrot patch pattern should be fun, relaxing, and rewarding—and the more love you put into it, the sweeter the result will be.
1. Is this pattern suitable for beginners?
Yes, many versions use simple stitches like single crochet, making it beginner-friendly with a bit of practice.
2. What type of yarn is best for this project?
Medium-weight cotton or acrylic yarn works great for durability and shape retention.
3. Can I make the bunny larger or smaller?
Absolutely! Adjusting your hook size or yarn thickness will change the overall size of the finished piece.
4. Do I need safety eyes, or can I embroider them?
Either works. Embroidered eyes are safer for small children, while safety eyes give a polished look.
5. How long does it take to complete the pattern?
Depending on skill level, it can take anywhere from a few hours to a couple of days.
6. Can I add more carrots or decorate the patch differently?
Yes! You can customize the number of carrots, add leaves, or even include flowers for a unique touch.
Making a crochet Easter Bunny in a carrot patch pattern is a joyful and creative project that brings the magic of spring and Easter into your home. From crafting the adorable bunny to assembling the vibrant carrot patch, every step lets you express your artistic side. With customization options and simple techniques, this project is perfect for crocheters at any level.
I hope this guide inspires you to start your own crochet bunny creation. Please leave your honest opinion and suggestions—your feedback helps me improve and craft even better guides for you!


