
Crochet Heart Rooster Rug Pattern – The Best Techniques and Tools

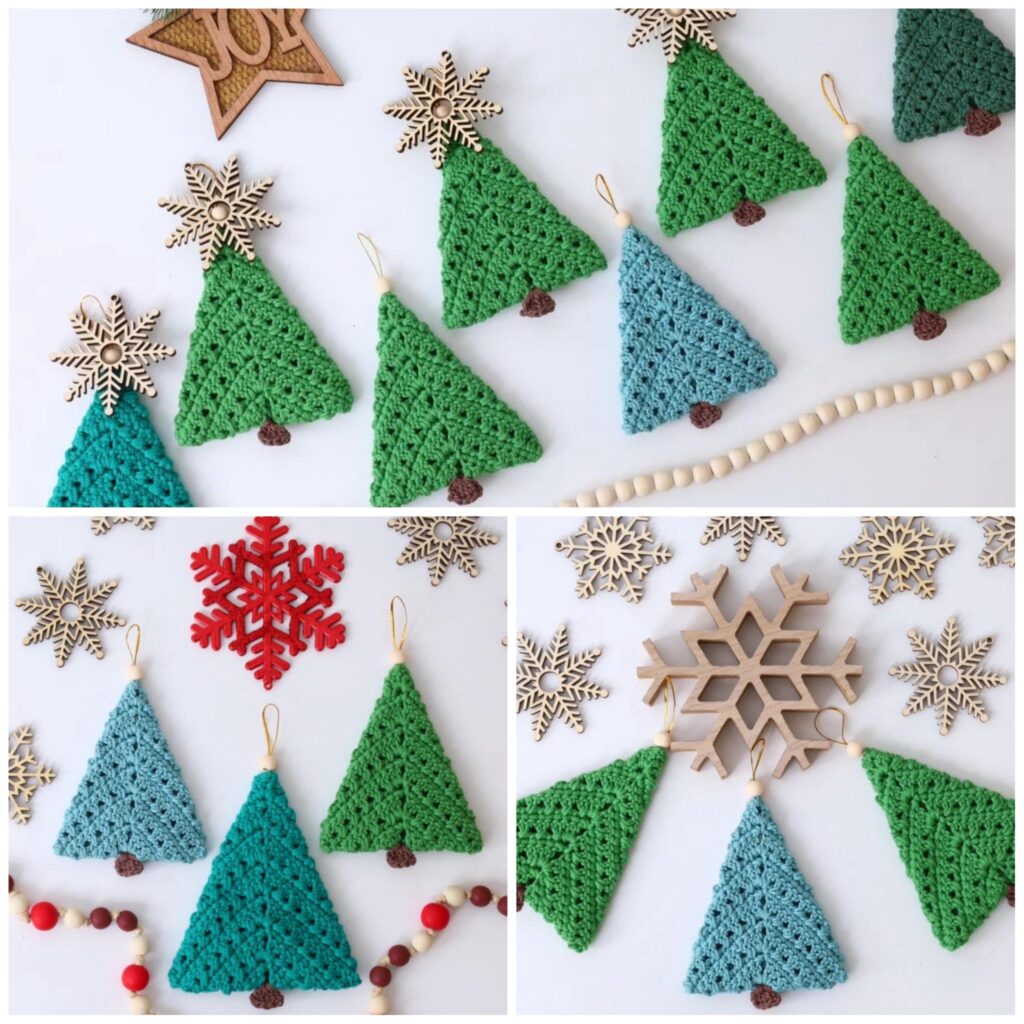
Crochet Christmas Trees – Tutorial is a charming and meaningful craft project that brings the holiday spirit to life. Creating your own Crochet Christmas Trees allows you to personalize your festive decorations while enjoying the therapeutic process of crochet.
In this tutorial, you’ll explore all the essential techniques, materials, and creative ideas needed to design beautiful pieces that can brighten your home, become thoughtful gifts, or even serve as handcrafted items for holiday sales.
From beginners to experienced crafters, everyone can enjoy diving into this cozy Christmas project.
The beauty of Crochet Christmas Trees lies in their versatility. You can create them in a variety of sizes, colors, and textures, customizing each piece to match your holiday theme. Whether your style is traditional, minimalistic, or colorful and playful, there is always room to adapt this craft to your personal taste. Before you begin crocheting, it’s important to understand the basic structure and essential supplies that shape the quality and durability of your final piece. The right choice of yarn, hook, and decorative elements can significantly elevate your results.
If you’ve been looking for a creative way to elevate your Christmas décor, Crochet Christmas Trees offer endless possibilities. They can be used on shelves, dining tables, centerpieces, office desks, mantels, or even as ornaments on your main Christmas tree. This tutorial will guide you through material selection, the stitching process, assembly, and decoration. Along the way, you’ll also find helpful tips for achieving a polished look and making your work unique. Now, let’s explore everything you need to start creating this festive crochet project.
Selecting the right materials is essential for producing well-structured and visually appealing Crochet Christmas Trees. The yarn you choose will influence the texture, firmness, and overall aesthetic of your project. Cotton yarn is often the top recommendation because it creates defined stitches and provides a steady shape. However, acrylic and blended yarns may also work well, especially if you prefer a softer finish or want to experiment with sparkly fibers for a festive touch.
Another critical factor is choosing the appropriate hook size. Ensuring the hook matches—or intentionally differs slightly from—the yarn label recommendation helps control stitch tightness. For Crochet Christmas Trees, tighter stitches usually produce better results, especially when stuffing the piece. A slightly smaller hook helps prevent gaps, creating a dense and solid surface that supports the tree’s structure. Using this strategy can also help maintain the cone shape more effectively.
The stuffing material also plays an important role. Polyester fiberfill is the most widely used option because of its lightweight and flexible qualities. It molds easily within the crochet shape and maintains volume without weighing down the project. Some crafters use yarn scraps as eco-friendly stuffing alternatives. If you prefer a firmer structure, you can insert cardboard or foam cones inside your Crochet Christmas Trees to ensure they remain upright and perfectly shaped.
Color selection is another delightful stage of preparation. While green is the classic shade associated with Christmas trees, there is no rule restricting creativity. Try incorporating white, gold, beige, red, or even pastel tones to match modern Christmas themes. Using multi-colored yarns may also produce playful and unique effects. With the right palette, your Crochet Christmas Trees can complement any décor style, from rustic to contemporary.
Decorative embellishments help bring your trees to life. You can add beads, tiny buttons, rhinestones, ribbons, or small pom-poms to simulate ornaments. They add visual interest and elevate the festive spirit. Just make sure these accessories are lightweight to avoid affecting the tree’s balance. If you want a more minimalist piece, you can keep the tree plain and let the stitching itself become the highlight.
Finally, always prioritize quality materials. Using durable yarn and reliable tools ensures your Crochet Christmas Trees will last for years, especially if you plan to reuse them every holiday season. High-quality materials also make the crafting experience smoother and more enjoyable.
Creating Crochet Christmas Trees becomes much easier when you understand the step-by-step construction. Most trees begin with a magic ring, which forms the pointed tip. From there, you’ll gradually increase stitches to shape the widening cone. Beginners may find the magic ring tricky at first, but with practice, it becomes second nature. Starting neatly at the top of the tree ensures a smooth and polished result.
After forming the tip, you will continue building the tree by working in rounds. Each round typically includes increases that widen the shape progressively. Consistency is key here—keeping your tension steady and counting stitches helps maintain symmetry. Many crocheters prefer using stitch markers at this stage to avoid losing track of rows. As your Crochet Christmas Trees grow in size, you’ll begin to see the cone structure becoming more defined.
Once the tree has reached the desired height, it’s time to add shaping details. Some designs include textured rows created with popcorn stitches, bobble stitches, or front-post variations. These special stitches help create the illusion of branches or layered tree sections. Incorporating such textures can give your work a distinctive and elegant look, making your projects stand out.
When the structure is complete, you’ll move on to the stuffing phase. Carefully fill the tree with the chosen stuffing material, applying small amounts at a time to avoid lumps. Distributing the stuffing evenly ensures your Crochet Christmas Trees maintain a balanced shape. If you’re using a cone insert, simply position it inside the crocheted shell and adjust the fabric around it.
Next comes the finishing stage, which includes closing the bottom of the tree. Depending on the pattern, this may involve crocheting a flat circular base or decreasing stitches until the base is secure. A well-closed bottom helps the tree sit upright and adds stability. You can also attach a thicker base if you want your Crochet Christmas Trees to stand taller or be used as table centerpieces.
Finally, you can begin decorating. Attach beads, ribbons, or other small embellishments with a needle and thread. This is your chance to let your creativity shine—try color-coordinated themes, sparkly accents, or even simple touches for a minimalist style. A star or small bow at the top adds a charming finishing detail.
Decorating Crochet Christmas Trees is a joyful step that lets you add personality and creativity to every piece. You can keep your trees classic or turn them into whimsical designs. One popular idea is to use tiny metallic beads to replicate the look of Christmas ornaments. These small touches can make your handmade decorations look elegant and festive without overwhelming the design.
Another charming idea is to incorporate ribbons. Thin satin ribbons tied around the tree or wrapped spirally can create a delightful visual effect. This technique works especially well for trees displayed on shelves or gift baskets. Matching ribbon colors to your holiday theme can help your Crochet Christmas Trees blend harmoniously into your overall décor.
For those who enjoy a bit of sparkle, adding glittery yarn or sewing on miniature sequins can provide a shimmering effect. These decorations catch the light beautifully, making your pieces stand out during nighttime gatherings or under warm holiday lighting. Just remember not to overuse heavy embellishments to maintain the tree’s balance.
Pom-poms are another playful option. Mini pom-poms in red, white, or multicolored shades bring a cozy and cheerful appearance. They work especially well if you’re decorating a children’s area or aiming for a cute and lively look. Pom-poms can be attached randomly or arranged symmetrically for a more structured design.
If you prefer a rustic style, consider using earthy tones and natural elements. Small wooden beads, jute cord, or neutral yarns can give your Crochet Christmas Trees a warm and handcrafted charm. This aesthetic blends beautifully with farmhouse or minimalist holiday décor.
Lastly, adding a topper is a wonderful finishing touch. A small crocheted star, bow, or snowflake can complete the look and make your tree feel truly special. This simple detail often becomes one of the most admired parts of the decoration.
Personalization plays a major role in making your Crochet Christmas Trees unique. One effective way to customize your project is to experiment with different yarn textures. Mixing smooth cotton with fluffy or metallic fibers can create surprising and beautiful contrasts. Textured yarns may also help simulate snow-covered branches or shimmering holiday lights.
Another useful tip is to vary the size of your trees. Creating sets with small, medium, and large pieces can enhance visual interest when arranging them on tables or shelves. Varying height levels brings depth to your display and makes your handmade decorations look more professionally curated.
You can also personalize your trees by adding names, initials, or small messages. Using embroidery techniques, you can stitch meaningful words onto the surface of your Crochet Christmas Trees, making them perfect for personalized gifts. These customized touches add sentimental value and turn a simple decoration into a memorable keepsake.
Color gradients are another creative way to elevate your project. Using ombré yarn or changing colors gradually as you work down the tree can produce a stunning visual effect. Soft transitions between shades can make your decorations look more artistic and eye-catching.
Working with different bases can also enhance your project. Instead of using plain bases, you can crochet sturdy stands or incorporate wooden blocks to lift the trees slightly. This helps create more presence in your holiday setup and prevents the decorations from tipping over.
Lastly, practice always leads to improvement. The more Crochet Christmas Trees you make, the more comfortable and confident you’ll become with shaping, decorating, and designing. Over time, your personal style will become evident in each new piece you create.
1. Are Crochet Christmas Trees suitable for beginners?
Yes, many patterns are beginner-friendly, especially those using simple stitches and basic cone shapes. Beginners can easily learn the foundation techniques.
2. What yarn works best for Crochet Christmas Trees?
Cotton or acrylic yarns work well because they offer good stitch definition and structure. Cotton provides firmness, while acrylic offers softness.
3. Can I decorate Crochet Christmas Trees with real ornaments?
Yes, but choose lightweight decorations to avoid flattening or unbalancing the tree.
4. How can I make my tree stand upright?
Use a sturdy base, such as a foam cone, cardboard insert, or a tightly crocheted circular bottom.
5. Can I sell the Crochet Christmas Trees I make?
Absolutely. Handmade holiday decorations are popular items for seasonal craft fairs and online sales.
6. How long does it take to make one tree?
The time varies depending on size and skill level, but many small trees can be completed in a single afternoon.
Creating Crochet Christmas Trees is a delightful and rewarding way to embrace the holiday season. Throughout this tutorial, you learned about material selection, the step-by-step process, decoration ideas, and ways to personalize your creations. These handmade pieces bring warmth, creativity, and charm to your Christmas décor. I hope this guide helps you feel confident and inspired to start crafting your own trees.
Please share your honest opinion and suggestions—I’d love to hear how your project turns out and what ideas you’d like to explore next!


