
Crochet Heart Rooster Rug Pattern – The Best Techniques and Tools

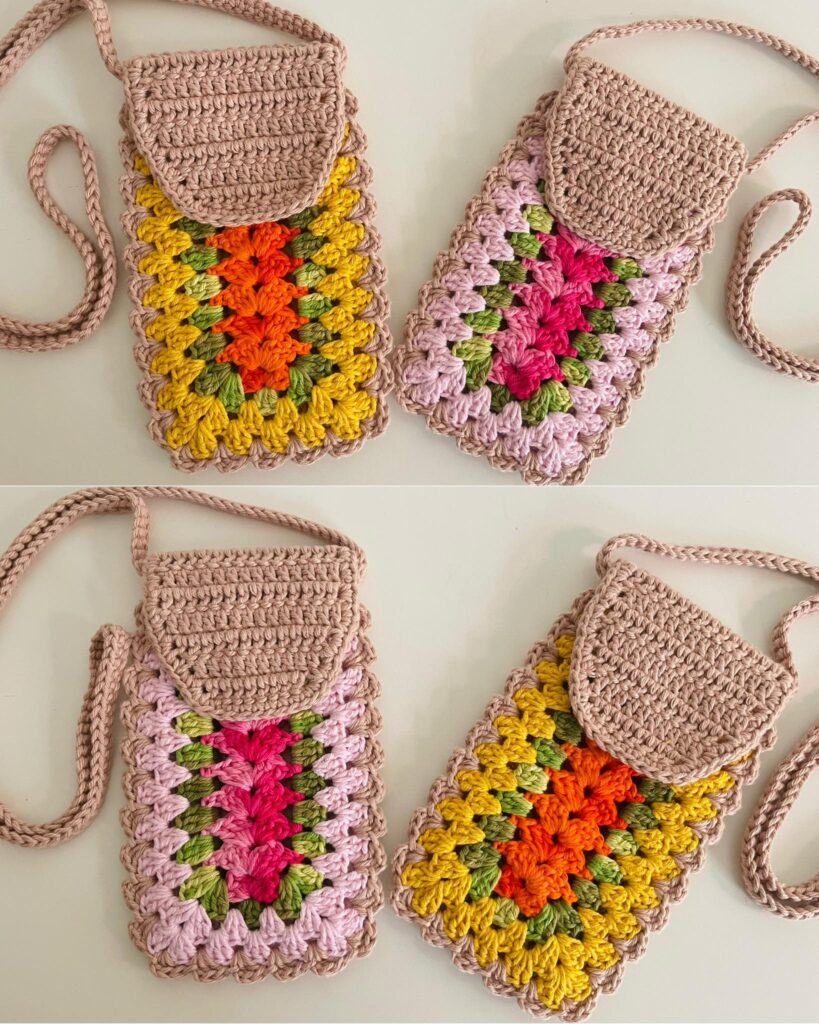
Crochet Cell Phone Holder Tutorial is a wonderful project for crafters who want to combine practicality with creativity, especially if you enjoy making functional crochet pieces that look beautiful as everyday accessories.
In this article, we will explore how to create your own crochet cell phone holder, what materials to use, why this project is great for beginners and experienced crocheters, and how you can personalize your finished piece.
The goal is to help you fully understand each detail so you can confidently crochet a stylish and durable mobile holder from scratch.
This Crochet Cell Phone Holder Tutorial also aims to provide a smooth learning experience by explaining each concept in a simple and organized way.
Whether you want to make a holder for yourself, gift it to someone special, or even sell your handmade items, this tutorial covers everything you need to know. Throughout the article, you’ll find useful tips to make your project stronger, prettier, and perfectly sized for modern smartphones. Keeping the keyword well integrated helps maintain SEO quality and ensures clarity while guiding you step-by-step.
Before we move into the structured sections, it is essential to emphasize that the Crochet Cell Phone Holder Tutorial focuses not just on crafting but also on personalization, creativity, and durability. This gives you the freedom to adapt the design to any color palette, stitch style, or purpose you prefer. You can add straps, buttons, flaps, decorative elements, or even pockets. With the instructions and ideas provided here, you will see how easy and enjoyable it is to create a unique accessory with your own hands.
Starting your journey with this Crochet Cell Phone Holder Tutorial begins with choosing the right materials. The best yarns are usually cotton or cotton-blend fibers because they give a sturdy texture and provide excellent durability. Cotton yarn also keeps the phone protector breathable and less likely to stretch out over time. Selecting the right hook size is equally important; typically, a 3.5 mm to 4.5 mm hook works perfectly for this kind of project, depending on the yarn thickness.
Another key step in beginning your crochet phone holder is measuring your phone correctly. You want your holder to fit snugly without being too tight or too loose. This means measuring the length and width of your device and adding a little extra space for seams and stretch. The goal is to create a pouch-like structure that safely carries your phone while looking stylish and handmade. Always keep these measurements in mind as you progress through the tutorial.
The initial stitches often determine the neatness of your final result. Beginners may find it easier to start with a chain that matches the width of the phone, then work in rounds to create a seamless pouch. Working in the round not only avoids seams but also gives the project a professional finish. Consistency in your tension will help ensure your holder is evenly shaped.
It is also helpful to choose a stitch pattern that suits your style. Single crochet stitches create a tight and protective texture, while half-double or double crochet stitches offer a looser, more flexible fabric. You can even mix different stitches for decorative effects or add stripes with various yarn colors. Each choice contributes to your customization, making this Crochet Cell Phone Holder Tutorial adaptable for all skill levels.
Beginners often worry about shaping, but one advantage of this project is that most holders are simple rectangles or tubes. As long as you follow your measurements and maintain your stitch count, your design will turn out nicely. If you make a mistake, this is a small project and very easy to undo and redo until it looks exactly how you want.
Once you have your materials prepared and your measurements ready, the actual crocheting becomes a smooth and relaxing experience. Remember, the beauty of the Crochet Cell Phone Holder Tutorial is that it encourages you to take your time, enjoy the process, and express creativity through a practical handmade item.
Stitch technique is one of the important foundations of this Crochet Cell Phone Holder Tutorial. The type of stitch you choose determines the structure of your phone holder, its thickness, and even the overall aesthetic. A common choice is the single crochet stitch, valued for its tight texture that prevents the phone from slipping out or the fabric stretching over time. It also gives a clean, dense look perfect for beginners.
Another popular option is the half double crochet stitch, which works slightly faster and provides a bit more flexibility. Many crafters prefer it because it strikes a balance between speed and structure. If you want a more decorative look, you can incorporate alternating stitches such as single crochet combined with double crochet for a patterned effect.
The crochet ribbing technique is another creative option, especially for adding stretch at the top of the phone holder. Ribbing can help the opening stay snug, acting like a grip around your phone. It also adds a fashionable texture that makes your finished holder look more polished and professionally crafted.
For those who love visual patterns, the moss stitch or linen stitch creates a subtle woven look perfect for a minimalist phone holder. These stitches are beginner-friendly and work well in solid or variegated yarns. They create a neat and reliable texture suitable for protective accessories like phone holders.
If you’re feeling adventurous, textured stitches such as puff, bean, or bobble stitches can add a decorative touch. These stitches create small raised elements that add character to the holder. While more advanced, they elevate the project and make your design look unique and eye-catching, even as a simple accessory.
Throughout this section of the Crochet Cell Phone Holder Tutorial, the main recommendation is to choose stitches that match your skill level and desired style. You are free to experiment, but grounding yourself in dependable techniques ensures that your final project remains functional and sturdy.
This Crochet Cell Phone Holder Tutorial goes beyond the basics to show how you can add custom features that reflect your personality. One of the easiest additions is a strap or handle. You can crochet a long shoulder strap, a wrist strap, or even a simple loop for hanging. Using slip stitches or single crochet rows creates a strong and secure strap that can comfortably carry the phone’s weight.
Adding a button closure is another useful idea. A simple flap worked from the back row of the holder can fold over the top and secure with a button or wooden toggle. This prevents the phone from sliding out, especially when you’re on the move. Buttons also add a decorative and charming element.
You may also consider adding a small pocket to the front or back of the holder. This is perfect for holding small items such as cards, receipts, or earbuds. To make a pocket, crochet a small rectangle and sew it securely onto the finished holder using a yarn needle and matching thread.
Another fun customization is adding embroidery details. Using contrasting yarn, you can stitch flowers, initials, geometric patterns, or cute shapes. This personal touch makes each holder special and is a great way to match it to your style or the recipient’s personality if you’re gifting it.
When decorating your holder, think about color combinations. Solid colors offer simplicity and elegance, while multicolored yarns create lively and energetic effects. Stripes are also easy to implement by switching yarn colors between rows or rounds.
Each of these ideas enriches your Crochet Cell Phone Holder Tutorial, encouraging creativity and turning a simple functional piece into a unique handmade accessory that truly stands out.
The final stage of this Crochet Cell Phone Holder Tutorial focuses on finishing touches that ensure your project looks polished and lasts longer. A key finishing step is weaving in the yarn ends neatly using a tapestry needle. This helps prevent your stitches from unraveling and gives the inside of your holder a cleaner look.
Blocking your piece is optional but beneficial. Lightly steaming or shaping the holder helps it settle into a symmetrical form. This is especially useful if your tension varied or if your stitch pattern naturally curls. Cotton yarn responds very well to gentle blocking.
Attaching embellishments, if you choose to use them, is best done after blocking. This includes buttons, beads, appliqués, or embroidered designs. Sewing them carefully will ensure they remain secure even with frequent use.
If you added a strap, double-check the attachment points to make sure they can handle the weight of your phone. Reinforcing them with extra stitches or tighter knots provides greater durability. Since this accessory may be used daily, strength is important.
You may also line the inside of the holder with fabric if you want extra protection. While optional, a thin cotton lining prevents stretching and adds a luxury feel. You would simply cut a fabric rectangle slightly smaller than the pouch and stitch it inside.
With all finishing steps completed, your handmade item from this Crochet Cell Phone Holder Tutorial is ready for everyday use—beautiful, functional, personalized, and uniquely crafted by you.
1. Is this Crochet Cell Phone Holder Tutorial suitable for beginners?
Yes, this tutorial is beginner-friendly because the design is basic and relies on simple stitches like single crochet.
2. What type of yarn works best for a crochet phone holder?
Cotton yarn is ideal because it provides durability, structure, and minimal stretching.
3. How long does it take to complete a crochet cell phone holder?
Most people finish it within 1–3 hours, depending on skill level and added details.
4. Can I make this pattern for larger or smaller phones?
Absolutely. The design is fully adjustable by taking measurements and modifying the number of chains or rounds.
5. Can I add a strap to the holder?
Yes, adding a strap is simple and can be done using single crochet rows or slip stitches for reinforcement.
6. What stitches are recommended for beginners?
Single crochet and half-double crochet are the most recommended because they create strong, stable fabric.
7. Do I need a lining inside the holder?
No, but lining provides extra support and prevents stretching if you use softer yarns.
This Crochet Cell Phone Holder Tutorial has shown you how to create a beautiful, functional accessory using simple techniques and customizable options.
You learned about materials, stitch choices, decoration ideas, and finishing touches to elevate your handmade holder. I hope this guide inspires you to explore your creativity and enjoy the rewarding process of crochet.


