
Crochet Heart Rooster Rug Pattern – The Best Techniques and Tools

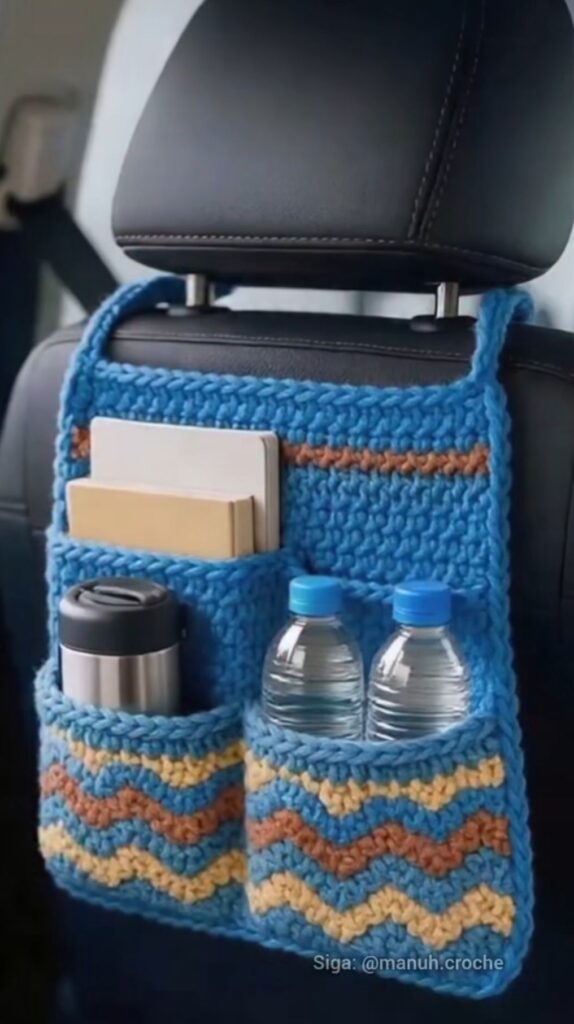
Creating a crochet car organizer pattern is a practical and enjoyable way to keep your vehicle tidy while adding a handmade touch of charm.
Using yarn, hooks, and basic crochet techniques, you can craft a custom organizer designed to hold everything from water bottles to toys, snacks, tissues, electronics, and travel essentials.
A handmade organizer not only helps reduce clutter but also enhances comfort during car rides—perfect for families, commuters, and anyone who appreciates functional décor.
The beauty of a crochet car organizer pattern lies in its flexibility. You can adapt the size, number of pockets, color scheme, and overall design to suit your car’s interior or your personal preferences.
Whether you prefer a simple minimalist organizer or a multicolor, multi-pocket storage panel, crochet gives you complete creative control. It’s a great project for beginners who want to practice basic stitches and for experienced crocheters looking for practical, customizable patterns.
Crafting your own car organizer is also more cost-effective than purchasing one. Store-bought organizers often lack character and may not fit all needs, whereas a crocheted organizer allows you to incorporate exactly what you want—durability, beauty, and usefulness. With the right yarn and structure, your organizer becomes a long-lasting travel companion, keeping your car neat, organized, and stylish.
To begin your crochet car organizer pattern, selecting the right yarn is essential. Durable, sturdy yarns like cotton or cotton blends work best because they offer structure and hold up well to frequent use. These yarns resist stretching, making them ideal for pockets that will carry heavier items such as bottles or electronics.
Choose a hook size that complements your yarn. A slightly smaller hook helps produce tighter stitches, giving your organizer more strength. Most creators use hook sizes between 4.0 mm and 5.5 mm, but always check your yarn’s recommendation to ensure optimal results.
You’ll also need a tapestry needle for weaving ends, stitch markers to help track your rounds or rows, and possibly plastic or wooden rings if your design calls for hanging loops. Some crafters even insert lightweight plastic sheets or stiff interfacing to reinforce the back of the organizer.
Consider the color palette you want to use. Matching your car’s interior creates a polished look, while bright colors add personality. You can also choose multicolored yarn for a textured, playful finish. Variety in shades makes your crochet car organizer more visually appealing.
Before beginning, plan how many pockets you want and what items they will hold. This helps determine the number of panels, pocket sizes, and overall dimensions. Effective planning ensures the final product is functional, balanced, and neatly structured.
Lastly, keep all materials organized before starting. This helps you maintain a smooth workflow and prevents interruptions while working on the pattern.
The base panel is the foundation of your crochet car organizer pattern. Most designs begin with a rectangular panel worked in rows using sturdy stitches such as single crochet or half-double crochet. These stitches create a dense fabric that supports pockets and maintains shape.
Start by chaining the width of your organizer. For most cars, a width of 12–18 inches works well, but you can adjust this depending on whether the organizer will hang on the back of a seat, the front passenger side, or across a console.
Once your chain is ready, crochet rows until you reach the desired height. The panel should be large enough to anchor multiple pockets but not so large that it obstructs seating or legroom. Keeping tension even is important for maintaining a clean, rectangular shape.
As you work, consider adding decorative stitches such as waistcoat stitch or moss stitch for texture. These stitches enhance the look without compromising durability. Textured stitches are especially appealing if your organizer will be visible from the front seats.
If you want added reinforcement, crochet two identical panels and stitch them together. Doubling the layer adds strength and stability, giving your organizer a sturdier base for heavy items.
Finally, finish the base panel with a neat border. Single crochet borders provide clean edges and prevent stretching. The border also makes it easier to attach pockets later.
Pockets are the highlight of your crochet car organizer pattern. They can be tailored to hold a wide range of items, and making multiple pocket sizes adds versatility and function to your organizer.
Begin each pocket by crocheting a smaller rectangle using the same yarn or a coordinating color. Single crochet and half-double crochet stitches work best for creating firm, reliable pockets. Make sure each piece is sturdy enough to support its intended contents.
For larger items like tablets, books, or notebooks, create wide pockets with reinforced top edges. You can achieve this by working a few rows of slip stitches or adding a decorative edging that doubles as a strengthening band.
Small pockets are perfect for pens, sunglasses, snacks, or charging cables. You can crochet these directly onto the base panel or make them separately and stitch them on. Spacing them evenly helps keep the organizer visually balanced.
To attach the pockets, use a tapestry needle and whip stitch or slip stitch method along the sides and bottom of each pocket. Leave the top open, of course, and make sure stitches are tight and secure. Reinforced seams prevent stretching and sagging over time.
For an extra touch of creativity, add flaps or button closures to some pockets. This helps secure delicate items and adds charm to your crocheted car organizer.
One of the joys of crafting a crochet car organizer pattern is adding personal decorative elements. You can incorporate stripes, color blocks, or textured rows to give your organizer personality and flair.
Consider adding appliqué shapes, such as stars, flowers, or geometric patterns, to the front of the pockets. These details make your organizer feel more handcrafted and unique.
If you love practical additions, crochet small loops on the sides for keys or car-friendly accessories. These loops can be reinforced with additional stitching and used frequently without wearing down.
Adding labels is another clever customization. Crochet or embroider labels for each pocket, such as “Snacks,” “Charger,” “Pens,” or “Kids.” This helps keep your car organized and makes it easier for passengers to find what they need.
You can also incorporate mesh-style pockets by using chain spaces or treble crochet stitches. Mesh pockets are ideal for quick-drying or breathable storage, especially during summer.
Finally, personalize your organizer with colors that reflect your style or mood. A cohesive palette gives a refined look, while contrasting shades create a bright, lively design for family vehicles.
1. What’s the best yarn for a crochet car organizer?
Durable cotton yarn or cotton blends are ideal because they provide strength, structure, and long-lasting quality.
2. Can beginners make a car organizer?
Yes! The pattern uses simple stitches, making it perfect for beginners with basic crochet skills.
3. How do I keep the pockets from stretching out?
Use tight stitches, reinforce seams, and choose sturdy yarn. You can also line the pockets with fabric if desired.
4. Does the organizer need a backing panel?
A backing panel adds strength, especially for larger organizers. Doubling the panel also improves durability.
5. How do I attach the organizer to the car seat?
Most people use crocheted straps, buttons, ties, or plastic rings to secure it around the headrest or seat frame.
6. Can I wash my crocheted organizer?
Yes, if you use washable yarn like cotton. Hand washing or gentle machine cycles are recommended.
Creating a crochet car organizer pattern is a practical, enjoyable, and rewarding project that adds both beauty and functionality to your vehicle. With simple stitches, customizable pockets, and endless creative options, this handmade organizer helps keep your car neat and your essentials within reach. Whether you’re crafting for yourself or making gifts for others, this project blends utility with craftsmanship in the best way.
I’d love to hear your honest opinion and any suggestions you may have. Your feedback helps inspire even better guides and creative ideas!


