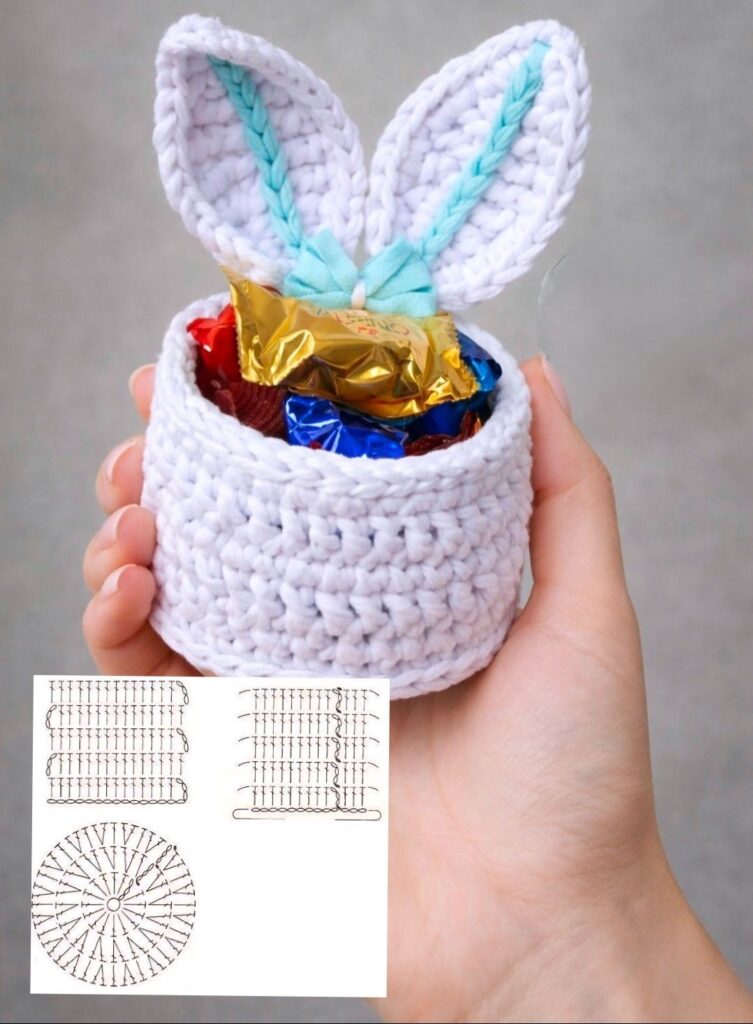
Crochet Bunny-Ear Treat Basket Pattern

Crochet Bunny-Ear Treat Basket Pattern is a delightful project for anyone who loves making cute, functional, and seasonal crochet pieces. This charming basket is perfect for Easter celebrations, spring decor, handmade gifts, party favors, or even as a sweet little organizer for small items.
Because the basket needs to stand upright and hold its form, this project is an excellent way to practice creating a more structured crochet piece while still keeping the design playful and decorative.
In this complete Crochet Bunny-Ear Treat Basket Pattern guide, you will learn how the basket is constructed, which materials work best, how to follow the project step by step, and how to make your final result look cleaner, sturdier, and more polished.
You can make it in soft pastel shades for a classic spring look, use bright cheerful colors for a playful style, or even choose neutral tones for a more elegant handmade finish. This flexibility makes the pattern suitable for many different tastes and creative goals.
Another reason this project is so popular is that it is relatively quick to complete compared to larger crochet items. Because of its small to medium size, it can often be finished in a short amount of time, which makes it ideal for weekend crafting, last-minute gift making, or creating several baskets as a matching set. This also makes it a rewarding project for crocheters who enjoy seeing results quickly.
If you want to improve your crochet confidence while making something adorable and useful, this Crochet Bunny-Ear Treat Basket Pattern is a wonderful choice. It gives you the chance to practice shape control, neat assembly, and decorative finishing in one project that feels light, fun, and satisfying from beginning to end.
Before starting your Crochet Bunny-Ear Treat Basket Pattern, it is important to understand how this type of project is usually built. Most bunny-ear baskets are made from a firm crochet base, upright side walls, a handle, and two decorative bunny ears attached near the top.
The base is often the first part to be crocheted. It is usually made in a circular or oval shape, depending on the basket style. This part needs to be flat and balanced so the basket can stand properly once completed.
After the base is finished, the sides are worked upward in rounds. This is where the basket begins to take shape. The goal is to build enough height for the basket to hold treats, small gifts, or decorative items without becoming floppy or uneven.
The handle is often added next. Some patterns crochet the handle separately and sew it on later, while others build it directly into the top edge of the basket.
The bunny ears are usually made as separate pieces and then attached. These ears are one of the most charming parts of the design and give the basket its playful personality.
Understanding these parts will help you feel more confident while working through your Crochet Bunny-Ear Treat Basket Pattern.
Choosing the right materials is one of the most important parts of creating a successful Crochet Bunny-Ear Treat Basket Pattern.
Cotton yarn is one of the best choices because it provides strong stitch definition and enough firmness to help the basket hold its shape. This is especially useful for the sides and handle.
Cotton blend yarn is also a great option if you want a slightly softer feel while still maintaining enough structure for the basket to stand upright.
If you prefer a softer decorative finish, acrylic yarn can be used, but it may require tighter stitches to keep the basket from becoming too flexible.
A smaller crochet hook than usual is often recommended for this type of project. Tighter stitches help improve structure and reduce gaps between stitches.
You will also need a yarn needle, sharp scissors, and optionally stitch markers to keep your rounds organized.
Using the right materials from the beginning will make your Crochet Bunny-Ear Treat Basket Pattern much easier to complete with better results.
The base is one of the most important parts of your Crochet Bunny-Ear Treat Basket Pattern, because it determines the stability of the entire basket.
Start with a magic ring or a small foundation chain, depending on whether you want a circular or oval base. This creates the center of your basket.
Work in rounds using simple stitches such as single crochet or half double crochet. Increase evenly to expand the shape and keep the base flat.
Continue increasing until the base reaches your desired width. Make sure it stays smooth and balanced without curling upward or becoming wavy.
It is a good idea to check your tension as you go. If your stitches are too loose, the basket may lose structure later.
Once the base is complete, count your stitches carefully before moving on to the next section.
A strong, even base gives your Crochet Bunny-Ear Treat Basket Pattern the support it needs to look neat and stand properly.
Once the base is complete, the next step in your Crochet Bunny-Ear Treat Basket Pattern is building the sides and handle.
To create the sides, stop increasing and begin working evenly around the base. This will naturally pull the crochet upward and start forming the basket walls.
Keep your stitches firm and consistent. This part of the project needs structure, so try not to loosen your tension.
Continue crocheting until the basket reaches your desired height. A shorter basket is ideal for candy or decorative eggs, while a slightly taller one can hold small gifts or craft supplies.
Next, crochet the handle. This can be done by chaining across the top and reinforcing it with additional stitches, or by making a separate strip and sewing it on later.
Make sure the handle is securely attached and evenly positioned. A crooked or weak handle can affect the overall appearance and function of the basket.
This stage gives your Crochet Bunny-Ear Treat Basket Pattern its practical shape and makes it feel like a real finished basket.
The bunny ears are what make your Crochet Bunny-Ear Treat Basket Pattern especially adorable and memorable.
Most bunny ears are made as two separate pieces using basic shaping techniques. They usually begin with a small chain or magic ring and then grow using simple increases.
Single crochet, half double crochet, and sometimes double crochet are often used to create the curved ear shape. You can keep them short and rounded or make them longer for a more whimsical look.
If you want extra detail, you can crochet an inner ear section in a contrasting color and sew or stitch it onto the main ear.
Once both ears are finished, position them carefully on the basket or near the handle. Make sure they are symmetrical before attaching them permanently.
Sew them on securely and weave in all ends neatly. These final decorative touches bring your Crochet Bunny-Ear Treat Basket Pattern to life beautifully.
A few practical tips can greatly improve the quality of your Crochet Bunny-Ear Treat Basket Pattern.
Always use tight and even stitches if you want the basket to stand upright and maintain a clean shape.
Check the basket’s symmetry as you go. It is easier to correct shape issues early than after the basket is fully assembled.
If the basket feels too soft, try using a smaller hook or firmer yarn next time. Structure often depends more on stitch tension than on the pattern alone.
Take extra care with finishing details. Neatly woven ends, balanced ears, and a well-placed handle can make the project look far more professional.
If you are making more than one basket, write down your stitch counts and measurements so you can repeat the same result more easily.
These simple improvements can help your Crochet Bunny-Ear Treat Basket Pattern look more polished, decorative, and gift-worthy.
1. Is this project beginner-friendly?
Yes, especially if you already know basic stitches and want to practice shaping and structure.
2. What is the best yarn for a bunny-ear basket?
Cotton yarn is one of the best options because it offers good shape and stitch definition.
3. Why is my basket too floppy?
This usually happens when the stitches are too loose or the yarn is too soft for the structure needed.
4. Can I make this basket in different sizes?
Yes, simply adjust the size of the base and the height of the sides.
5. How do I make the ears stand better?
Use firmer stitches, shape them carefully, and attach them securely.
6. Can I use this basket as a gift?
Absolutely. It makes a lovely handmade gift for Easter, spring, or children’s celebrations.
7. How long does it take to make one?
It depends on the size and detail, but many can be completed in just a few hours.
Before reaching the final stage of your Crochet Bunny-Ear Treat Basket Pattern, take a moment to check the shape of the basket, the firmness of the handle, and the placement of the bunny ears. Small refinements such as evening out the edges, reinforcing the sides, or adjusting the ears can make a big difference. These finishing touches help your basket look cleaner, sturdier, and more beautifully handmade.
Creating a Crochet Bunny-Ear Treat Basket Pattern is a rewarding and enjoyable way to combine creativity with practical crochet skills. Throughout this guide, you learned how the basket is structured, which materials work best, how to crochet each section, and how to improve the final appearance with simple finishing techniques.
This project is a wonderful opportunity to practice shape, tension, and decorative assembly while making something festive and useful. Whether you create one basket or a full set, each piece can become a charming handmade addition to your seasonal decor or gift collection.
If this article helped you, feel free to leave your honest opinion and suggestions. Your feedback can inspire new ideas, better tutorials, and even more creative crochet projects in the future.


