Granny Square Amigurumi Pin Cushion Crochet Pattern

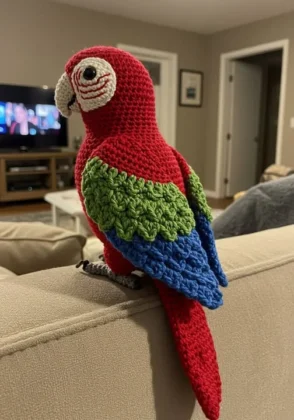
The Red Macaw Amigurumi is a stunning and vibrant CROCHET creation that captures the majestic beauty of the tropical red macaw in a soft, adorable form. With its striking red, blue, and yellow feathers, this bird makes the perfect inspiration for a unique and eye-catching amigurumi project. Whether you’re an experienced crocheter or just starting out, crafting a red macaw plushie will bring both fun and satisfaction.
Creating an amigurumi piece like the Red Macaw Amigurumi is not only about skill, but also about expressing creativity through yarn and hook. Using various CROCHET stitches and colorful yarn, you can recreate this exotic bird into a cuddly companion. Plus, this type of project is perfect for gifting, decorating nurseries, or even selling in handmade marketplaces.
In this article, you’ll find a comprehensive guide to everything you need to know about making a Red Macaw Amigurumi. From tools and yarn choices to CROCHET techniques and assembly tips, we’ll walk through every step in detail. Let’s dive into this tropical-inspired crafting journey!

When it comes to crafting a Red Macaw Amigurumi, the first step is gathering the right materials. Choosing quality supplies ensures a durable and beautiful final piece.
Start by selecting CROCHET yarn in bold, tropical colors. The red macaw’s signature look includes vibrant red, bright yellow, and deep blue. Use medium-weight cotton or acrylic yarn to keep your stitches defined and the structure firm.
You’ll need a CROCHET hook that matches your yarn’s recommended size. Most amigurumi patterns call for a slightly smaller hook than normal to create tight, dense stitches that prevent stuffing from peeking through.
Don’t forget fiberfill stuffing to shape your amigurumi and bring it to life. Stuffing gives your red macaw a soft and cuddly texture while maintaining its form.
Other essential tools include stitch markers, yarn needles, and scissors. Safety eyes or embroidered eyes will add character and expression to your plushie.
A stitch counter or mobile app can help you keep track of your rounds, especially for beginners or complex parts of the pattern.
Lastly, consider using wire or pipe cleaners for the wings or tail if you want to add poseable features to your Red Macaw Amigurumi, though this step is optional.
Once you’ve gathered your materials, it’s time to start crafting the body of your Red Macaw Amigurumi. The body acts as the central structure, so it should be carefully shaped and evenly stitched.
Begin with a magic ring and work in continuous rounds using single CROCHET stitches. This technique is essential in amigurumi to create a seamless and rounded shape.
Gradually increase your stitches to widen the body, and then evenly decrease as you approach the neck area. Be sure to stuff as you go to ensure firmness.
Use red yarn for the body to reflect the real red macaw’s vibrant feathers. Keep your tension consistent so the shape doesn’t warp or become too tight.
As you progress, place stitch markers at the start of each round. This helps track your progress and ensures the symmetrical shaping of your amigurumi.
Once the body is complete, fasten off and weave in the ends securely. The base is now ready for attaching wings, tail, and other details.
Remember to frequently compare your work to reference images of real macaws or pattern illustrations to maintain accuracy and charm.
Now comes the exciting part—bringing your Red Macaw Amigurumi to life with colorful details. This step is where the personality of your bird really shines through.
Start by CROCHETing the wings using blue and yellow yarn. Use the same tight stitch technique and shape them in slightly curved pieces to mimic a bird’s natural wing structure.
Attach the wings symmetrically to the body’s sides. Some crafters prefer to sew them flat, while others slightly stuff and shape them for a more dynamic appearance.
Next, move on to the tail feathers, using long strands of blue, red, and yellow yarn. You can crochet individual tail pieces or use fringe techniques for a soft, flowy effect.
For the face, begin with a white patch around the eyes, then attach safety eyes or embroider expressive ones. Don’t forget to CROCHET a small curved beak in black or grey.
Add little feet using black or brown yarn. These can be simple loops or more detailed claws, depending on your skill level and preference.
All these finishing touches give the Red Macaw Amigurumi its playful and realistic vibe. Take your time with assembly for a polished look.
Even if you’re new to amigurumi, the Red Macaw Amigurumi can be a rewarding project with a bit of patience and creativity. Here are some useful tips for success.
First, practice basic CROCHET stitches like single CROCHET (sc), increase (inc), and decrease (dec). These are the foundation of most amigurumi patterns.
Use online tutorials or diagrams to visualize complex steps. Many patterns come with photos or video guides that are extremely helpful for beginners.
Keep your tension consistent. Uneven tension can make your amigurumi look lumpy or misshapen. Don’t worry—this improves with practice!
Customize your macaw with accessories like a pirate hat, bandana, or even a tiny perch. This adds charm and makes your piece unique.
Experiment with yarn textures such as chenille or velvet for a fluffier, more cuddly result. Just make sure the yarn still allows for tight stitching.
Lastly, document your progress and share it with others. The CROCHET community online is welcoming and filled with inspiration for future projects.
FAQ – Red Macaw Amigurumi & CROCHET Tips
Q1: Is the Red Macaw Amigurumi suitable for beginners?
Yes, while it includes some detailed steps, many beginner-friendly patterns are available. Start simple and build your skills gradually.
Q2: What size hook should I use for amigurumi?
Typically, a hook one size smaller than the yarn label suggests works best for tight stitches. For worsted yarn, a 3.5mm or 4mm hook is common.
Q3: Can I wash my Red Macaw Amigurumi?
Yes, but handwashing is best. Use mild soap and gently press the water out. Let it air dry fully to maintain shape.
Q4: How can I keep the wings and tail firm?
You can use pipe cleaners, craft wire, or insert felt pieces to keep the wings and tail stiff and shaped.
Q5: What type of yarn is best for this project?
Cotton and acrylic yarns are great for amigurumi. They hold shape well and come in a wide range of vibrant colors.
Q6: How long does it take to finish a Red Macaw Amigurumi?
It depends on your skill level and time availability. On average, expect to spend 6–10 hours on this detailed project.
Creating a Red Macaw Amigurumi is a delightful and colorful CROCHET project that combines creativity, craftsmanship, and fun. With the right materials, step-by-step guidance, and attention to detail, anyone can bring this exotic bird to life. Whether you’re crafting for joy, gifting, or selling, this plushie is sure to impress.
We hope this guide inspired you to start your own Red Macaw Amigurumi adventure! If you enjoyed the article or have suggestions for future topics, please leave your honest opinion and feedback in the comments below. Happy crocheting!
