
Crochet Heart Rooster Rug Pattern – The Best Techniques and Tools

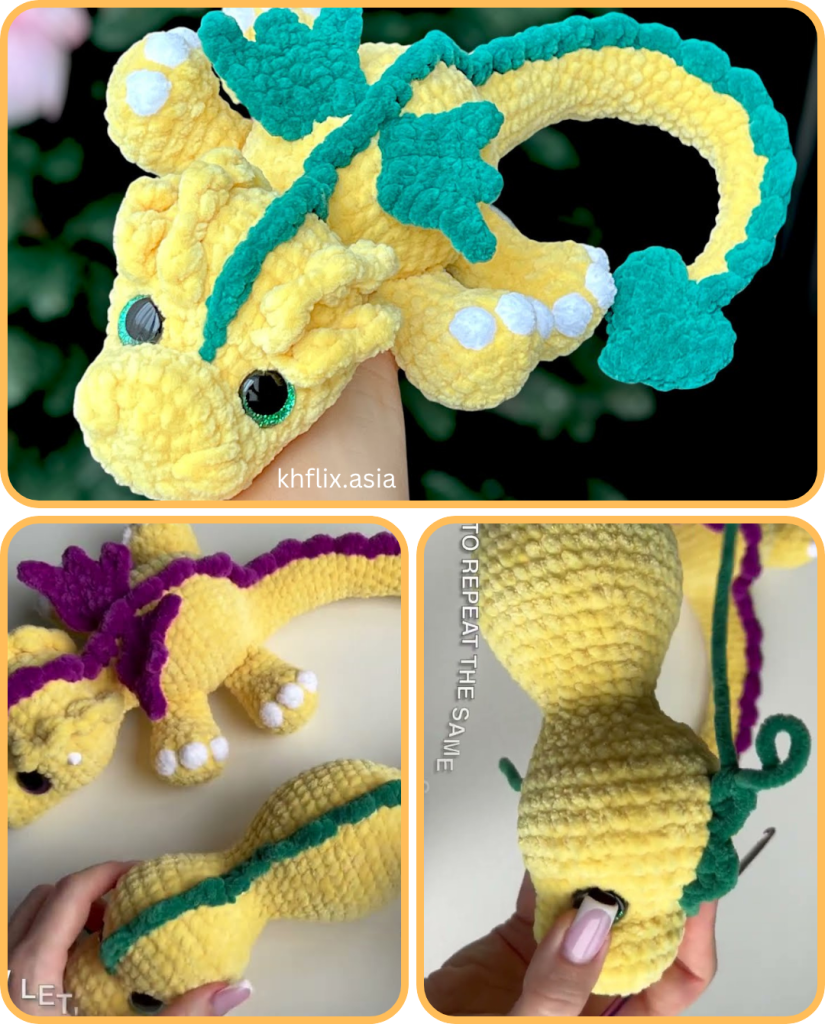
Amigurumi Fairy Dragon Crochet Free Pattern lovers, rejoice—you’re about to find a complete, friendly roadmap to designing a tiny, magical dragon that looks like it flew in from a storybook.
If you’ve ever wished for a pattern that is equal parts charming and structured, this Amigurumi Fairy Dragon Crochet Free Pattern is your new go-to.
What makes this project special is its blend of fantasy flair and straightforward construction. By treating this as a guided Amigurumi Fairy Dragon Crochet Tutorial, we’ll move from materials to shaping, through assembly and finishing, and end with styling ideas to personalize your dragon.
Choose a soft acrylic or cotton blend DK or worsted yarn for a cuddle-friendly finish. Acrylic is light and resilient; cotton shows crisp stitches if you prefer a defined texture. Either works for this Amigurumi Fairy Dragon Crochet Free Pattern, just be consistent with fiber so pieces block and stretch similarly.
For hooks, select the size that produces a tight fabric without gaps; many crafters use 2.25–3.5 mm with DK, or 3.5–4 mm with worsted. Tight stitches prevent stuffing from peeking out and give the dragon its round, plush silhouette—key to a clean Amigurumi Fairy Dragon Crochet Tutorial result.
Safety first: for gifts to children under three, embroider the eyes instead of using safety eyes. Stuff firmly but not hard; the shape should spring back when squeezed. This aligns with family-friendly guidelines and keeps your Amigurumi Fairy Dragon Crochet Free Pattern project comfortable and secure.
Begin the head with a magic ring of 6 sc; increase evenly to 36 sts over several rounds. Keep a marker at the first stitch of each round. Smooth, symmetrical increases are the backbone of a polished Amigurumi Fairy Dragon Crochet Free Pattern face.
Work even for a few rounds to build height, then add the snout. For the snout, crochet a small oval: ch 6, sc around both sides with increases at the ends, then work even. Attach it low-center for a gentle, friendly look typical of an Amigurumi Fairy Dragon Crochet Tutorial mascot.
Before closing the head, insert safety eyes (or embroider eyes) spaced evenly across the snout’s top line. Add a small wedge of stuffing under each eye to avoid dents. This detail enhances the cuteness and readability of your Amigurumi Fairy Dragon Crochet Free Pattern features.
Start the body at the neck with about 24–30 sts, increase to a gentle barrel at 42–48 sts, then work even. Decrease toward the hips for a pear shape. This silhouette feels whimsical and suits the Amigurumi Fairy Dragon Crochet Free Pattern charm.
Create the belly patch as an oval panel in a lighter color. Work rows back and forth, then sew it on before closing the body. The high-contrast belly adds depth—a favorite Amigurumi Fairy Dragon Crochet Tutorial technique for toy photography.
For the tail, attach at the back with 12–18 sts, decreasing gradually. Add a spade tip by switching to a triangle or small leaf motif. This taper gives graceful movement, enhancing your Amigurumi Fairy Dragon Crochet Free Pattern from any angle.
Shape legs as short tubes: 6 sc to 18 sc, a few even rounds, then a gentle decrease. Sew flat to the body’s underside for stability. This stance supports your Amigurumi Fairy Dragon Crochet Free Pattern without wobble.
Add arms slightly smaller than legs so they drape cutely by the belly patch. Rotate the seam toward the inside before sewing. It’s a simple Amigurumi Fairy Dragon Crochet Tutorial hack for cleaner photos and a professional look.
Optional claws: embroider tiny triangles or add picots at the tips. Keep them soft and child-safe. Subtle claw detailing elevates the Amigurumi Fairy Dragon Crochet Free Pattern without complicating the build.
Sew from center outward: head to body, then limbs, tail, wings, ears, and horns. Use whipstitch with a long tail from each piece. This order prevents tilt and supports the Amigurumi Fairy Dragon Crochet Free Pattern symmetry.
Hide knots within the stuffed core; weave tails in short zigzags. Tug gently to settle seams. Seam hygiene is a hallmark of a polished Amigurumi Fairy Dragon Crochet Tutorial outcome.
Blush the cheeks with a tiny bit of fabric-safe pastel or crochet small felt circles to stitch on. Keep coloration light and even. This soft accent complements the Amigurumi Fairy Dragon Crochet Free Pattern palette.
What yarn works best for a fairy dragon?
DK cotton for crisp stitch definition or soft acrylic for plushness both work beautifully. The key is consistency in fiber, which keeps your Amigurumi Fairy Dragon Crochet Free Pattern uniform.
How do I keep stuffing from showing through?
Use a smaller hook than the yarn label suggests to create a dense fabric. Even tension is more important than exact gauge, a core Amigurumi Fairy Dragon Crochet Tutorial insight.
Can I make child-safe eyes?
Yes—embroider eyes with satin stitch or use felt appliqués. This ensures the Amigurumi Fairy Dragon Crochet Free Pattern stays safe for little hands and meets gift-friendly standards.
How do I get symmetrical wings?
Count carefully and mirror the shaping row for row. Pin both wings before sewing, a practical Amigurumi Fairy Dragon Crochet Tutorial step to prevent crooked placement.
My dragon won’t sit upright—what now?
Rebalance stuffing at the hips and tail and check that legs are sewn evenly. Small adjustments often rescue the Amigurumi Fairy Dragon Crochet Free Pattern posture instantly.
Can I scale the pattern?
Absolutely. Change yarn weight and hook together, and scale every part proportionally. This preserves the silhouette taught in the Amigurumi Fairy Dragon Crochet Tutorial method.
How do I add sparkle without scratchiness?
Lightly embroider with metallic floss on the surface, away from high-touch areas. It’s a gentle way to enchant your Amigurumi Fairy Dragon Crochet Free Pattern wings and belly swirl.
What if I’m new to amigurumi?
Work slowly, mark your rounds, and practice invisible decreases on a scrap swatch first. The Amigurumi Fairy Dragon Crochet Tutorial approach in this guide keeps each step digestible.
Do I need wire for the wings?
No. Wire is optional for poseability; omit it for children’s toys. Sew only the wing roots to preserve the airy Amigurumi Fairy Dragon Crochet Free Pattern movement.
How do I keep seams invisible?
Match yarn to the piece you’re sewing, take small bites of both edges, and bury tails inside. Seam finesse is a classic Amigurumi Fairy Dragon Crochet Tutorial finishing skill.
What’s the ideal hook size?
Use the smallest hook that still lets you stitch comfortably without splitting the yarn. This keeps the Amigurumi Fairy Dragon Crochet Free Pattern tight and tidy.
How do I prevent gaps at color changes?
Work a slip stitch and carry the new color snugly along the inside. This neat handoff is a dependable Amigurumi Fairy Dragon Crochet Tutorial trick for clean striping.
Can I add removable accessories?
Yes—tiny capes, flower crowns, or satchels are adorable. Keep them simple so they don’t distract from the Amigurumi Fairy Dragon Crochet Free Pattern wings and spines.
How long does the project take?
Time varies with size and detail, but planning your parts in sessions—head, body, wings—matches the Amigurumi Fairy Dragon Crochet Tutorial workflow and keeps momentum steady.
Any tips for photographing the finished dragon?
Use soft natural light, a neutral background, and shoot multiple angles. This flatters textures and highlights your Amigurumi Fairy Dragon Crochet Free Pattern craftsmanship.
In this guide, you learned how to build a magical plush from the ground up: materials, head and facial shaping, body and wings, limbs and spines, assembly, and finishing—everything framed as both a Amigurumi Fairy Dragon Crochet Free Pattern and a practical Amigurumi Fairy Dragon Crochet Tutorial.
With tight stitches, careful counting, and a sprinkle of creative flair, your fairy dragon will look whimsical yet professionally finished. I’d love to hear your honest feedback and suggestions—what worked for you, what you customized, and which colors brought your dragon to life.


