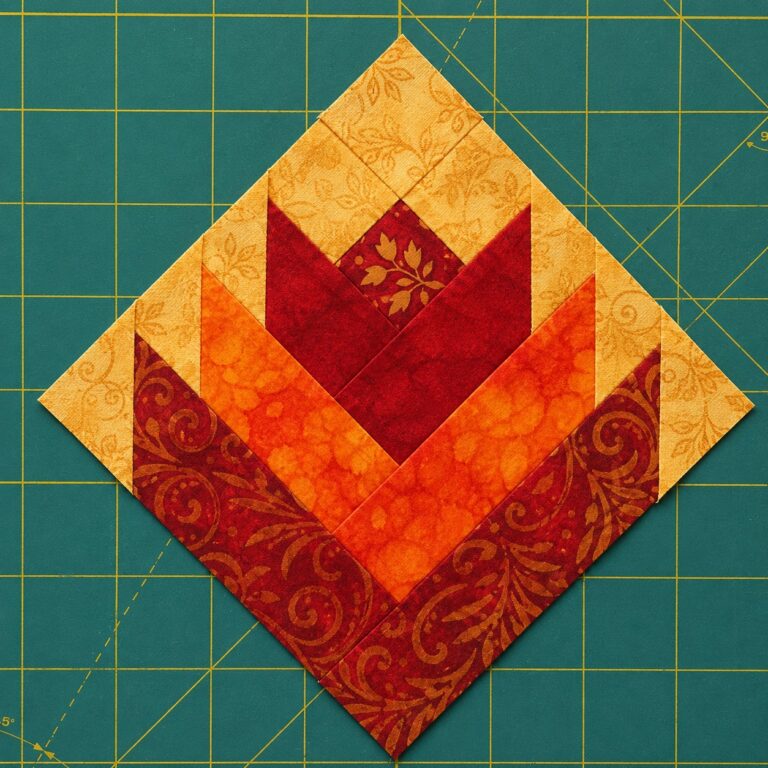
Desert Flower Quilt Block Pattern

Anti-frizz Satin Bonnet Pattern and Sewing is a practical and stylish solution for anyone looking to protect their hair while sleeping or relaxing at home.
The Anti-frizz Satin Bonnet Pattern and Sewing concept has gained popularity because satin fabric helps reduce friction, retain moisture, and prevent hair breakage. This makes satin bonnets especially beneficial for curly, wavy, textured, and even straight hair types that are prone to frizz and dryness.
Creating your own Anti-frizz Satin Bonnet Pattern and Sewing project allows you to customize size, fit, and style according to personal needs.
Instead of relying on mass-produced options, sewing a satin bonnet at home ensures better comfort, improved durability, and a perfect fit. It also offers the freedom to choose high-quality satin and elastic, which directly affects performance and longevity.
Another advantage of following an Anti-frizz Satin Bonnet Pattern and Sewing guide is accessibility. Even beginners with basic sewing knowledge can complete this project successfully. With simple shapes, minimal fabric waste, and straightforward construction, this sewing pattern is ideal for both new sewists and experienced crafters looking for a quick, useful project.
The Anti-frizz Satin Bonnet Pattern and Sewing design focuses on reducing hair friction during sleep or rest. Satin fabric has a smooth surface that allows hair to glide freely, minimizing tangles and preventing moisture loss. This is the core reason satin bonnets are recommended for hair care routines.
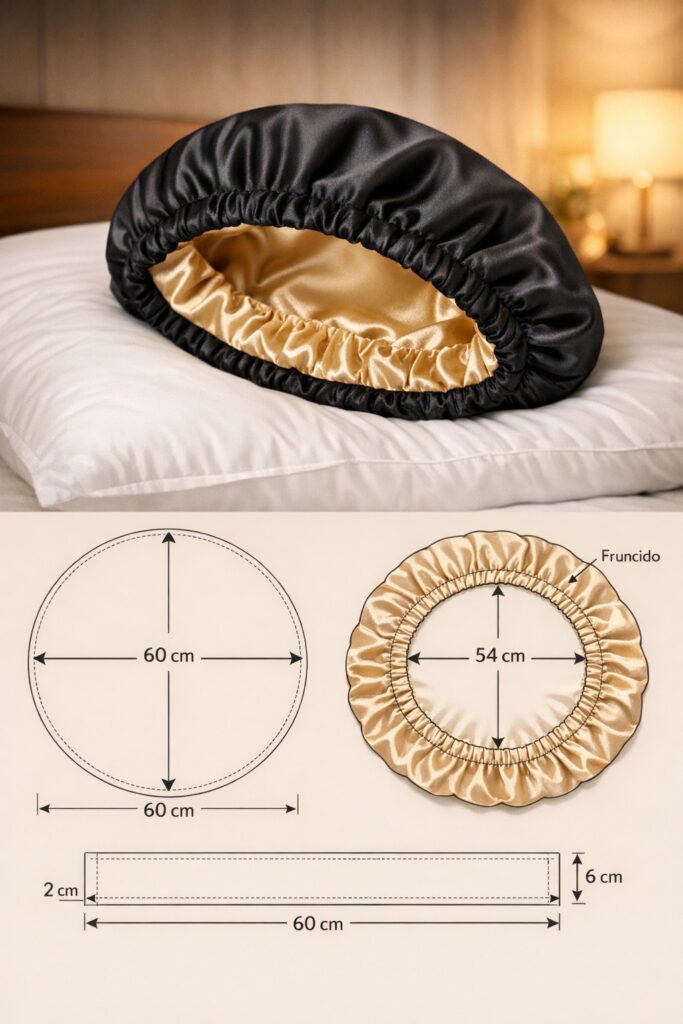
Most Anti-frizz Satin Bonnet Pattern and Sewing designs use a circular or slightly oval shape. This shape provides enough room to contain different hair volumes while maintaining a secure fit around the head. The simplicity of the pattern makes it easy to adjust for various head sizes.
Elastic placement is a key feature of the Anti-frizz Satin Bonnet Pattern and Sewing process. The elastic ensures the bonnet stays in place without feeling tight or uncomfortable. Proper elastic measurement helps prevent headaches and pressure marks.
The pattern often includes a casing for the elastic, which improves durability and makes future adjustments easier. This thoughtful detail adds functionality and extends the life of the bonnet.
Another important concept is fabric orientation. Satin has a right and wrong side, and placing the shiny side inward ensures maximum hair protection. This detail is essential in any Anti-frizz Satin Bonnet Pattern and Sewing project.
Overall, the concept emphasizes comfort, hair health, and simplicity, making this pattern both functional and beginner-friendly.
Choosing the right materials is essential for a successful Anti-frizz Satin Bonnet Pattern and Sewing project. Satin is the primary fabric, but not all satin is the same. High-quality polyester satin or silk satin provides the smooth finish needed to protect hair effectively.
Polyester satin is commonly used because it is affordable, durable, and easy to sew. Silk satin offers superior breathability and luxury but requires more careful handling. Both options work well for an Anti-frizz Satin Bonnet Pattern and Sewing project.
Elastic selection is equally important. Soft, flexible elastic between 1 to 2 centimeters wide is ideal. It should stretch comfortably without losing shape over time, ensuring the bonnet remains secure during sleep.
Thread choice should match the satin fabric in strength and color. A fine polyester thread works best, as it blends well and maintains seam integrity. Using the correct needle, such as a universal or microtex needle, helps prevent fabric snags.
Additional tools include fabric scissors, pins or clips, a measuring tape, and an iron set to low heat. These tools help achieve clean seams and accurate construction in the Anti-frizz Satin Bonnet Pattern and Sewing process.
By selecting quality materials, the finished bonnet will be more effective, comfortable, and long-lasting.
The Anti-frizz Satin Bonnet Pattern and Sewing process begins with cutting the fabric. Most patterns require two circular pieces of satin, which can be cut using a plate or template for accuracy. Precision at this stage ensures a balanced final shape.
Once the fabric is cut, the two satin pieces are placed with right sides facing each other. Sewing around the edge creates the bonnet shell. Leaving a small opening is important for turning the fabric right side out later.
After turning the bonnet, the edges are pressed gently to maintain shape. Satin requires low heat and light pressure to avoid damage. This step improves the appearance and ease of further sewing.
The next step in the Anti-frizz Satin Bonnet Pattern and Sewing process is creating the elastic casing. This is done by folding the edge inward and stitching around the circumference, leaving an opening for inserting the elastic.
Elastic is then threaded through the casing using a safety pin. Adjusting the elastic length ensures a snug but comfortable fit. Once satisfied, the elastic ends are sewn together securely.
Finally, the casing opening is closed, completing the bonnet. This structured yet simple process makes the Anti-frizz Satin Bonnet Pattern and Sewing project approachable and efficient.
One of the biggest advantages of the Anti-frizz Satin Bonnet Pattern and Sewing project is customization. Size adjustments allow the bonnet to accommodate different hair lengths and volumes, from short hair to thick curls and braids.
Adding a double-layer design is a popular option. A second layer of satin increases durability and provides extra protection. This variation enhances the overall effectiveness of the bonnet.
Color and print choices allow personal expression. Solid colors create a classic look, while patterned satin adds personality. Customization makes the Anti-frizz Satin Bonnet Pattern and Sewing project more enjoyable and unique.
Some sewists choose to add ties instead of elastic. This option allows adjustable fit and adds a decorative touch. While slightly more advanced, it expands design possibilities.
Another customization idea is adding a reversible feature. Using two different satin colors allows the bonnet to be worn on either side, increasing versatility.
These options make the Anti-frizz Satin Bonnet Pattern and Sewing project adaptable to personal preferences and different hair care routines.
What hair types benefit from an anti-frizz satin bonnet?
All hair types benefit, but curly, coily, textured, and dry hair see the most improvement.
Is this sewing project suitable for beginners?
Yes, the Anti-frizz Satin Bonnet Pattern and Sewing project is beginner-friendly with basic sewing skills.
How long does it take to sew a satin bonnet?
Most people complete it in under one hour.
Can I wash a satin bonnet?
Yes, gentle hand washing or delicate machine washing is recommended.
Is silk better than satin for bonnets?
Silk offers premium benefits, but satin provides excellent results at a lower cost.
Can the bonnet be resized later?
Yes, elastic can be adjusted easily if a casing is used.
The Anti-frizz Satin Bonnet Pattern and Sewing project is a simple yet powerful way to improve hair care through handmade craftsmanship. Throughout this article, we explored the concept, materials, sewing steps, and customization options that make this pattern both practical and accessible.
VIDEO TUTORIAL
By creating your own satin bonnet, you gain better fit, comfort, and long-term hair protection. If you found this guide helpful, feel free to leave your honest opinion and share suggestions or ideas for future sewing projects, thank you.

