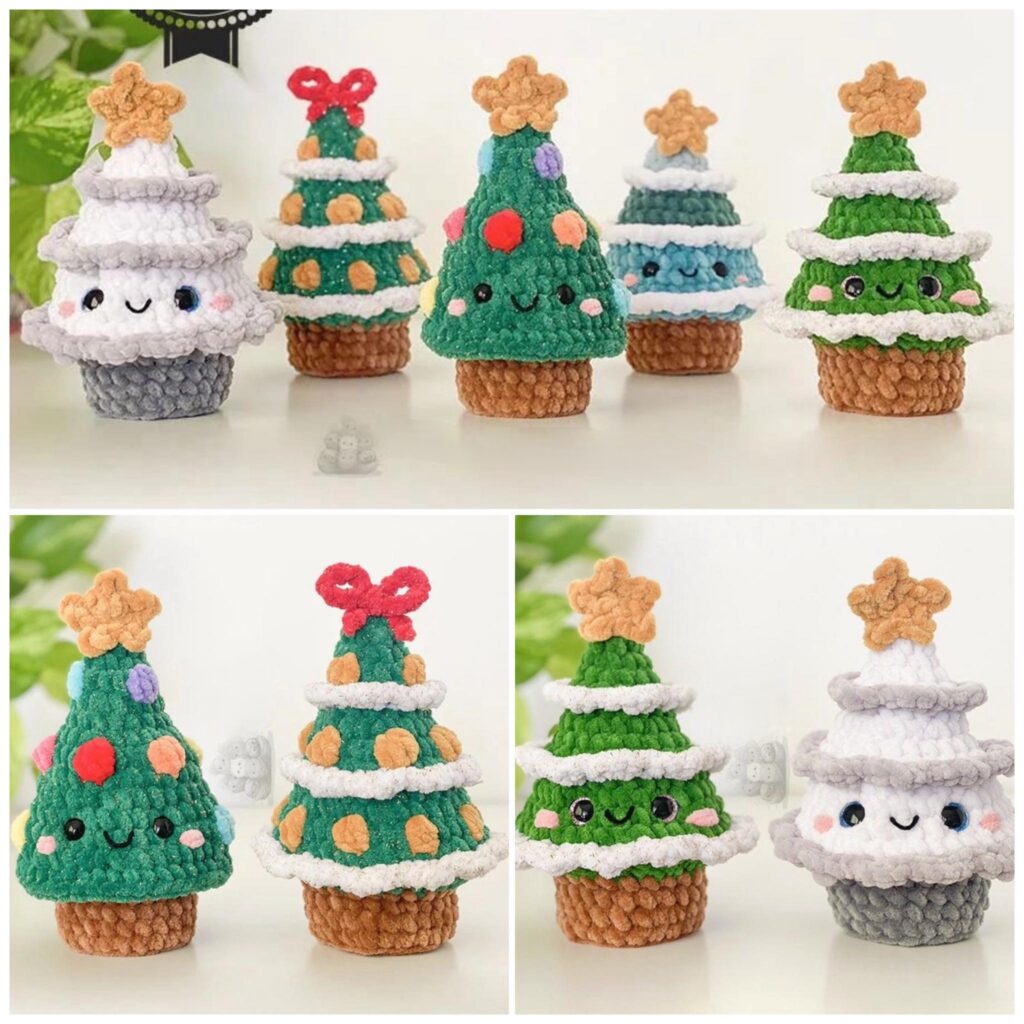
The magic of Christmas is all about creativity, warmth, and handmade love. And what better way to bring festive spirit into your home than by making your very own crochet Christmas trees?
Whether you prefer a minimalist Scandinavian style or a sparkling tree covered in beads and ribbons, this project lets you infuse your personal touch into every stitch.
Advertising
In this detailed guide, we’ll walk you through everything you need to know: from choosing materials to crocheting step by step, plus creative variations and decorating ideas for your handmade Christmas trees.
Image From Google
Why Crochet Christmas Trees Are So Popular
Handmade Christmas décor has become a growing trend in recent years. Crocheting your own trees combines two wonderful things — creativity and sustainability. Instead of buying plastic or mass-produced ornaments, you can create eco-friendly decorations that will last for years.
Here are a few reasons why crocheted Christmas trees are beloved by crafters worldwide:
Quick and easy – Most designs can be completed in under an hour.
Beginner-friendly – Uses basic stitches like single crochet, double crochet, and slip stitch.
Scrap-friendly – Great way to use leftover yarn.
Customizable – Change the size, color, and embellishments for a unique result every time.
Perfect for gifts – Make a few to share with friends and family during the holidays.
These little trees also make adorable items for Christmas markets or Etsy shops, since they’re inexpensive to make but full of handmade charm.
Advertising
Materials and Tools You’ll Need
Before starting, gather your materials. You can make these trees with any type of yarn, but the best results come from cotton or acrylic blends that hold their shape well.
Supplies:
Worsted-weight yarn in green, white, red, or any festive color
Crochet hook: size H/5mm or suitable for your yarn
Fiberfill or stuffing (optional) if you want 3D trees
Wooden dowel or cinnamon stick (for the tree trunk)
Small wooden base or cork to hold the tree upright
Tapestry needle for weaving ends
Scissors
Optional embellishments:
Mini pom-poms, beads, buttons, ribbons, sequins, or small stars
Metallic thread for garland effect
White yarn or paint for a snow-dusted look
Step-by-Step Crochet Christmas Tree Tutorial
This simple crochet Christmas tree pattern is worked in the round, forming a cone shape that naturally resembles a tree. You can adjust the size by increasing the number of rounds or using thicker yarn.
Step 1: Create the Base of the Tree
Start with a magic ring (or ch 4 and join with a slip stitch).
Round 1: Ch 1, work 6 sc into the ring. Join with a sl st to the first stitch. (6 sts)
Round 2: Ch 1, sc in first stitch, 2 sc in next stitch — repeat around. Join with sl st. (9 sts)
Round 3: Ch 1, sc in each stitch around. Join. (9 sts)
This creates the beginning of your cone shape.
Step 2: Build the Tree’s Body
From here, you’ll increase every few rounds to widen the cone gradually:
Round 4:Sc in next 2 sts, 2 sc in next stitch around. (12 sts)
Round 5: Sc in each stitch.
Round 6:Sc in next 3 sts, 2 sc in next stitch around. (15 sts)
Round 7: Sc in each stitch.
Round 8:Sc in next 4 sts, 2 sc in next stitch around. (18 sts)
Continue alternating one increase round followed by one even round until the tree reaches your desired height (typically 18–24 rounds for a medium tree).
You’ll notice your cone taking shape — firm and structured, just like a real Christmas tree!
Step 3: Add the Tree Ruffles (Optional but Beautiful)
For a more textured, layered look, you can crochet ruffles on specific rounds:
On any round, insert your hook into the back loop only (BLO) when crocheting.
After completing a few rounds, go back to the front loops of those rounds and crochet 3 dc in each loop to form decorative ruffles.
These give your tree the illusion of layered branches — a lovely detail that looks great when lightly dusted with white yarn for a “snowy” effect.
Step 4: Finishing the Tree
Once your cone is tall enough:
Fasten off and leave a long tail.
If you’re making a 3D tree, stuff lightly with fiberfill before closing the top.
Insert a wooden dowel or cinnamon stick through the center for the trunk.
Secure the base by gluing or stitching it into a small cork, wood slice, or spool.
You now have a freestanding crochet Christmas tree!
Decorating Your Crochet Trees
Here comes the most fun part — decorating your handmade trees! Here are some creative ideas:
Classic Christmas Look: Use green yarn with gold thread spiraled around the tree like tinsel. Add red beads or buttons as ornaments.
Snowy Scandinavian Style: Crochet in white or pale gray yarn and add small wooden beads for a minimalist, Nordic vibe.
Rustic Farmhouse Theme: Use natural fibers like jute or cotton yarn. Decorate with twine bows and tiny pinecones.
Glamorous Sparkle: Use metallic yarn (silver or gold) or add sequin strands for a glittery finish.
Mini Ornament Set: Create several small trees to hang on your Christmas tree or attach them to garlands and wreaths.
These variations make it easy to match your décor style — or gift sets of trees to family and friends.
Variations on the Crochet Christmas Tree Pattern
1. Flat Crochet Tree (for Ornaments)
If you prefer a quick project, crochet a flat triangle tree using rows instead of rounds:
Ch 21
Row 1: Sc across.
Row 2: Sc2tog at start and end of each row.
Repeat until one stitch remains — you’ll have a perfect triangle!
Decorate with surface crochet lines or tiny buttons, then attach a loop to hang it.
2. Granny Square Christmas Tree
Use traditional granny stitch clusters (3 dc per space) to form a triangle-shaped tree. These are colorful and nostalgic, great for vintage-style décor.
3. Layered Tree
Crochet separate cone layers (small, medium, large) and stack them for a tiered 3D effect. Add a small crochet star at the top for a festive touch.
Helpful Tips for Beginners
Use stitch markers to keep track of your rounds, especially as the cone grows.
Adjust the hook size for firmness — smaller hooks create denser, sturdier trees.
Experiment with textures: Bouclé and velvet yarns make fluffy trees; cotton makes crisp shapes.
Make multiples! These trees look amazing grouped in clusters on a mantel or tabletop.
Store safely: When the holidays are over, keep them in a sealed bag to prevent dust or moth damage.
Eco-Friendly and Gift Ideas
Crochet Christmas trees are not only beautiful — they’re sustainable and reusable. You can avoid waste and even repurpose yarn scraps that would otherwise go unused.
Gift Ideas:
Pair a crochet tree with a homemade candle or ornament for a cozy gift set.
Add a few drops of essential oil (like pine or cinnamon) to the stuffing for a scented decoration.
Wrap in eco-friendly kraft paper with a handwritten tag for a personal touch.
Each handmade tree carries a bit of holiday love — a symbol of creativity, care, and tradition.
Conclusion
The Crochet Christmas Trees Pattern is a wonderful project for crafters of all levels. Whether you’re looking to decorate your home, make thoughtful gifts, or sell handmade items at holiday markets, this pattern delivers beauty and simplicity in every stitch.
By blending creativity, color, and cozy textures, these crochet trees capture the heart of the season — making your Christmas truly handmade and meaningful.
