Desert Flower Quilt Block Pattern

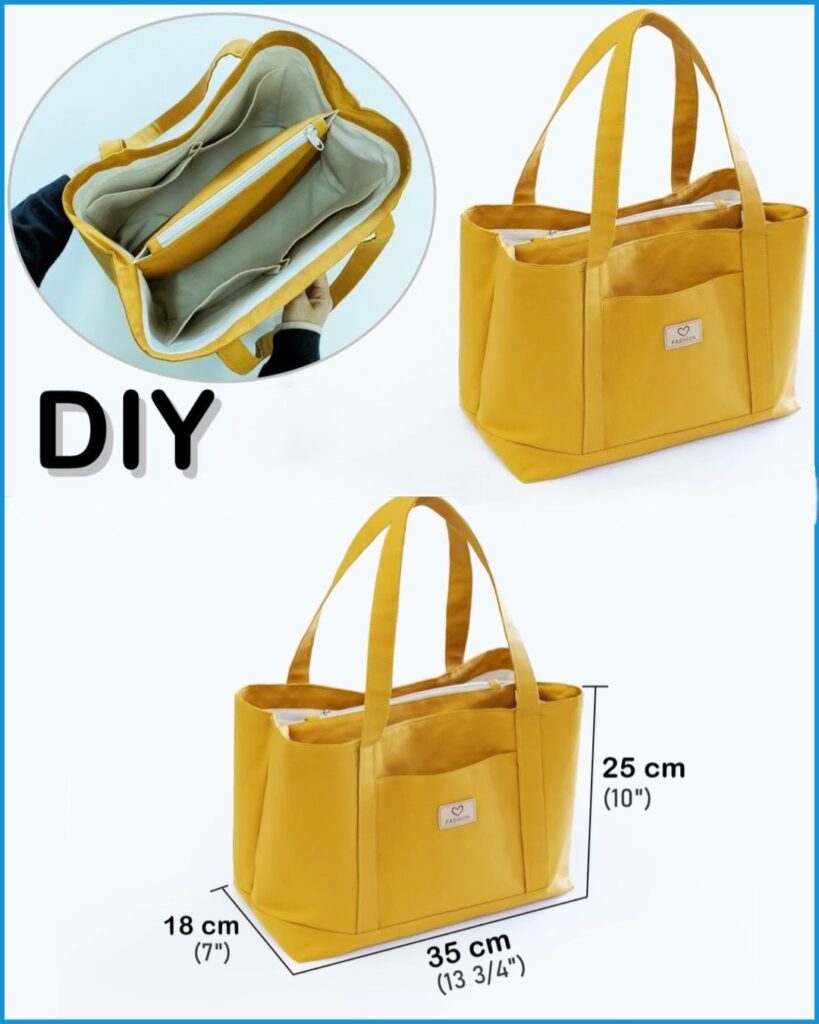
Starting a Shoulder Bag with Internal Zippered Pocket Tutorial is one of the most rewarding ways to create a stylish, functional, and long-lasting accessory.
The great advantage of following a Shoulder Bag with Internal Zippered Pocket Tutorial is that you gain both creative freedom and the ability to design something unique.
Another strong point of creating your own bag is durability. By selecting high-quality materials and sewing them with care, you can be sure that your shoulder bag will last for years.
When starting a Shoulder Bag with Internal Zippered Pocket Tutorial, the first step is choosing the right materials. This decision will determine the durability and overall look of the final piece. Opting for strong fabrics such as canvas, denim, or faux leather ensures the bag maintains its structure and withstands daily use.
Lining fabric is also crucial because it adds stability and protects the interior. Cotton fabric is a great choice as it is easy to sew and comes in endless prints and patterns. For a more elegant finish, polyester lining is another alternative that makes the interior smooth.
Zippers are essential, especially for the internal pocket. A high-quality zipper not only guarantees functionality but also ensures durability. Choosing a zipper in a complementary or contrasting color can enhance the bag’s design.
Straps deserve careful attention as well. You may choose pre-made leather straps, sew fabric straps, or even repurpose an old belt. The strap should be comfortable enough to carry on your shoulder for long periods.
Interfacing is another important material. It reinforces the fabric, giving the bag a professional structure. Lightweight interfacing works for softer fabrics, while heavy-duty interfacing is better for sturdier bags.
Finally, don’t forget accessories such as hooks, buckles, and decorative elements. These small touches make the bag unique while adding to its functionality. Following these tips ensures your Shoulder Bag with Internal Zippered Pocket Tutorial starts on the right track.
The next stage in the Shoulder Bag with Internal Zippered Pocket Tutorial involves cutting and preparing the fabric. Accurate cutting is crucial because it ensures all pieces align properly during assembly. Measuring carefully with a ruler or cutting mat prevents mistakes and saves time later.
Begin by cutting the outer fabric according to your chosen size. A medium shoulder bag typically measures about 14 inches in width and 12 inches in height. Add extra seam allowance, usually half an inch, to all sides. This prevents the bag from turning out smaller than expected once sewn.
Cutting the lining fabric requires the same dimensions as the outer fabric. Remember, the lining is just as important as the exterior since it protects the interior seams and creates a neat finish. Preparing both layers together guarantees a snug fit.
For the internal zippered pocket, cut two rectangles of fabric. The pocket can be around 7 inches wide and 6 inches tall, but you can adjust according to your needs. These pieces will hold the zipper between them, forming a secure compartment.
Interfacing pieces should also be cut in matching sizes for both the outer fabric and pocket fabric. Ironing the interfacing onto the fabric gives it strength and prevents sagging over time.
After cutting all pieces, organize them clearly before starting the sewing process. Keeping the fabrics, zippers, and accessories in order avoids confusion. This stage of the Shoulder Bag with Internal Zippered Pocket Tutorial ensures a smooth transition to actual sewing.
A highlight of this Shoulder Bag with Internal Zippered Pocket Tutorial is adding the inner compartment. The internal pocket gives the bag a professional touch and improves organization. Begin by marking the position where you want the pocket on the lining fabric. Usually, it is placed in the upper middle section for easy access.
Pin one rectangle of pocket fabric onto the lining, right sides together. Place the zipper face down between the fabrics and sew carefully using a zipper foot. This ensures the seam stays close to the zipper teeth. Repeat with the second rectangle of pocket fabric on the other side of the zipper.
Once sewn, press the fabric away from the zipper and topstitch along the seam. This step prevents the fabric from catching in the zipper and gives a polished finish. A neat topstitch is one of the secrets to making a bag look professional.
After finishing the zipper seam, align the two pocket fabric pieces and sew around the edges, leaving the zipper open. This forms the pocket compartment securely within the lining. Always reinforce the corners to withstand frequent use.
Check if the zipper opens and closes smoothly. If it does, you have successfully installed the internal pocket. Practicing this step helps you gain confidence in working with zippers, which can be intimidating for beginners.
This section of the Shoulder Bag with Internal Zippered Pocket Tutorial ensures your bag not only looks stylish but is also highly functional, keeping your essentials safe and accessible.
The final part of the Shoulder Bag with Internal Zippered Pocket Tutorial is assembling the main body. Start by sewing the lining pieces together, ensuring the pocket is secure. Leave a small opening at the bottom of the lining to later turn the bag right-side out.
Next, sew the outer fabric pieces together, right sides facing. Reinforce the seams to make the bag durable. If you want a boxed bottom for more depth, mark small squares on the corners and sew across diagonally before trimming the excess fabric.
With both lining and outer bag complete, insert the lining inside the outer fabric, right sides facing each other. Sew around the top edge, making sure straps are placed correctly between the layers. Double-check their positioning to ensure comfort when carrying the bag.
After sewing the top, pull the bag right-side out through the lining opening. Carefully press the seams with an iron to create a crisp edge. Topstitch around the upper edge of the bag for extra strength and a clean finish.
Sew the opening in the lining closed by hand or machine. At this point, your shoulder bag is fully functional. Make any final adjustments or add decorative touches such as buttons, patches, or embroidery.
By the end of this Shoulder Bag with Internal Zippered Pocket Tutorial, you will have created a beautiful and practical accessory ready for daily use or even as a thoughtful handmade gift.
1. What materials are best for a shoulder bag?
Durable fabrics like canvas, denim, or faux leather are excellent for the exterior, while cotton or polyester lining adds stability and a clean interior finish.
2. How do I install the internal zippered pocket?
You sew two fabric rectangles with a zipper between them, attach them to the lining, and then close the edges to form a secure compartment.
3. Can I make the bag without interfacing?
Yes, but interfacing adds structure and durability. Without it, the bag may feel softer and less professional.
4. How long does it take to complete a shoulder bag?
For beginners, it may take 4–5 hours, while experienced sewists can finish in about 2–3 hours.
5. Can I adjust the size of the bag?
Absolutely. You can scale the dimensions up or down to create a larger tote-style bag or a smaller purse.
6. What type of zipper should I use for the pocket?
A standard nylon or metal zipper works well. Make sure it is smooth and durable for frequent use.
This Shoulder Bag with Internal Zippered Pocket Tutorial has shown you how to choose the best materials, prepare and cut fabric pieces, sew a professional-looking internal zippered pocket, and assemble the final bag.
By following each step, you gain not only a functional accessory but also valuable sewing skills. Try experimenting with fabrics, colors, and finishing touches to make your bag truly unique.
If you enjoyed this tutorial, please share your honest opinion and suggestions so we can continue improving and bringing you more detailed guides.https://youtu.be/5GevbJfDboo


