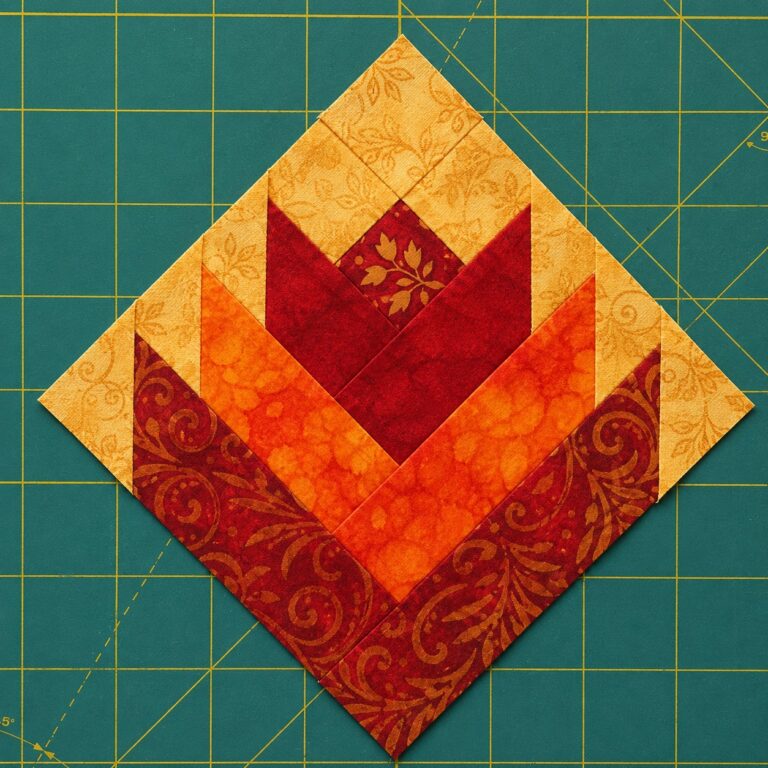
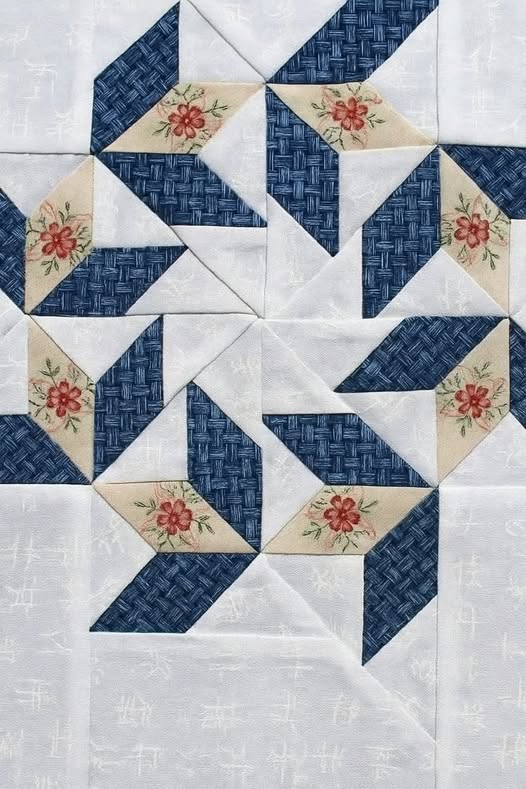
Desert Flower Quilt Block Pattern

Falling Star Block Quilt Pattern is the phrase quilters love to see, because it promises a beautiful result without paywalls or confusion.
To keep things simple and enjoyable, we’ll use accessible shapes—squares, rectangles, half-square triangles (HSTs), and flying geese—so you can sew with confidence even if it’s your first star quilt.
Before we jump in, a quick overview: this Falling Star Block Quilt Pattern builds one block style and repeats it to form a luminous field of stars.
Start by shopping your stash. The Falling Star Block is perfect for fat quarters and scraps, but coordinated bundles make color planning easier. For a throw quilt (60″ x 72″), plan roughly 20–25 blocks at 12″ finished, plus background, binding, and backing. If you’re aiming for a lap, baby, or queen size, simply adjust the number of blocks or the block size. This flexibility is one reason the Falling Star Block Quilt Pattern is so beginner-friendly and budget-wise.
When choosing fabric, think contrast first. Stars pop when their points are darker or more saturated than the background. Try a two-value color story: light background, bold star points, and a medium-tone center to anchor the block. Solids deliver a modern look, while prints add texture. Directional prints can work if you cut thoughtfully, but non-directional prints are simpler for newcomers to the Falling Star Block.
Let’s talk pre-cuts. A layer cake (10″ squares) yields generous pieces for 12″ or 16″ blocks with minimal waste, while fat quarters (18″ x 22″) provide flexibility for centers and points. If you love speed, jelly roll strips can become background sashing or binding. Whatever you choose, keep your color palette cohesive to maintain the luminous, falling-star effect that defines a standout star quilt.
Begin with the center of the Falling Star Block. Many quilters choose a fussy-cut motif or a strong solid to anchor the star. Cut a square that fits your block grid (for a 12″ block, a 3½” center square works before sewing). Press the edges lightly to avoid distortion and keep your grain stable while you handle surrounding units.
Next, make half-square triangles (HSTs) for the star’s points. Pair one star fabric square with a background square, draw a diagonal line, stitch ¼” on both sides, and cut along the line. Press to the darker side or open, depending on bulk. Trim to the exact unfinished size (e.g., 3½” square for a 3″ finished unit). Accurate trimming is crucial for clean points in your star quilt.
For smoother points and fewer seams, many quilters prefer flying geese units over HST pairs. Use your favorite no-waste method or stitch-and-flip corners. Either way, be sure to square each unit to the correct unfinished size with a scant ¼” seam allowance at the triangle tip—the “goose”—so it doesn’t get blunted when you join rows. This detail elevates the look of the Falling Star Block.
A single Falling Star Block is striking, but a field of stars is where the magic happens. For a modern vibe, use a single background color with gradient star fabrics—from deep navy to pale sky—to create a drifting, celestial look. For a traditional feel, choose scrappy points with a unifying center color. Either approach supports the signature movement of a “falling” star quilt.
Consider adding sashing. Narrow sashing (1½”–2″ finished) between blocks can highlight each star and help points stand out. Cornerstones—in a contrasting color—add a dot-to-dot rhythm across the quilt. Without sashing, stars touch and create dramatic secondary patterns, which many quilters love in a Falling Star Block Quilt Pattern.
Test on-point settings. Rotating blocks 45 degrees changes the visual flow and emphasizes diagonal movement. On-point layouts also let you feature larger centers or fussy-cut motifs. If you go this route, remember to cut setting triangles and plan your final measurements accordingly so your quilt pattern remains square and balanced.
Pressing is as important as stitching. After each seam, press rather than iron—lift and set the iron to avoid stretching bias edges. For HSTs and flying geese in the Falling Star Block, consider pressing seams open where multiple points converge to reduce bulk. The flatter your block, the sharper your star.
Use accurate rulers and check your ¼” seam early. Sew two test squares, measure the finished width, and adjust your needle position or foot if needed. Perfecting this now ensures every quilt block finishes at the correct size, which makes assembling the Falling Star Block Quilt Pattern painless.
Trim units thoughtfully. Square up HSTs using a ruler with a 45° line; align that line with the seam and trim two sides, rotate, and trim the remaining sides. For flying geese, use a dedicated geese trimmer or mark the required unfinished size. Consistent trimming keeps your star points precise in every Falling Star Block.
When your top is complete, layer the quilt sandwich: backing (wrong side up), batting, and top (right side up). Smooth each layer and baste with safety pins or spray baste per manufacturer instructions. Extra care here prevents puckers and ensures your Falling Star Block shines after quilting.
Choose quilting that complements the star geometry. Straight-line quilting with a walking foot emphasizes angles and feels modern. Stitch-in-the-ditch around star points protects your hard-won accuracy. If you prefer free-motion, try gentle swirls or echoed stars—both elevate the celestial theme of a star quilt.
Thread selection matters. A fine 50-wt thread blends well for subtle texture, while a slightly thicker 40-wt makes the quilting pop. Match bobbin and top thread or contrast intentionally. Test on a scrap sandwich of the same fabrics to ensure tension is balanced before you quilt your Falling Star Block Quilt Pattern.
If points are getting clipped, your seam allowance may be generous. Aim for a scant ¼” seam and verify with a ruler. Also check that your flying geese have a full ¼” seam allowance above the tip. These two tweaks protect the crisp peaks in every Falling Star Block.
Wavy borders happen when measurements drift. Measure the quilt top across three places, average the numbers, and cut borders to that length. Pin quarter marks and ease gently. This prevents ripples and keeps the star quilt square and flat.
Color seems muddy? Increase contrast. Lighten the background or darken the star points. Sometimes swapping a medium print for a solid makes the Falling Star Block Quilt Pattern read more clearly from across the room.
What size should I make each Falling Star Block for a throw quilt?
A common choice is a 12″ finished block. For a 60″ x 72″ throw, try 5 blocks across by 6 down (30 blocks total) or adjust to your preferred dimensions. You can also scale to 10″ or 16″ blocks—larger blocks finish faster and showcase prints.
Is the Falling Star Block beginner-friendly?
Yes. The Falling Star Block uses basic shapes—squares, HSTs, and flying geese. With careful trimming and a consistent ¼” seam, beginners can achieve crisp points and a polished look using this Falling Star Block Quilt Pattern.
Do I need special rulers or tools?
Not strictly. A standard quilting ruler and a good rotary cutter are enough. That said, dedicated HST or flying geese trimmers can improve speed and accuracy, helping your quilt block units stay perfectly square.
We covered cutting plans, piecing methods for HSTs and flying geese, accuracy habits like trimming and seam nesting, layout ideas, quilting options, and care tips.
With thoughtful contrast, consistent ¼” seams, and patient pressing, your Falling Star Block will sparkle across the quilt top.
